O2VEND Documentation
  • Tutorials
Search Results for

    Show / Hide Table of Contents
    • Getting Started
    • O2VEND Store
      • My Stores
        • Create Store
      • My Account
        • My Profile
        • Manage Billing
        • Support Desk
    • Dashboard
      • Dashboard
    • Orders
      • Quotation
      • Request For Quotation
      • Sales Order
      • Work Order
      • Purchase Order
      • Subscription
      • ActiveCarts
    • Vouchers
      • Sales
        • Manage Sales
        • Create Sales Invoice
        • Cancel Sales Invoice
        • How to create GDN(Goods Delivered Note)
        • How to add lot for products in GDN
        • How to view sales details
      • Services
        • Services
      • Purchase
        • Manage purchase
        • Create Purchase Invoice
        • Cancel purchase Invoice
        • How to create GRN(Goods Received Note)
        • How to add lot for products in GRN
        • How to print a barcode label in purchase
        • How to view purchase details
      • Credit Note
      • Debit Note
      • Receipt
      • Payment
      • Journal
      • Contra
    • Inventory
      • Stock Quantity (Alt+I)
      • Stock History
      • Print Barcode Label
      • Delivery Challan
      • Receipt Challan
      • Stock Transfer
      • Manufacturing Voucher
      • Stock Take
      • Incoming Packages
      • Outgoing Packages
    • Catalog
      • Product
      • Brand
      • Categories
      • Option
      • Attributes
      • Attributes Categories
      • Attributes Templates
      • Price List
      • Bulk Product Price update
      • Bulk Product Updates
      • Sku Rules
      • Pricing Rules
    • Parties
      • Customers
      • Customer Groups
      • Supplier
      • Supplier Group
    • Inbox
      • SMS
      • E-Mail
      • Whatsapp
      • Configuration
    • Accounting Books
      • Ledgers
      • Chart of Accounts
      • Day Book
      • Cash Book
      • Sales Book
      • Purchase Book
      • Account Group Book
    • Reports
      • Order Reports
        • Web Orders Progress Report
        • Back Order Items Report
        • Purchase Order Pending Item Report
        • Sales Order Pending Item Summary
        • Sales Shipping Status Report
        • Sales Order Summary
        • Sales Order Progress Report
        • Purchase Order Progress Report
        • Sales Order with Product Line Item Report
        • Sales Order Packing Sheet Report
        • Back Order Report
        • Purchase Order Summary
        • Sales Order Shipment Report
        • Sales Order Shipping Address Report
      • Sales/Purchase Reports
        • Sales Invoice Report
        • Sales Invoice Summary
        • Sales Items Summary
        • Purchase Invoice Report
        • Purchase Invoice Summary
        • Purchase Items Summary
        • Receipt Report
        • Daily Settlement Report
        • Contribution Margin Report
        • Agent Sales Report
        • Agent Report
        • Employee Sales Report
        • Employee Report
      • Supplier Reports
        • Supplier Report
        • Supplier Purchase Report
        • Supplier Detail Report
      • Inventory Reports
        • Stock Summary
        • Stock Valuation Summary
        • Stock Ageing Report
        • Location Summary
        • Stock Movement Summary
        • Stock Ledger Report
        • Stock/Location Summary
        • Stock Movement And Valuation Summary
      • Products
        • Sold Product Categories
        • Product Category Summary
        • Product Sale Summary
        • Category Sale Summary
        • Brand Sale Summary
        • Reordering Stock Summary
        • Price Movement
        • Product Seasonal Demand
        • Product Stock Analysis Report
        • Stock Projection Report
      • Pos Reports
        • Cash Register Summary
        • Current Cash Registers
      • Account Reports
        • Day Book
        • Ledger
        • Cash Book
        • Sales Books
        • Purchase Books
        • Daily Sales and Payment Report
        • Balance Sheet
        • Profit and Loss Report
        • Trial Balance
      • Miscellaneous Reports
        • Output Detailed Tax Report
        • Output Tax Report Summary
        • Account Receivable Report
        • Account Payable Report
        • Gross Profit Report
        • Daily Tax Report
        • GSTR-1 Report
        • External API Logs
        • Benefit Usage
        • Offers Usage
        • Coupon Usage
        • Configuration Change History
        • VisitLog
    • Tools
      • Import
      • Export
    • OnlineStore
      • Themes
      • Theme Data
      • Shipping Methods
      • Payment Methods
      • Currency
      • Reviews
      • Zones
      • Delivery Zones
      • webstoreContentsSettings
        • Site Pages
        • Site Menus
          • Main Menu
          • Site Menus
        • Home Page Components
        • Page Header
        • Blog Categories
        • Blog
        • News Letter Subscription
        • menus
          • Main Menu
          • Site Menus
    • Analytics
      • Visitor Analytics
      • E-commerce Analytics
      • Product Analytics
      • Campaigns Analytics
    • Settings
      • Settings
      • Business Settings
        • Business Details
        • Tax Classes
        • Tax Rates
        • Operating Countries
        • Operating State or Province
        • Branches
        • Sales Channels
        • Return Rule
        • Backoffice Print Detail
        • Download Template
      • Point Of Sale
        • Quick Add Buttons
        • Print Settings
        • Payment Methods
        • Delivery Settings
        • Language
      • Agent App
        • Agent App Print Details
      • Inventory
        • Unit Of Measure
        • Location
        • Unit Of Measure Conversions
        • Stock Levels
        • Sub Location
        • Print Barcode Label Settings
        • Package Material
      • userSettings
        • vendors
        • User Date Setup
        • Employees
          • Set Up Employee Roles
          • Ecommerce
          • Point Of Sale
          • Back Office
          • Sales App
        • Vendors Commission
        • Credit Rules
        • Automatic User Code
      • Loyalty and Promotions
        • Reward Points
        • Coupons
        • Gift Vouchers
        • Offers and Discounts
        • Benefits
        • Affiliate
        • Coupon Print Setting
      • Account
        • Financial Year
        • Voucher Numbering
        • Sales Account Map
        • Voucher Numbering Rules
    • Features
      • General
      • POS
      • Webstore
      • Integration
    • Integration
      • General
      • Phonepe
      • Paytm
      • Stripe
      • Cashfree
      • Paypal
      • Razorpay
      • Shiprocket
      • Shipway
      • Amazon Shipping
      • O2VEND Webhook
      • Sendgrid
      • MSG91
      • Amazon SES
      • reCAPTCHA
      • E-invoice
      • Shopify
      • Facebook Catalog
      • Whatsapp
      • Typesense
    • Profile
      • My Profile
    • Manage Physical Stores
      • Login
      • Sales Bill
        • Manage sales orders
        • How to add products to a customer's shopping cart
        • How to apply discounts/coupons
        • How to search products in Sales Screen
        • How to add products quickly to the Cart
        • How to add serial and lot number
        • How to Print sales bills in POS
      • Receive Payments (Receipts)
      • Delivery
      • Invoice Receipts
      • Manage Cash Register
      • Reprint
      • Dashboard
      • POS Offline
      • Stock Transfer
    • O2VEND App
      • Install O2VEND App
      • Home
      • Customers
      • Orders
      • Products
      • Receipts
      • Stock Movement
    • Webhooks
      • Webhook
      • Examples of JSON format data via webhook
      • Testing webhook

    Package Material Setup in O2VEND Back Office — Complete Guide

    The Package Material Setup in O2VEND Back Office helps manage all packaging materials used in sales, inventory, and shipment operations.
    It ensures accurate logistics, consistent packaging standards, and efficient order fulfillment across all sales channels.

    Defining parameters such as dimensions, weight, and shipment type helps improve fulfillment accuracy, inventory control, and delivery efficiency.


    Navigate to Package Material

    Steps

    1. From the Back Office Dashboard, open Settings.
    2. Select Inventory → Package Material.
    3. View all existing materials used across Online Store, POS, and Marketplace channels.

    Create a New Package Material

    Steps

    1. Click Create Package Material.
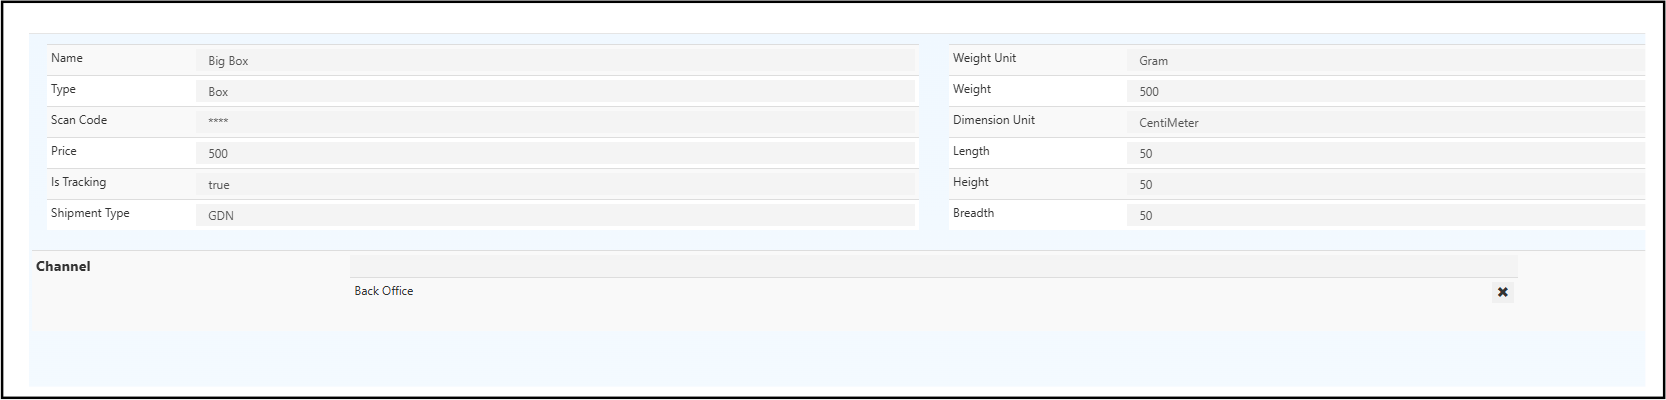
    2. Fill in the required fields:
    Field Description
    Name Package name (e.g., Box, Bag, Envelope).
    Type Packaging type used for shipping or handling.
    Shipment Type Define use with modules like GDN (Goods Delivery Note).
    Scan Code Barcode or scan code for quick identification.
    Price Cost per package unit.
    Is Tracking Enable for shipment tracking support.

    Package Material Setup in O2VEND Back Office — Complete Guide ---

    Define Dimensions & Weight

    Field Description
    Dimension Unit e.g., Centimeter
    Length / Height / Breadth Physical package size
    Weight Unit e.g., Gram or Kilogram
    Weight Total package weight

    Assign Channels

    Link materials with:

    • Online Stores
    • Retail POS
    • Marketplaces

    Ensures uniform packaging and centralized control.


    Save / Edit / Delete

    • Click Save to store details.
    • Use ✏ Edit to update or 🗑 Delete to remove old entries.
      Regular updates keep records clean and accurate.


    Package Material Workflow in O2VEND — Complete Step-by-Step Guide

    This document describes the complete flow after package material creation in O2VEND:

    1. Configure Location routes (Inward / Outward).
    2. Map the Location to a Branch.
    3. Open Goods Issue (GDN) and Initiate Goods Issue.
    4. Open New Package, select package material and Add.

    1) Configure Location — Inward & Outward Route

    Purpose: Define how stock is received into the location (Inward Route) and how stock leaves the location (Outward Route). Proper route configuration ensures correct handling of GRN and GDN workflows.

    Steps

    1. Open Create or Edit Location screen for the required warehouse/location.
    2. Under Inward Route, select one of:
      • Direct — goods go directly into stock.
      • Draft_Inspection — goods enter a review/inspection workflow before stock update.
    3. Under Outward Route, select one of:
      • Direct — immediate dispatch.
      • Pick_PackAndDelivery — standard pick, pack and dispatch workflow.

    2) Map Location to Branch

    Purpose: Associate a branch record with the configured location so branch-based operations (POS, stock visibility, GDN origin) use the correct physical location.

    Steps

    1. Open Edit Branch screen (branch record management).
    2. Locate the Locations field (multiselect or tag list).
    3. Add the previously configured location (example: Store:Delhi NCR) and Save.

    3) Open Goods Issue (GDN) — Initiate Goods Issue

    Purpose: Create a Goods Issue (GDN) record to dispatch items from the selected branch/location. The GDN screen is the starting point for packaging and dispatch.

    Steps

    1. Navigate to Inventory → Goods Issue and create or open a GDN record.
    2. Verify the Branch/location selection shows the branch with mapped location (e.g., Delhi NCR/Store:Delhi NCR).
    3. Click Initiate Good Issue (if applicable) to begin the dispatch workflow.

    4) Packages Tab — Open New Package

    Purpose: Assign physical package materials to the GDN so dispatch labels, weight and dimensions are consistent with the package material setup.

    Steps

    1. In the GDN screen, switch to the Packages tab.
      • The tab is typically next to the General tab and displays overall totals (Total Quantity, Approved Quantity, etc.).
    2. Click Open New Package (or Add Package) to begin adding packages for the GDN.

    5) Select Package Material and Add

    Purpose: Select predefined package material (created earlier under Inventory → Package Material) and add it to the open package. This binds dimensions, weight and scan codes to the physical parcel.

    Steps

    1. After clicking Open New Package, a package selection screen appears.
    2. Search or click the desired package material (buttons or tiles may appear; examples: Medium Box, Big Box).
    3. Select the package material and click Add to insert the package into the GDN.

    6) Add Products via Scan or Manual Selection

    Steps

    1. In the Scan/Type field, scan the product barcode or type the product name.
    2. The product details automatically appear in the list below.
    3. Select Add Quantity and input the number of units per box.

    Note: Only approved quantities are deducted from stock upon saving.

    7) Step 4: Save and Approve GDN

    Steps

    1. Once all items are added, click Save.
    2. Then select Approve to finalize the goods issue.
    3. The system automatically reduces the stock from the corresponding warehouse.

    8) Step 5: Same Process for GRN (Goods Receipt Note)

    Steps For inbound stock (GRN), follow the above same steps:

    1. Select GRN screen.
    2. Add product using Scan or Type.
    3. Apply package material and Approve.
    4. Stock quantity increases automatically.
    • Edit this page
    In this article
    © 2019–2025 Jeyan Technologies Private Limited • www.o2vend.com • Create your own store