How to Create and Manage Sales Orders in O2VEND ERP
Learn how to create, review, edit, and manage Sales Orders in O2VEND ERP with a clear step-by-step guide for business users.
Sales Orders are the foundation of sales operations, inventory movement, invoicing, and delivery tracking.
This guide explains how Sales Orders are created and managed in O2VEND ERP, helping businesses reduce errors, improve order accuracy, and maintain smooth workflows.
Sales Orders – List View & Actions
This section explains all fields, filters, tabs, and top actions available on the Sales Orders list screen, helping business users track, filter, export, and schedule sales order data accurately.
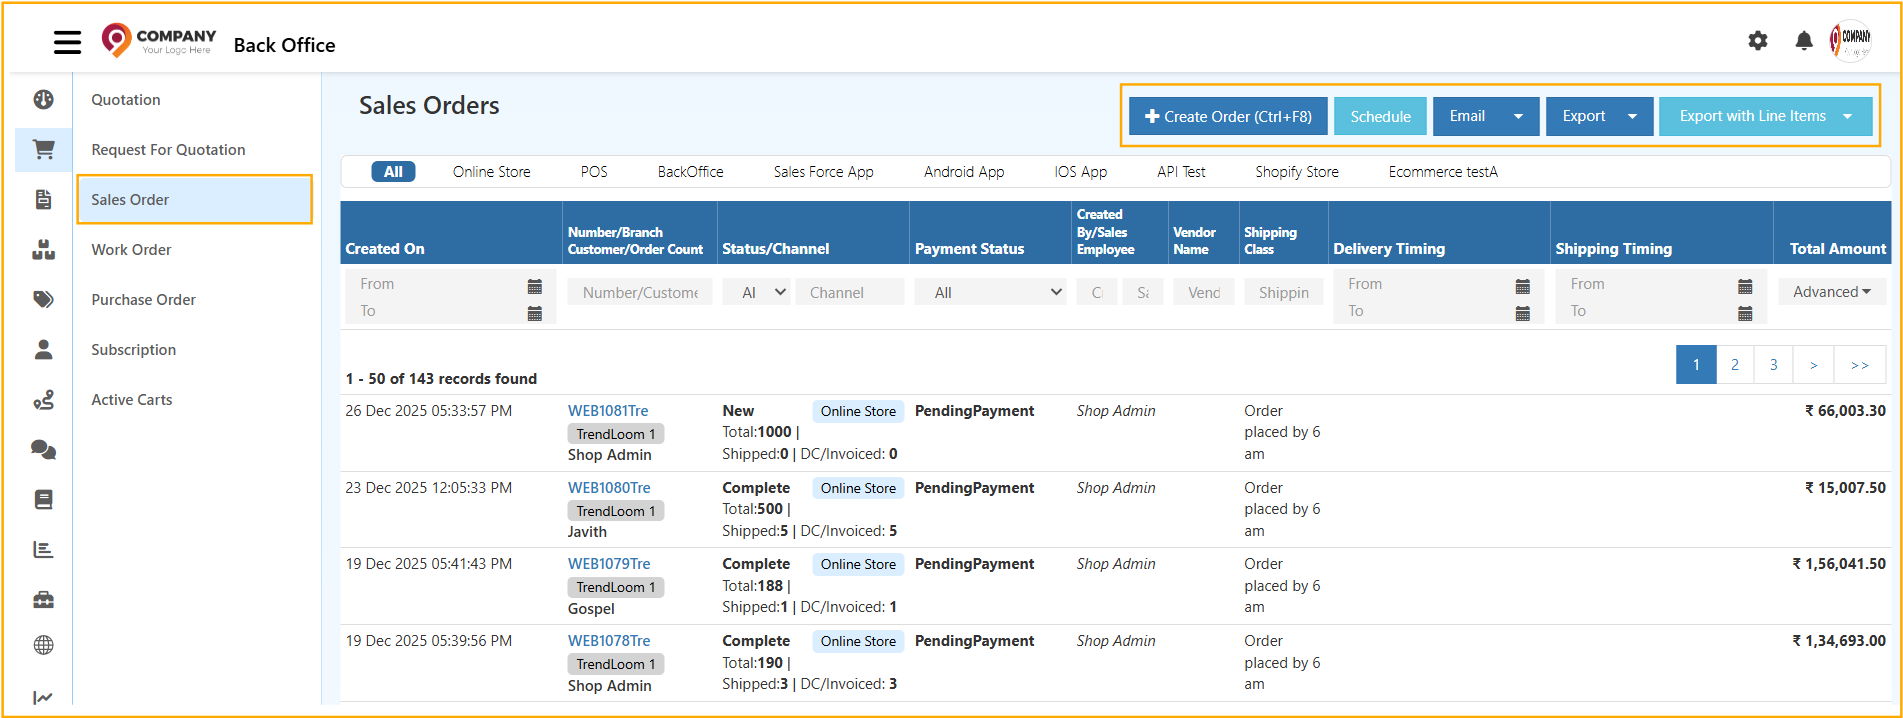
Sales Orders – Channel Tabs
These tabs filter orders based on the order source.
All
Displays sales orders from all channels combined.Online Store
Orders placed through the e-commerce website.POS
Orders created from retail Point of Sale terminals.BackOffice
Orders manually created by admin or staff.Sales Force App
Orders placed by field sales representatives.Android App
Orders placed through the Android mobile application.iOS App
Orders placed through the iOS mobile application.
Sales Orders – Grid Columns Explanation

Created On
- Displays the date and time when the sales order was created.
- Useful for tracking order timelines and reporting.
Number / Branch / Customer / Order Count
- Order Number: Unique identifier for the sales order.
- Branch: Store or business location where the order originated.
- Customer: Customer name linked to the order.
- Order Count: Total items or quantity in the order.
Status / Channel
- Status: Current stage of the order (New, Complete, Delivered, Cancelled).
- Channel: Source of the order (Online Store, POS, BackOffice, etc.).
Payment Status
- Indicates payment progress:
- Pending Payment
- Payment Received
Created By / Sales Employee
- Displays the staff member or system user who created the order.
Vendor Name
- Shows the vendor or supplier linked to the order, if applicable.
Shipping Class
- Defines the delivery method or shipping category (Standard, Express, etc.).
Delivery Timing
- Expected delivery date or delivery window.
Shipping Timing
- Scheduled shipping date or shipment window.
Total Amount
- Final payable amount after taxes, discounts, and charges.
Sales Orders – Filters & Search Options
Created On (From – To)
- Filters orders based on the order creation date range.
Number / Customer / Branch
- Search by order number, customer name, or branch name.
Status
- Filter orders by status such as New, Complete, or Cancelled.
Channel
- Filter orders by sales channel.
Payment Status
- View only paid or unpaid orders.
Created By / Sales Employee
- Filter orders created by a specific staff member.
Vendor Name
- Filter orders linked to a particular vendor.
Shipping Class
- Filter orders by shipping method.
Delivery Timing (From – To)
- Filter based on delivery date range.
Shipping Timing (From – To)
- Filter based on shipment date range.
Advanced
- Opens advanced filtering options for precise data analysis.
Top Action Buttons – Detailed Explanation
Create Order
- Creates a new sales order manually.
- Shortcut: Ctrl + F8
- Used for phone orders, walk-ins, or special cases.
Schedule
Used to automatically email sales order reports.

Schedule Report Fields
Select Data Size
- All Data: Includes all available sales orders.
- Minimum Data: Includes only essential columns.
Schedule
- Daily / Weekly / Monthly
- Time selection for report delivery
Previous
- Demonstrates how many past intervals to include (example: last 1 day).
To Email ID
- Email address that receives the report.
Email Subject
- Subject line for the scheduled email.
Email Body
- Description of report contents.
Save schedules the report.
Cancel exits without saving.
Used to manually email sales order reports.
- All Data: Sends complete sales order details.
- Minimum Data: Sends summarized order data.
Useful for quick sharing with management or finance teams.
Export
Exports sales orders to file format.
All Data
- Exports complete order details including financials.
Minimum Data
- Exports summary-level information.
Ideal for accounting, auditing, and analysis.
Export with Line Items
Exports sales orders along with product-level details.
All Data
- Includes full product, pricing, tax, and quantity information.
Minimum Data
- Includes essential order and item details only.
Used for inventory analysis, reconciliation, and sales reporting.
The Sales Orders list screen acts as a centralized control panel for monitoring, filtering, exporting, and scheduling order data across all sales channels. Proper use of filters and top actions ensures accurate reporting, better operational visibility, and improved decision-making.
Step-by-Step: Create a Sales Order
Step 1: Open Sales Orders
- Navigate to Back Office → Sales Order
- Click Create Order (Ctrl + F8)
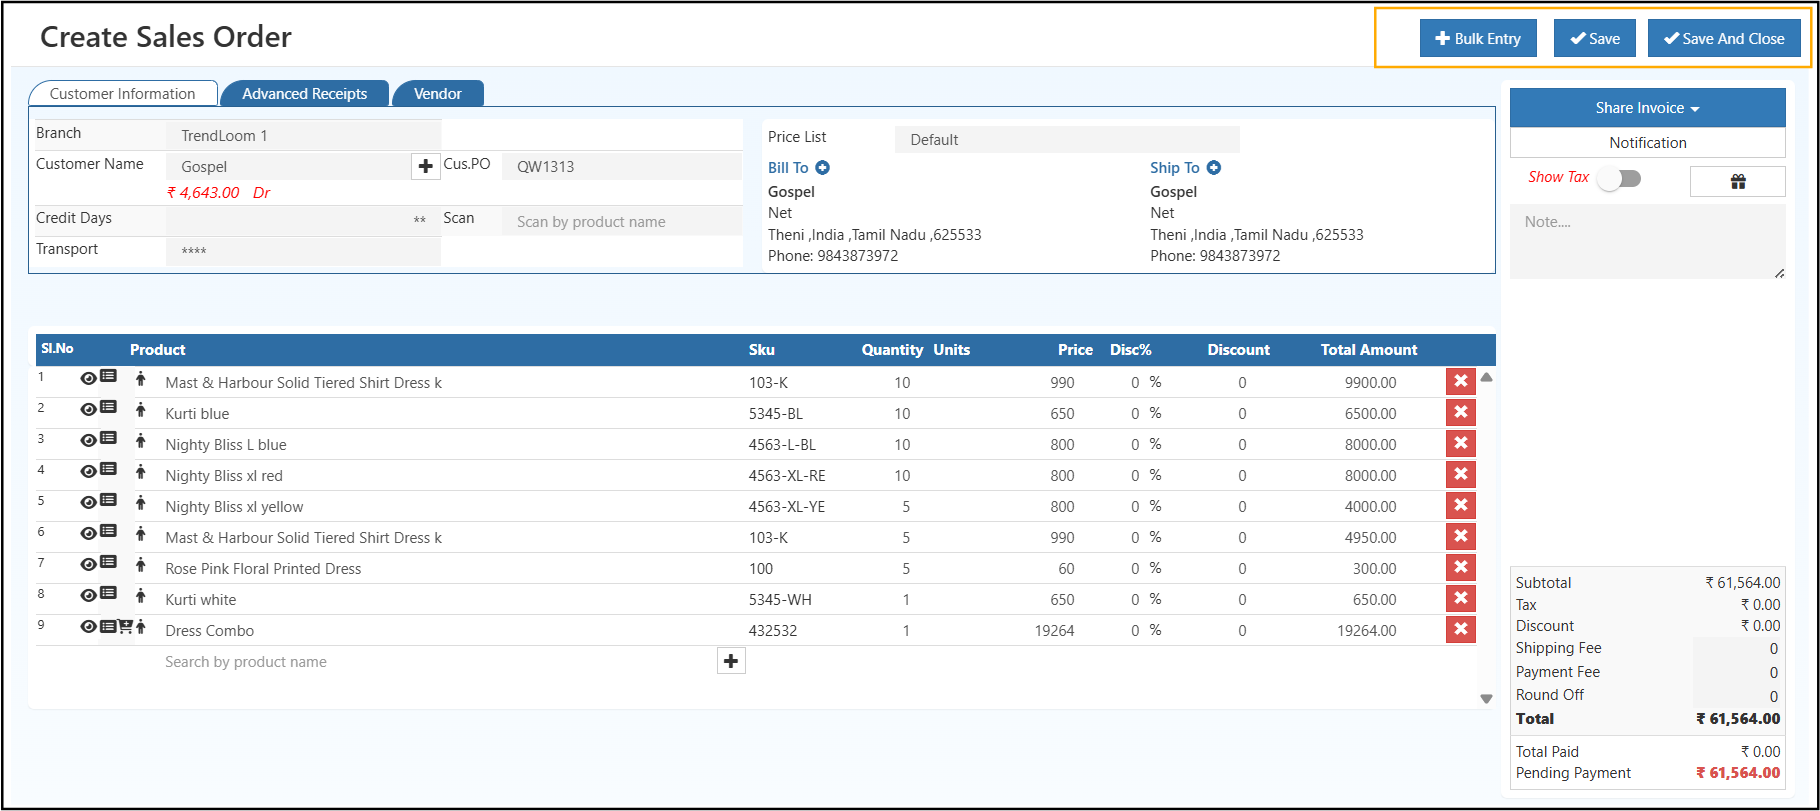
Create Sales Order – Detailed Explanation (SEO Optimized)
The Create Sales Order screen is used to record customer orders, allocate stock, calculate totals, and prepare invoices. This section is divided into clear functional areas to ensure accuracy, faster order processing, and better reporting.
Customer Information Section
This section captures who is placing the order and from which branch it is processed.
Branch
- Select the business branch or store where the sales order is created.
- Inventory, revenue, and reports are tracked based on the selected branch.
- Mandatory field.
Customer Name
- Choose the customer account placing the order.
- Automatically loads:
- Billing & shipping details
- Credit balance
- Price list
- Tax rules
- Mandatory field.
Customer PO
- Enter the customer’s purchase order number.
- Useful for:
- Matching customer records
- Audits and reconciliation
- Optional field.
Credit Days
- Defines the allowed payment period for the customer.
- Automatically calculates the due date.
- Optional field (depends on customer credit policy).
Transport
- Add transport or delivery reference details.
- Helps in logistics coordination.
- Optional field.
Billing & Shipping Section
This section defines where the invoice is billed and where goods are delivered.
Price List
- Selects the pricing rule for the customer.
- Prices are auto-applied to products based on the selected list.
Bill To
- Displays the billing address and contact details.
- Used for:
- Invoice generation
- Tax calculation
- Mandatory for accounting compliance.
Ship To
- Displays the delivery address and contact details.
- Used for:
- Delivery planning
- Shipping documents
- Can be same or different from billing address.
Product Section (Line Items)
This is the core section where ordered products are added.
Product Selection
- Search products by:
- Product name
- SKU
- Barcode (scan option)
- Mandatory to create a sales order.
SKU
- Unique product identification code.
- Auto-filled from product master.
- Ensures correct stock deduction.
Quantity
- Number of units ordered.
- Mandatory field.
- Directly impacts inventory availability.
Units
- Measurement unit (pcs, box, kg, etc.).
- Auto-filled based on product setup.
Price
- Unit selling price.
- Auto-populated from the price list.
- Can be edited if user has permission.
Discount %
- Apply percentage-based discount per item.
- Optional.
Discount Amount
- Apply fixed value discount per item.
- Optional.
Total Amount
- Auto-calculated:- Updates instantly when values change.
Remove Item
- Use the delete icon to remove unwanted products.
Order Summary & Payment Details
This section provides a financial overview of the order.
Subtotal
- Total value of all products before tax and charges.
Tax
- Calculated based on:
- Tax configuration
- “Show Tax” toggle
- Can be enabled or disabled.
Discount
- Displays total order-level discounts.
Shipping Fee
- Additional delivery or logistics charges.
- Optional.
Payment Fee
- Gateway or transaction charges.
- Optional.
Round Off
- Automatically adjusts the final amount.
Total
- Final payable amount after all calculations.
Payment Status
- Displays:
- Pending Payment
- Partially Paid
- Fully Paid
Top Action Buttons (Header Actions)
Located at the top-right of the screen.
Bulk Entry
- Used to add multiple products at once.
- Ideal for large or recurring orders.
- Supports Excel upload.
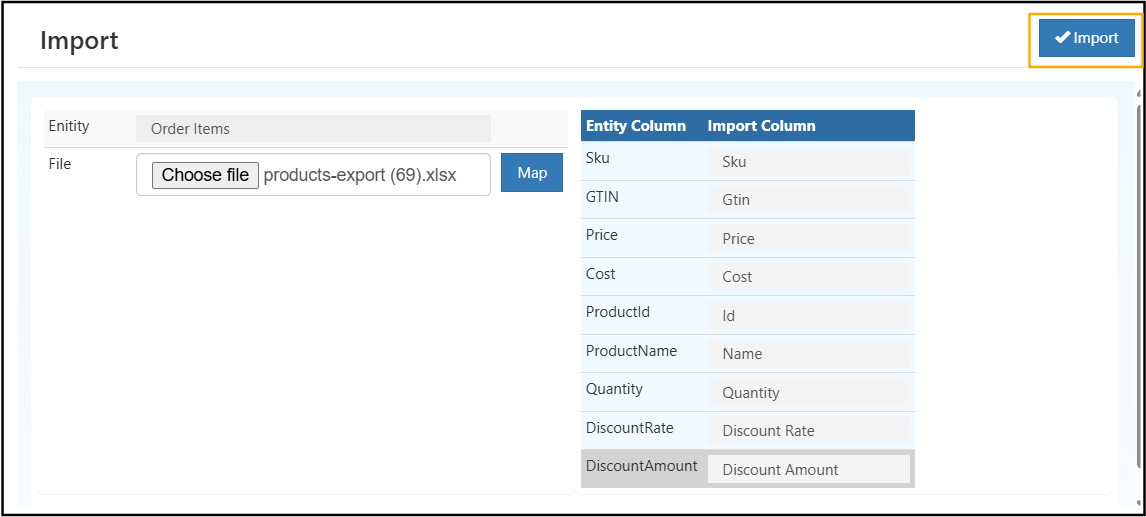
Bulk Import – Sales Order Items (Bulk Entry)
The Bulk Import feature helps you quickly add multiple products to a Sales Order using an Excel file. This is ideal for large orders, repeat orders, or migrating data without manual entry.
When to Use Bulk Import
- Adding many products at once
- Creating recurring or wholesale orders
- Reducing manual errors and time
- Uploading orders from external systems or Excel
Bulk Import Screen Overview
Entity
- Order Items
- Defines what data you are importing
- In this case, it imports Sales Order product line items
File Upload
- Click Choose file
- Upload an Excel file (
.xlsx) - The file should contain product and quantity details
Example file name:
products-export.xlsx
Map Button
- Click Map after uploading the file
- Opens column-mapping between Excel and system fields
- Ensures correct data alignment before import
Column Mapping Section
This section maps Excel columns to Sales Order fields.
| Entity Column | Import Column | Description |
|---|---|---|
| Sku | Sku | Unique product code (recommended) |
| GTIN | Gtin | Global Trade Item Number |
| Price | Price | Selling price per unit |
| Cost | Cost | Product cost (optional) |
| ProductId | Id | Internal product ID |
| ProductName | Name | Product display name |
| Quantity | Quantity | Number of units ordered |
| DiscountRate | DiscountRate | Discount percentage |
| DiscountAmount | DiscountAmount | Flat discount value |
⚠️ Tip: At least SKU + Quantity is mandatory for successful import.
Required Columns (Minimum Data)
To import successfully, ensure your Excel file includes:
- SKU
- Quantity
Optional but recommended:
- Price
- Discount Rate or Amount
- Product Name
Import Button (Top Action)
Import
- Validates the uploaded data
- Adds all items to the Sales Order
- Automatically calculates totals and discounts
- Displays errors if any rows fail validation
Save
- Saves the sales order as draft.
- Order can be edited later.
Save and Close
- Saves the order and exits the screen.
- Recommended after order confirmation.
Additional Actions
Share Invoice
- Send invoice via email or other channels.
Notification
- Triggers alerts or notifications related to the order.
Show Tax Toggle
- Enables or hides tax calculation on the order.
Notes
- Add internal remarks or customer instructions.
- Not visible on invoice unless configured.
Tip: Always verify customer details and product quantities before saving to avoid stock mismatches or billing errors.