O2VEND Documentation
  • Tutorials
Search Results for

    Show / Hide Table of Contents
    • Getting Started
    • O2VEND Store
      • My Stores
        • Create Store
      • My Account
        • My Profile
        • Manage Billing
        • Support Desk
    • Dashboard
      • Dashboard
    • Orders
      • Quotation
      • Request For Quotation
      • Sales Order
      • Work Order
      • Purchase Order
      • Subscription
      • ActiveCarts
    • Vouchers
      • Sales
        • Manage Sales
        • Create Sales Invoice
        • Cancel Sales Invoice
        • How to create GDN(Goods Delivered Note)
        • How to add lot for products in GDN
        • How to view sales details
      • Services
        • Services
      • Purchase
        • Manage purchase
        • Create Purchase Invoice
        • Cancel purchase Invoice
        • How to create GRN(Goods Received Note)
        • How to add lot for products in GRN
        • How to print a barcode label in purchase
        • How to view purchase details
      • Credit Note
      • Debit Note
      • Receipt
      • Payment
      • Journal
      • Contra
    • Inventory
      • Stock Quantity (Alt+I)
      • Stock History
      • Print Barcode Label
      • Delivery Challan
      • Receipt Challan
      • Stock Transfer
      • Manufacturing Voucher
      • Stock Take
      • Incoming Packages
      • Outgoing Packages
    • Catalog
      • Product
      • Brand
      • Categories
      • Option
      • Attributes
      • Attributes Categories
      • Attributes Templates
      • Price List
      • Bulk Product Price update
      • Bulk Product Updates
      • Sku Rules
      • Pricing Rules
    • Parties
      • Customers
      • Customer Groups
      • Supplier
      • Supplier Group
    • Inbox
      • SMS
      • E-Mail
      • Whatsapp
      • Configuration
    • Accounting Books
      • Ledgers
      • Chart of Accounts
      • Day Book
      • Cash Book
      • Sales Book
      • Purchase Book
      • Account Group Book
    • Reports
      • Order Reports
        • Web Orders Progress Report
        • Back Order Items Report
        • Purchase Order Pending Item Report
        • Sales Order Pending Item Summary
        • Sales Shipping Status Report
        • Sales Order Summary
        • Sales Order Progress Report
        • Purchase Order Progress Report
        • Sales Order with Product Line Item Report
        • Sales Order Packing Sheet Report
        • Back Order Report
        • Purchase Order Summary
        • Sales Order Shipment Report
        • Sales Order Shipping Address Report
      • Sales/Purchase Reports
        • Sales Invoice Report
        • Sales Invoice Summary
        • Sales Items Summary
        • Purchase Invoice Report
        • Purchase Invoice Summary
        • Purchase Items Summary
        • Receipt Report
        • Daily Settlement Report
        • Contribution Margin Report
        • Agent Sales Report
        • Agent Report
        • Employee Sales Report
        • Employee Report
      • Supplier Reports
        • Supplier Report
        • Supplier Purchase Report
        • Supplier Detail Report
      • Inventory Reports
        • Stock Summary
        • Stock Valuation Summary
        • Stock Ageing Report
        • Location Summary
        • Stock Movement Summary
        • Stock Ledger Report
        • Stock/Location Summary
        • Stock Movement And Valuation Summary
      • Products
        • Sold Product Categories
        • Product Category Summary
        • Product Sale Summary
        • Category Sale Summary
        • Brand Sale Summary
        • Reordering Stock Summary
        • Price Movement
        • Product Seasonal Demand
        • Product Stock Analysis Report
        • Stock Projection Report
      • Pos Reports
        • Cash Register Summary
        • Current Cash Registers
      • Account Reports
        • Day Book
        • Ledger
        • Cash Book
        • Sales Books
        • Purchase Books
        • Daily Sales and Payment Report
        • Balance Sheet
        • Profit and Loss Report
        • Trial Balance
      • Miscellaneous Reports
        • Output Detailed Tax Report
        • Output Tax Report Summary
        • Account Receivable Report
        • Account Payable Report
        • Gross Profit Report
        • Daily Tax Report
        • GSTR-1 Report
        • External API Logs
        • Benefit Usage
        • Offers Usage
        • Coupon Usage
        • Configuration Change History
        • VisitLog
    • Tools
      • Import
      • Export
    • OnlineStore
      • Themes
      • Theme Data
      • Shipping Methods
      • Payment Methods
      • Currency
      • Reviews
      • Zones
      • Delivery Zones
      • webstoreContentsSettings
        • Site Pages
        • Site Menus
          • Main Menu
          • Site Menus
        • Home Page Components
        • Page Header
        • Blog Categories
        • Blog
        • News Letter Subscription
        • menus
          • Main Menu
          • Site Menus
    • Analytics
      • Visitor Analytics
      • E-commerce Analytics
      • Product Analytics
      • Campaigns Analytics
    • Settings
      • Settings
      • Business Settings
        • Business Details
        • Tax Classes
        • Tax Rates
        • Operating Countries
        • Operating State or Province
        • Branches
        • Sales Channels
        • Return Rule
        • Backoffice Print Detail
        • Download Template
      • Point Of Sale
        • Quick Add Buttons
        • Print Settings
        • Payment Methods
        • Delivery Settings
        • Language
      • Agent App
        • Agent App Print Details
      • Inventory
        • Unit Of Measure
        • Location
        • Unit Of Measure Conversions
        • Stock Levels
        • Sub Location
        • Print Barcode Label Settings
        • Package Material
      • userSettings
        • vendors
        • User Date Setup
        • Employees
          • Set Up Employee Roles
          • Ecommerce
          • Point Of Sale
          • Back Office
          • Sales App
        • Vendors Commission
        • Credit Rules
        • Automatic User Code
      • Loyalty and Promotions
        • Reward Points
        • Coupons
        • Gift Vouchers
        • Offers and Discounts
        • Benefits
        • Affiliate
        • Coupon Print Setting
      • Account
        • Financial Year
        • Voucher Numbering
        • Sales Account Map
        • Voucher Numbering Rules
    • Features
      • General
      • POS
      • Webstore
      • Integration
    • Integration
      • General
      • Phonepe
      • Paytm
      • Stripe
      • Cashfree
      • Paypal
      • Razorpay
      • Shiprocket
      • Shipway
      • Amazon Shipping
      • O2VEND Webhook
      • Sendgrid
      • MSG91
      • Amazon SES
      • reCAPTCHA
      • E-invoice
      • Shopify
      • Facebook Catalog
      • Whatsapp
      • Typesense
    • Profile
      • My Profile
    • Manage Physical Stores
      • Login
      • Sales Bill
        • Manage sales orders
        • How to add products to a customer's shopping cart
        • How to apply discounts/coupons
        • How to search products in Sales Screen
        • How to add products quickly to the Cart
        • How to add serial and lot number
        • How to Print sales bills in POS
      • Receive Payments (Receipts)
      • Delivery
      • Invoice Receipts
      • Manage Cash Register
      • Reprint
      • Dashboard
      • POS Offline
      • Stock Transfer
    • O2VEND App
      • Install O2VEND App
      • Home
      • Customers
      • Orders
      • Products
      • Receipts
      • Stock Movement
    • Webhooks
      • Webhook
      • Examples of JSON format data via webhook
      • Testing webhook

    How to setup Site Navigation in O2VEND

    The menu is an important part of an ecommerce website, as it allows customers to navigate through the site and find the products they are looking for. It is essential that the menu is easy to use, well-organized, and intuitive.

    The O2VEND platform provides options to set up and customize the menu of your ecommerce store. You can create and organize different sections in the menu such as categories, products, collections and more. It allows you to create a hierarchical structure of the menu, which makes it easy for customers to find products and navigate through the store.

    You can customize the menu by adding or removing items, changing the order of items, and organizing items into subcategories. This allows you to create a menu that is tailored to your business and provides the best user experience for your customers.

    It also provide an option to set the menu items as sub-menu, that help to navigate to different sections, this also allows you to group the related items under the same section.

    The O2VEND platform also allows you to customize the appearance of the menu, you can change the color, font, and layout of the menu to match the overall look and feel of your store. This can help to create a cohesive and professional-looking website.

    Main menu and Smart menu in O2vend

    A main menu on a business's website serves as a navigation tool for customers to easily access different sections and pages on the site. It is often prominently displayed on the homepage and allows customers to quickly access the products and categories offered by the business. By having a well-organized and easy-to-use main menu, customers can quickly find what they are looking for, which can lead to increased sales and customer satisfaction. Additionally, it can also help to reduce the bounce rate on the website, as customers are able to find the information they need without difficulty, which encourage them to stay on the website longer. Overall, a well-designed main menu can improve the user experience and make it easier for customers to find the products they are looking for, which can ultimately drive more sales for the business.

    How to Setup Main menu in O2VEND Store

    List the number of parent categories and child categories in the below header of your store. It is useful to Quick navigate and provides customers to enhance the shopping experience.

    Steps to setup Main menu: -

    1. Open O2VEND Back office.

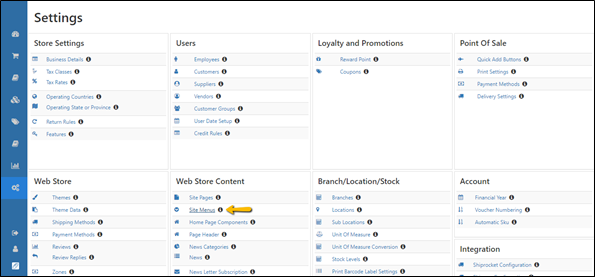
    2. Go to Web Store Content and click Site Menus. How to setup Site Navigation in O2VEND

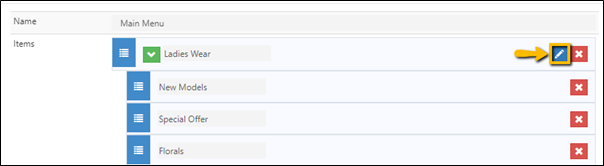
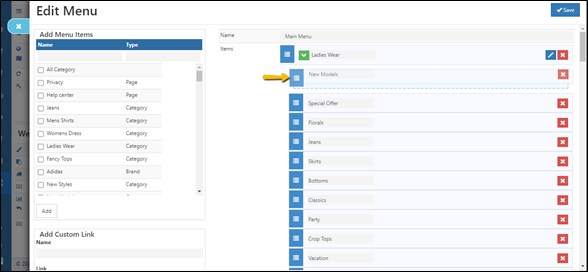
    3. A menu popup appears there to click and open the edit icon in the main menu.

    How to setup Site Navigation in O2VEND
    1. Add child menu below the Parent menu.
    How to setup Site Navigation in O2VEND
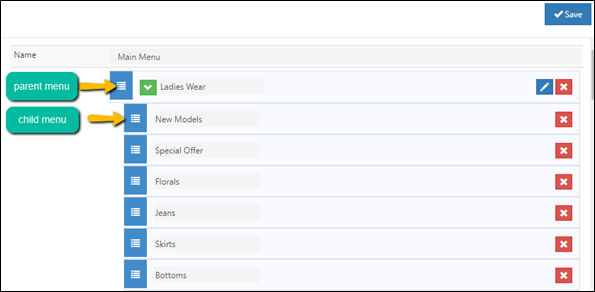
    1. Set Is Published -TRUE.
    2. Click Save button.

    Add custom link: -

    Custom links in a main menu can serve as a powerful call to action for businesses. They allow businesses to direct customers to specific pages or sections of their website, such as a product page, a blog post, or a newsletter sign-up page. By adding custom links to the main menu, businesses can increase visibility for these important pages and make it easier for customers to find and access them.

    For example, a business may want to promote a new product, so they can add a custom link in the main menu that directs customers to the product page. This can help to increase visibility and drive more traffic to the product page, which can lead to increased sales. Similarly, a business may want to promote a newsletter, so they can add a custom link in the main menu that directs customers to a sign-up page. This can help to increase visibility and drive more sign-ups for the newsletter, which can lead to increased customer engagement.

    Overall, custom links in a main menu can be a powerful tool for businesses to drive customer engagement and increase visibility for important pages on their website. It is one of the way to direct the audience to the desired web pages in an easiest way.

    Here steps as follows: -

    How to setup Site Navigation in O2VEND How to setup Site Navigation in O2VEND

    Admin can enable a main menu in the settings section. Add the categories, brands, pages, and blogs from the menu items. Customers easily to see the parent and subcategory menu on homepage header. Subcategory is the most specific filtered options on the homepage.

    Smart menu option useful for show the categories include with the page.

    How to setup Site Navigation in O2VEND

    How to enable the smart menu in the O2VEND Store

    Smart menu provides a quick view of the store for online users to buy very fast and easy to go through the products. O2vend supports users to navigate and explore shopping through Smart Menu.

    Easier to Customize:

    The common menu has a long list of text one type of menu, when using smart menu admin can customize by category and subcategory name, brand name, pages, blog, color, and image to enhance the shopping experience of the customers.

    Increase Sales:

    Using smart menu customers feels a unique experience and makes it easy to search for products and get more sales for this quick view.

    Steps to set up Smart menu: -

    1. Click the main menu edit icon in the site menu section. How to setup Site Navigation in O2VEND

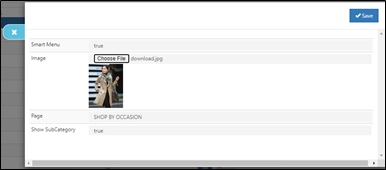
    2. Set smart menu TRUE, then upload Image in the field and select Page in the list.

    3. Set TRUE in the Show Subcategory field.

    4. Click the Save button.

    How to setup Site Navigation in O2VEND
    1. If subcategories need Drag and Drop the existing child menus or add menus from the Add menu items and set those menus below any Parent category. How to setup Site Navigation in O2VEND
    2. At final set Is Published -TRUE.
    How to setup Site Navigation in O2VEND

    If the smart menu is false it looks like default displays.

    • Edit this page
    In this article
    © 2019–2025 Jeyan Technologies Private Limited • www.o2vend.com • Create your own store