• Tutorials

    Show / Hide Table of Contents
    • Getting Started
    • O2VEND Store
      • My Stores
        • Create Store
      • My Account
        • My Profile
        • Manage Billing
        • Support Desk
    • Store Setup
      • Initial Store Setup
    • Dashboard
      • Dashboard
    • Orders
      • Quotation
      • Sales Order
      • Purchase Order
      • ActiveCarts
    • Vouchers
      • Sales
        • Manage Sales
        • Create Sales Invoice
        • Cancel Sales Invoice
        • How to create GDN(Goods Delivered Note)
        • How to add lot for products in GDN
        • How to view sales details
      • Purchase
        • Manage purchase
        • Create Purchase Invoice
        • Cancel purchase Invoice
        • How to create GRN(Goods Received Note)
        • How to add lot for products in GRN
        • How to print a barcode label in purchase
        • How to view purchase details
      • Credit Notes
      • Debit Notes
      • Receipt
      • Payment
      • Journal
      • Contra
    • Inventory
      • Manage Stocks
      • Stock History
      • Print Barcode Label
      • Delivery Challan
      • Receipt Challan
      • Goods Entries
      • Stock Transfer
      • Stock Take
    • Catalog
      • Set Up Products
        • General
        • Variations
        • Attributes
        • Stock Levels
        • Pricing
        • SEO
      • Product Categories
      • Product Brand
      • Product Option
      • Attributes
      • Attributes Group
      • Product Templates
      • Price List
      • Bulk Product Price update
      • Bulk Product Updates
    • Communication
      • Communication
    • Accounting Master
      • Master
    • Reports
      • Order Reports
        • Sales Order Summary
        • Purchase Order Summary
        • Sales Order Shipment Report
        • Sales Order Pending Item Report
        • Purchase Order Pending Item Report
        • Sales Order Pending Item Summary
      • Inventory Reports
        • Stock Summary
        • Location Summary
        • Stock/Location Summary
        • Reordering Stock Summary
        • Stock Valuation Summary
      • Products
        • Sold Product Categories
        • Category Product Return
        • Product Sale Summary
        • Product Seasonal Demand
      • Pos Reports
        • Cash Register Summary
        • Current Cash Registers
      • Sales/Purchase Reports
        • Sales Report
        • Purchase Report
        • Sales Summary
        • Purchase Summary
        • Receipt Report
        • Sales Items Summary
        • Daily Settlement Report
      • Account Reports
        • Ledger
        • Cash Book
        • Day Book
        • Sales Books
        • Purchase Books
      • Miscellaneous Reports
        • Output Detailed Tax Report
        • Output Tax Report Summary
        • OutStanding Report
        • Gross Profit Report
        • GSTR-1 Report
      • Financial Reports
        • Balance Sheet
        • Profit And Loss Report
        • Trial Balance
    • Settings
      • Settings
      • Store Settings
        • Business Details
        • Tax Classes
        • Tax Rates
        • Operating Countries
        • Operating State or Province
        • Return Rule
      • Users
        • User Role Management
          • Set Up Employee Roles
          • Ecommerce
          • Point Of Sale
          • Back Office
          • Sales App
        • customers
        • Supplier
        • vendors
        • Customer Groups
        • User Date Setup
        • Credit Rules
      • Loyalty and Promotions
        • Reward Points
        • Coupons
        • Benefits
        • Affiliate
      • Point Of Sale
        • Quick Add Buttons
        • Print Settings
        • Payment Methods
        • Delivery Settings
      • Web Store
        • Themes
        • Theme Data
        • Shipping Methods
        • Payment Methods
        • Currency
        • Reviews
        • Review Replies
        • Zones
      • Web Store Content
        • Site Pages
        • Site Menus
          • Main Menu
          • Site Menus
        • Home Page Components
        • Page Header
        • Blog Categories
        • Blog
        • News Letter Subscription
      • Stock Settings
        • Unit Of Measure
        • Location
        • Delivery Zones
        • Unit Of Measure Conversions
        • Stock Levels
        • Branches
        • Sub Location
        • Print Barcode Label Settings
      • Account
        • Financial Year
        • Voucher Numbering
    • Features
      • General
      • POS
      • Webstore
      • Integration
    • Profile
      • My Profile
    • Manage Physical Stores
      • Login
      • Sales Bill
        • Manage sales orders
        • How to add products to a customer's shopping cart
        • How to apply discounts/coupons
        • How to search products in Sales Screen
        • How to add products quickly to the Cart
        • How to add serial and lot number
        • How to Print sales bills in POS
      • Receive Payments (Receipts)
      • Delivery
      • Invoice Receipts
      • Manage Cash Register
      • Reprint
      • Dashboard
      • POS Offline
      • Stock Transfer
    • O2VEND App
      • Install O2VEND App
      • Home
      • Customers
      • Orders
      • Products
      • Receipts
      • Stock Movement
    • Webhooks
      • Webhook
      • Examples of JSON format data via webhook
      • Testing webhook

    Benefits

    A benefit is a set of rules that allow consumers and affiliates to earn commissions or cashback from online stores.

    In O2VEND, the benefit rule applies when it is associated with coupons. Customers or affiliates(he refers to the code or URL for that consumer) who use that coupon may be eligible for cashback, encouraging new customers and making frequent purchases from your store.

    This section describes the steps to using a Benefit Coupon in a store. The configuration process consists of two parts:

    Creating the benefit rule: In the O2VEND back office, the admin can create a benefit rule by navigating to the settings tab and selecting the benefits option. Here, the admin can set the details of the benefit, such as the type of benefit (cashback or commission), the amount of the benefit, and the conditions for eligibility.

    Associating the benefit rule with a coupon: Once the benefit rule is created, it can be associated with a coupon. The admin can create a new coupon or edit an existing one, and select the benefit rule from a drop-down menu. The coupon can then be shared with customers or affiliates, who can use it to redeem the benefit.

    Using the benefit coupon: Customers or affiliates can use the benefit coupon by applying it at checkout when making a purchase from the store. Once the coupon is applied, the benefit will be applied to the purchase and the customer or affiliate will be eligible for the cashback or commission.

    Tracking the benefits: The admin can track the benefits earned by customers or affiliates in the O2VEND back office by navigating to the reports section and selecting the benefits option. This will provide a detailed view of the benefits earned, including the customers or affiliates who earned them and the amount of the benefit.

    By using benefit coupons in O2VEND, businesses can incentivize customers and affiliates to make purchases, encouraging repeat customers and expanding their reach through affiliate marketing. This can help increase sales and revenue for the business.

    Set up the benefit

    1. Open Back Office.
    2. Go to Settings Menu. See the Loyalty and Promotion sections.
    3. Click and open the Benefits section.
    4. Click the create Benefit button in the top right corner.
    1. Enter all the needed details.
    2. Press the Save button.

    From this page, users can add, edit and view benefits rules.

    The Benefit Rules are a set of conditions under which cashback will provide to your customers. When adding a new benefit rule, you will enter the name, select the cashback option (fixed or percentage) for orders, enter the cashback trigger, enter the maximum discount amount, enter the total lifetime cashback, and set the benefit rule as active or not.

    Name*

    Enter the name of the benefit.

    Type*

    Select the type of benefit.

    Customer Fixed CashBack

    A customer who makes an online purchase will earn a fixed amount of cash back on their points account, which they can use to make a future purchase.

    Customer Percentage Cashback

    A customer who makes an online purchase will earn an amount (total amount estimated by percentage) of cashback on their points account, which they can use to make a future purchase.

    Affiliate Fixed CashBack

    When customers use an affiliate's referral code to purchase from your store, the affiliate will get a fixed amount of cashback.

    Affiliate Percentage CashBack

    The affiliate will receive a certain amount (total amount estimated by given percentage) of cashback when clients use an affiliate's referral code to purchase from your site.

    Affiliate Fixed Commission

    When customers use an affiliate's referral code to purchase from the site, the affiliate will get a fixed commission amount on their account.

    Affiliate Percentage Commission

    When customers use an affiliate's referral code to purchase from the site, the affiliate will get a percentage commission amount on their account.

    Condition

    Choose the applicable condition - "No condition" or "for order placed".

    No condition

    when selecting "No condition", the benefit rule will apply to all orders.

    For order placed

    After selecting the "For order placed" condition, fill the "From" and "To" in the fields.

    In the box, enter the number in which sequence this benefit rule will apply. For example, if an admin wants to provide a cashback for a customer's first and second orders, he will input "1" and "2" in the "from and to" boxes.

    Cashback Trigger

    The cashback is credited to their points account based on trigger conditions.

    Choose the cashback trigger conditions,

    Once order placed

    It means that the customer will receive cashback after placing an order.

    Once order complete

    The customer will get cashback after the order has been completed/dispatched.

    Discount Amount

    Enter the discount amount(Fixed amount/ percentage) for this benefit rule.

    Max Discount Amount

    It only applies when entering the percentage. Enter the maximum discount amount. For example, if the maximum discount is 50, the number of coins added will not exceed 50.

    Total Lifetime Cashback*

    Total Lifetime Cashback refers to the cashback rewards earned in your coins account at the start of the cashback programme. Enter the total amount of lifetime cashback.

    Active

    Setting active to true is necessary to activate the benefit rule. If it is false, it is not active.

    Configuring the benefits of the coupon

    Benefit rules are only applied to the coupon as it is configured within the coupon.

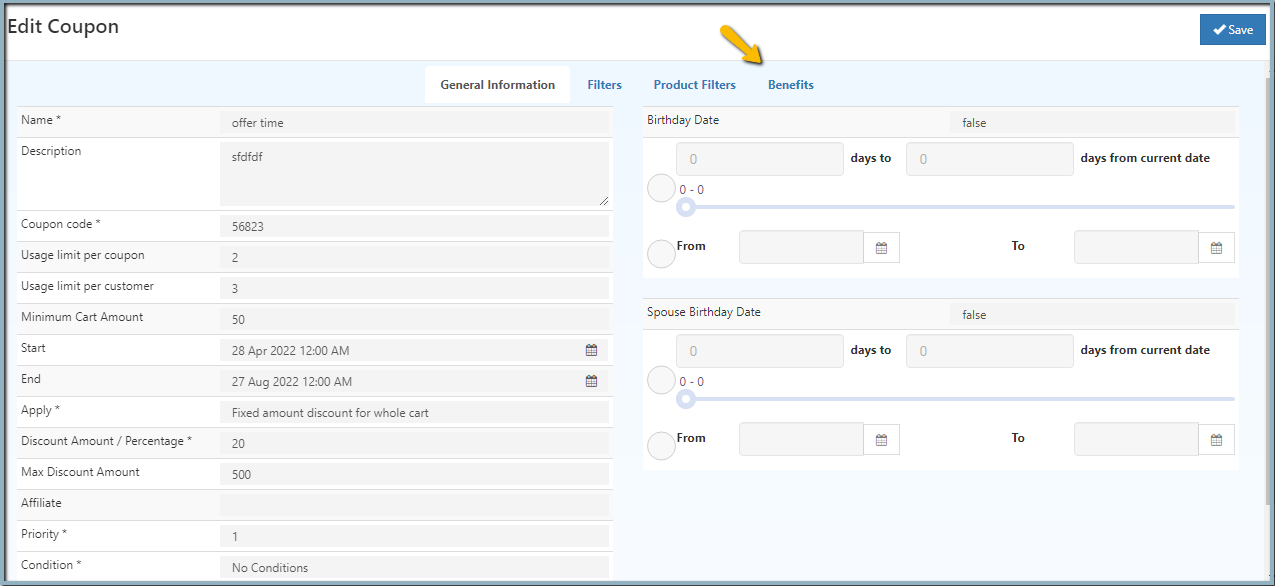
    1. Launch the Back Office.
    2. Navigate to the settings menu. See the sections on promotion and loyalty.
    3. Click and open the "Coupons".
    4. Click on the edit coupon.
    5. Navigate to the section on benefits.
    1. Choose the benefit name in the page's top navigation.
    1. Press the save button.
    • Improve this Doc
    Back to top Generated by DocFX