O2VEND ERP – Goods Dispatched Note (GDN) & Outbound Shipment Workflow
Logistics • Inventory Management • Warehouse Dispatch • Delivery Workflow
Learn how to manage outbound shipments, track delivery orders, and generate GDNs in your warehouse management system.
The GDN workflow acts as a complete dispatch management system inside O2VEND ERP. The Goods Dispatched Note (GDN) workflow in O2VEND ERP manages the complete outbound shipment cycle, ensuring accurate stock-out, smooth delivery movement, and streamlined warehouse logistics. This guide covers shipment creation, courier assignment, dispatch verification, package entry, and documentation required for successful order fulfillment.
Definition: Goods Dispatched Note (GDN)
A Goods Dispatched Note (GDN) -is a logistics document used to record outbound shipments, customer deliveries, and dispatch orders from the warehouse.
It serves as an official record for inventory stock-out, dispatch verification, and proof of goods delivery.
This page is a core part of the outbound logistics workflow in O2VEND, supporting real-time stock deduction, delivery accuracy, and transparent shipment tracking.
Why GDN Is Important
A GDN plays a critical role in warehouse dispatch operations and inventory control.
It ensures:
- Accurate documentation of outbound shipments
- Real-time stock deduction during dispatch
- Compliance with audit and logistics requirements
- Error-free order fulfillment workflow
- Clear traceability of every package leaving the warehouse
In an ERP dispatch module, the GDN acts as the final checkpoint before goods move to the customer, making it essential for delivery accuracy and warehouse logistics automation.
Table of Contents – O2VEND GDN
- Why GDN Is Important
- Navigation to Goods Dispatched Note / GDN
- Step-by-Step Process to Create a GDN
- Add Package Panel
- GDN Edit Page – Step-by-Step Guide
- Initiate GDN Button Activation – Location Routing Logic
- GDN Packages Tab & Package Handling
- Frequently Asked Questions (FAQ)
- Refer Related Links
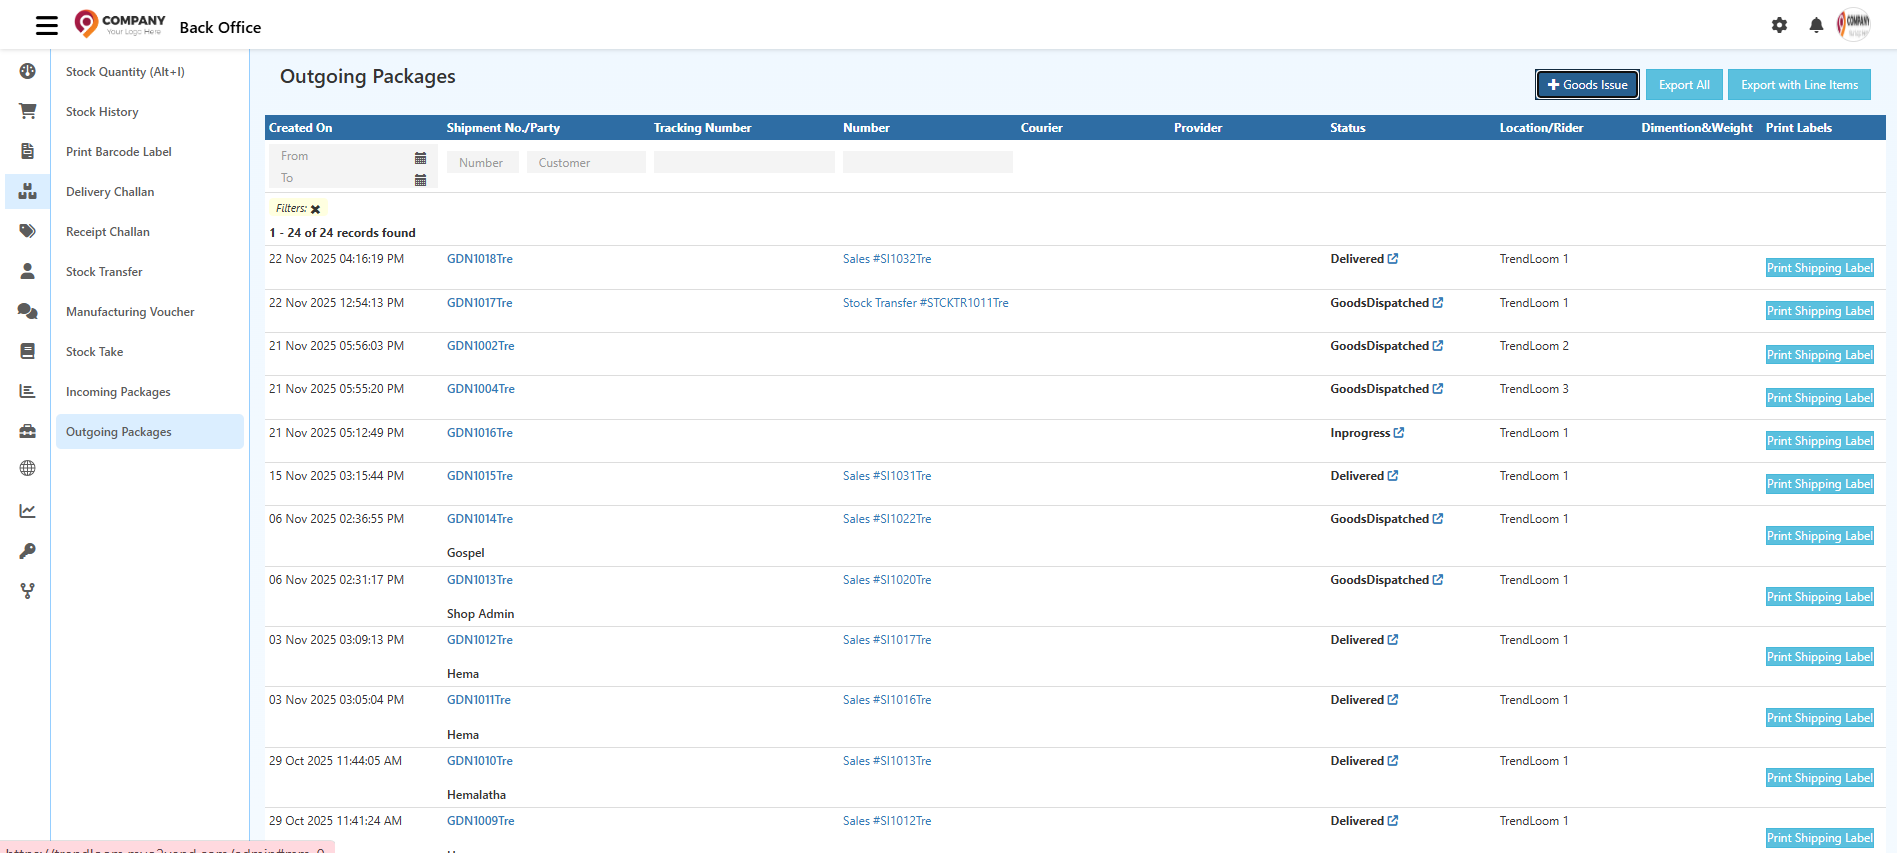
Navigation to Goods Dispatched Note / GDN
You can access GDN entries from the Outbound Shipments list:
- Open the Back Office
- Go to the Inventory menu
- Select Outgoing Packages
- Click Goods Dispatched to open the GDN list
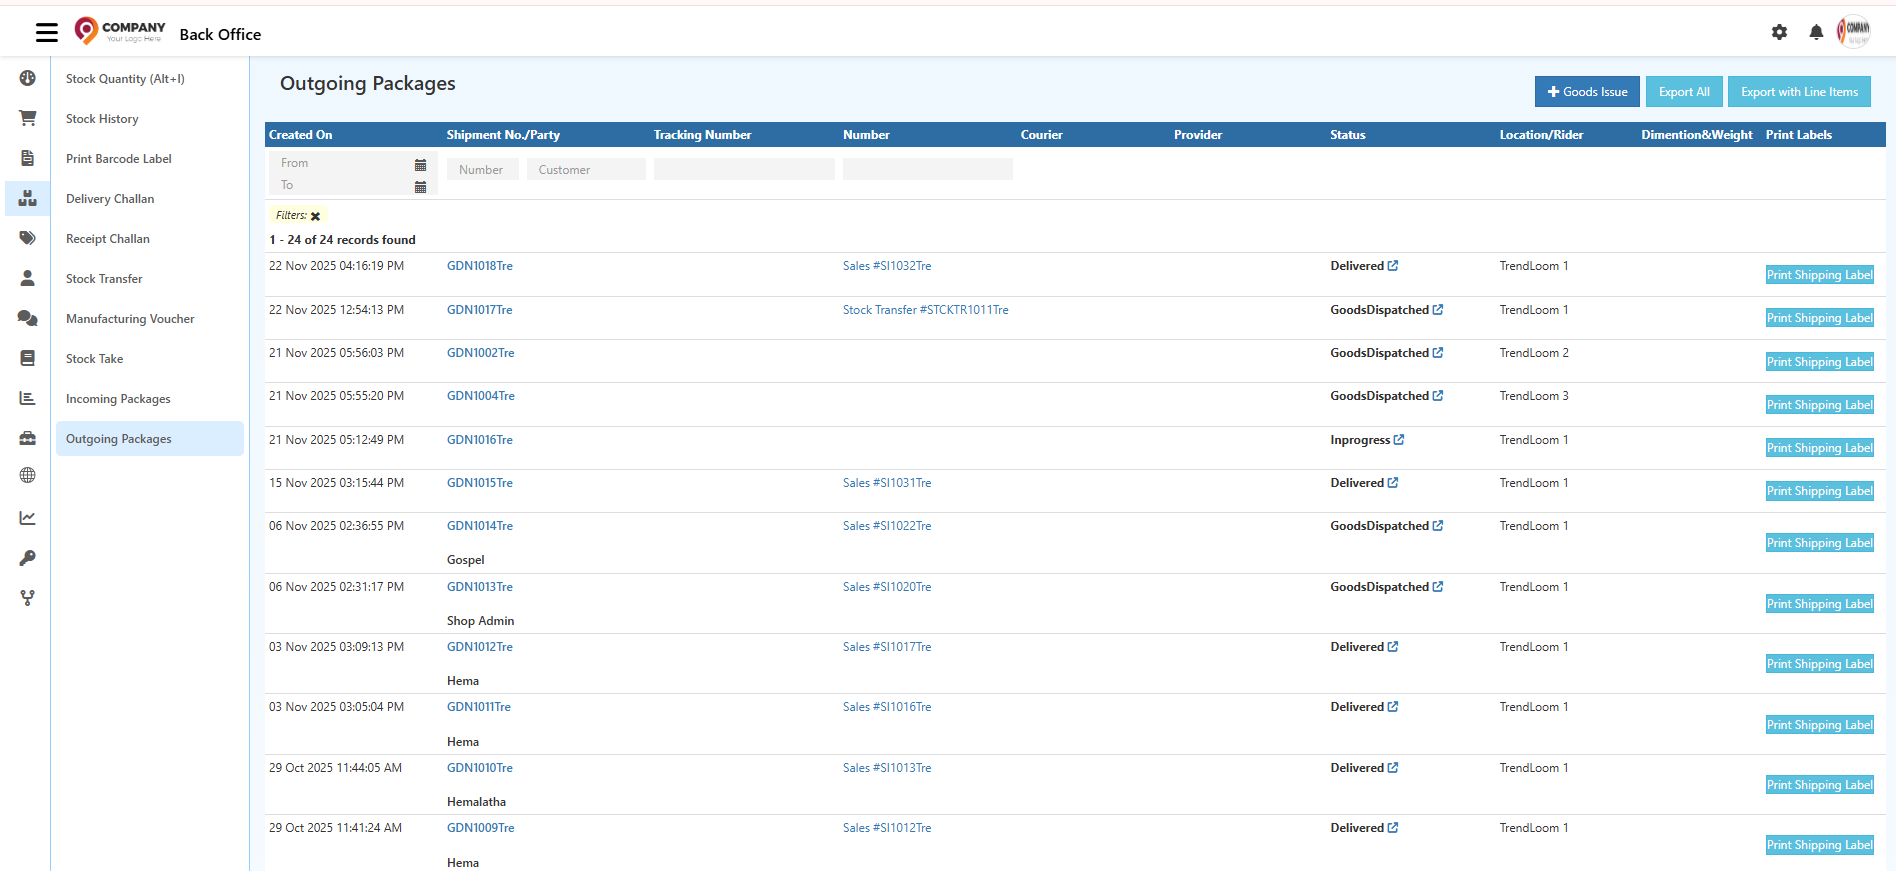
GDN Overview – Goods Dispatch in O2VEND ERP
The Goods Dispatched (GDN) workflow manages all outgoing packages, sales order dispatches, and delivery challan shipments.
This page displays shipment date, customer, delivery partner, packaging, and status.
It helps warehouse teams ensure accurate order dispatch, timely deliveries, and correct stock deduction.
A GDN ensures:
- Accurate inventory stock-out update
- Verified picked, packed, and dispatched orders
- Proper tracking of sales order deliveries & DC shipments
- Delivery accuracy & audit compliance
- Streamlined last-mile logistics operations
Columns & Their Functions in GDN
Created On
Shows the date & time the GDN or outbound shipment was created.
Shipment No / Customer
Displays shipment reference number and the customer or destination details.
Tracking Number
Courier tracking number for monitoring shipment progress.
Delivery Challan / Order No
Internal reference such as Sales Order Number or Delivery Challan Number.
Courier
Name of the delivery partner / logistics provider.
Provider
Indicates shipment source (e.g., Warehouse, Branch, Supplier Dispatch).
Status
Shows the current stage of the outbound shipment:
- Dispatched – Shipment handed to logistics
- OutForDelivery – Out for customer delivery
- Delivered – Customer received
- Exception – Delivery issue
- AttemptFail – Delivery attempt failed
- PickedUp – Pickup completed (for return orders)
Location / Rider
Warehouse dispatching the goods and assigned rider (if own delivery).
Dimension & Weight
Package measurements for courier charges & delivery planning.
Print Labels
Prints shipping labels for dispatched packages.
Filters Section
- Date Filter (From/To) – View dispatches by date
- Shipment No / Order No – Search by reference
- Customer – Filter dispatches by customer
- Tracking Number – Search by courier tracking ID
Top Buttons for GDN
Goods Issue
Creates a GDN, deducting stock and marking the order as dispatched.
Export All
Exports complete list of outbound shipments.
Export with Line Items
Exports product-level details for each dispatch.
Step-by-Step Process to Create a GDN (Goods Dispatched)
1. Open the Goods Dispatched Screen
Navigate to Inventory → Goods Dispatched, or open from Sales Order / Delivery Challan.

2. Enter Transportation Details
- Courier / Transporter
- Rider (Own delivery)
- Tracking Number / LR number
- Tracking URL
3. Verify Order & Dispatch Location
- Reference – Sales Order / Delivery Challan
- Dispatch Location – Warehouse / Branch
- Sub-location – Picking shelf / rack
4. Choose Item Entry Mode
- Scan Mode – Barcode scanning for fast picking
- Type Mode – Manual product selection
5. Review the Product List
Displays Product Name, SKU, Quantity Ordered, Units, Sub-location.
6. Enter Dispatched Quantities
Enter or confirm final quantities dispatched to the customer.
7. Assign Units & Sub-Locations
Supports accurate picking & packing.
8. Add Packages
Enter package dimensions and weight for shipping label accuracy.
9. Bulk Entry
Upload dispatch product list via Excel to speed up large order dispatch.
10. Review & Confirm
Check courier details, quantities, and package list.
11. Save the GDN
- Updates stock outward in real-time
- GDN status changes to Dispatched
- Delivery logs recorded in History
Need Help with GDN / Dispatch Workflow?
Get assistance with configuring Goods Dispatched Notes, courier setup, outbound shipment workflow, and dispatch process in O2Vend ERP.
Visit O2Vend Support →Goods Issue Tabs Overview
General
Main dispatch screen for courier info, picking mode, and product list.
History
Logs:
- Created by
- Status changes
- Courier updates
Change Status
Used to update GDN lifecycle manually.
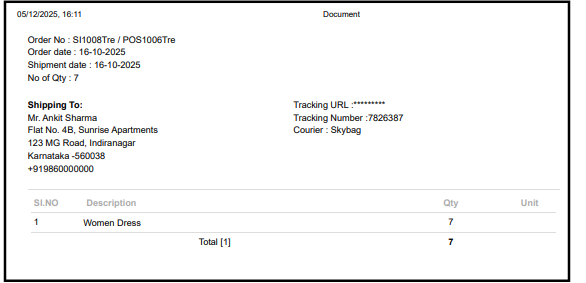
Documents
Store attachments:
- Delivery challan
- Packing list
- Shipment labels
- Proof of delivery
Status List (Change Status Tab)
| Status | Meaning |
|---|---|
| Dispatched | Shipment sent out |
| OutForDelivery | Courier out for delivery |
| Delivered | Customer has received |
| Exception | Damage/issue occurred |
| AttemptFail | Delivery attempt failed |
| PickedUp | Return pickup completed |
| InProcess | Order being picked/packed |
| Packed | Packaging completed |
| ReadyToShip | Awaiting courier pickup |
General Tab
Reference
Select the internal reference number linked to the Sales Order, sales invoice, Shipment, or Delivery Challan.
Transport / Courier
Type or select the logistics provider responsible for delivering the shipment. Examples: Delhivery, Blue Dart, DTDC.
Rider
Search for a delivery rider or in-house delivery executive. Used when orders are delivered through your own delivery team.
LR Number / Tracking Number
Enter the transport LR number or courier tracking number for shipment tracking and verification.
Tracking URL
Paste the courier tracking page link to enable one-click shipment tracking from the system.
Branch / Location
Select the warehouse, branch, or store responsible for dispatching the order. This controls inventory deduction and routing.
Scan / Type Toggle
Choose how products are validated during dispatch.
- Scan Mode: Use barcode scanners for fast picking.
- Type Mode: Manually search for products using the search bar.
Product Table
| Field | Description |
|---|---|
| Product Name | Name of the product dispatched |
| Product SKU | Unique SKU for tracking and stock mapping |
| Quantity | Quantity ordered by the customer |
| Quantity to Ship | Final quantity dispatched; allows partial shipment |
| Units | Units of measure such as PCS, BOX, SET |
| Available Quantity | Real-time stock availability in the selected branch |
Top Action Buttons in Goods Dispatched (GDN)
Bulk Entry
Upload multiple dispatch items using an Excel sheet. This feature is ideal for bulk or wholesale order processing.
After clicking the Import button, the products listed in the Excel file will be added or updated in the GDN.
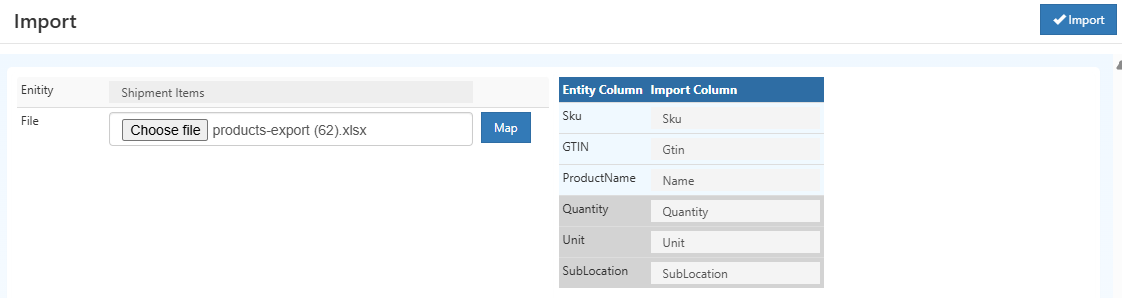
Supported Column Mapping
| Entity Column | Description |
|---|---|
| Sku | Product SKU |
| Gtin | Product barcode |
| Name | Product name |
| Quantity | Quantity dispatched |
| Unit | Unit of measure (PCS, BOX) |
| SubLocation | Rack/Shelf location |
Print Pickup List
Generate a printed picking list to support warehouse picking, packing, and verification processes.
Save
Save the Goods Issue and update stock, status, and dispatch logs.
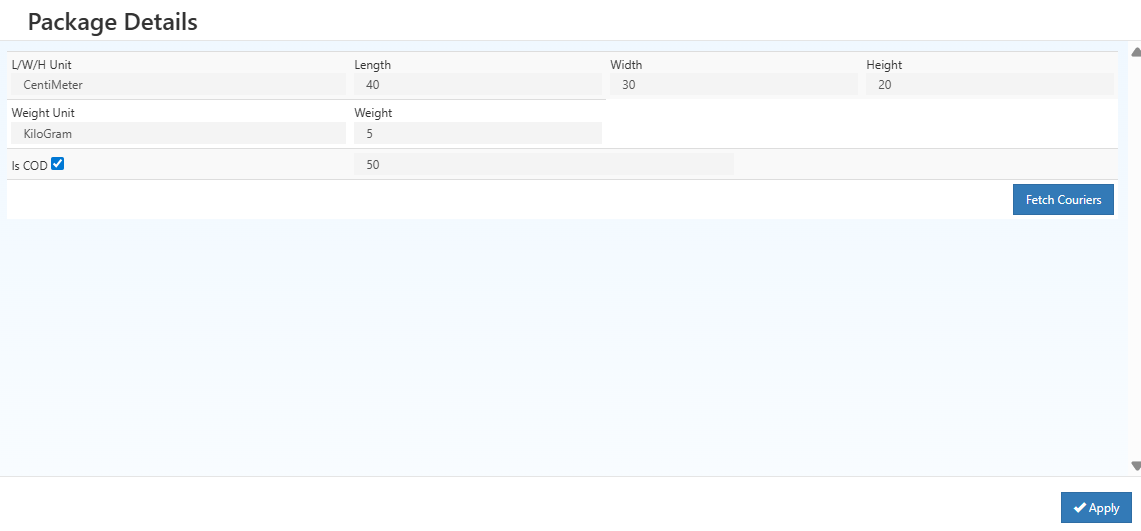
Add Package Panel
These details are used for courier selection and shipping label generation. Click Add Package to open the package details popup. Add shipment package details including dimensions, weight, COD option, and courier selection.
Package Management Steps for GDN
1. Open/Add Package
- Click Add Package to create a new shipment package.
- Each package can contain one or multiple products for dispatch.
2. Enter Package Details
- Choose package type (e.g., Box, Pallet)
- Enter dimensions (L/W/H) and weight
- Enable COD option if applicable
3. Add Products to Package
- Scan product barcodes or manually enter items
- Enter dispatched quantities
- Verify all items before approval
4. Save and Finalize
- Save the package details
- Confirm to update the GDN
- Packages are ready for shipping label generation and courier pickup
GDN Edit Page – Step-by-Step Guide
The GDN Edit page allows you to review, update, and finalize all details required before dispatching a shipment. Use this page to manage courier information, add package details, and generate shipping documents.
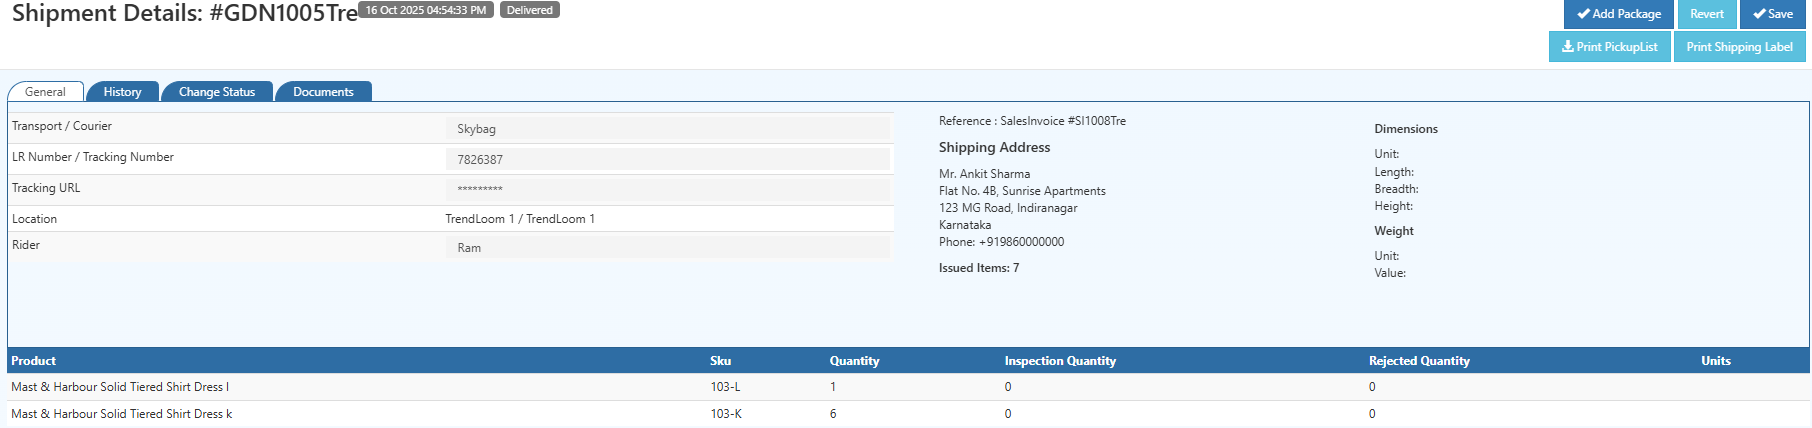
1. Check Courier & Shipment Info
Review the courier name, tracking number, rider, and dispatch location to ensure all shipment details are correct.
2. Verify Shipping Address
Confirm the customer's delivery address and contact details to avoid delivery issues.
3. Review Issued Items
Ensure the listed products, SKUs, and quantities match what needs to be dispatched.
4. Add Package Details
Use Add Package to enter package size, weight, and COD value.
These details are used for courier selection and shipping label accuracy.
5. Save Your Changes
Click Save to apply updates to courier details, package info, or address edits.
6. Print Required Documents
- Print Picklist for warehouse item picking
- Print Shipping Label for attaching to the parcel

7. Revert if Needed
Use Revert to discard any unsaved changes and return to the previous state.
Initiate GDN Button Activation – Location Routing Logic
In O2VEND, the availability of the Initiate Goods Issue buttons depends on the location’s outward routes.
Outward Route – Pick_PackAndDelivery
- Field:
Outward Route - Value:
Pick_PackAndDelivery✅
Effect:
- Activates the Initiate Goods Issue button when dispatching goods.
- Ensures that stock is picked, packed, and delivered properly before inventory is reduced.
Edit Location
If the buttons are not visible:
- Go to Back Office → Locations → Edit Location
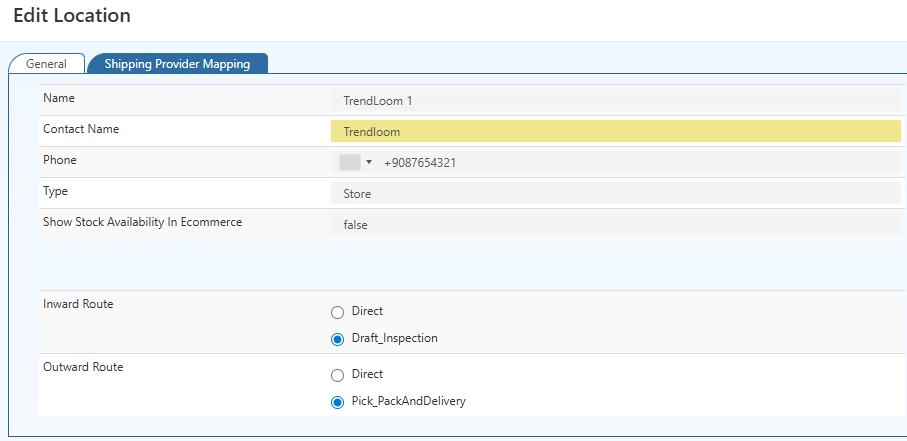
- Check and update Outward Route for GDN
- Save changes → Initiate Goods Issue Buttons should now appear
The availability of buttons is location-dependent.
Workflow Example – Pick_PackAndDelivery
- Configure location:
- Outward Route = Pick_PackAndDelivery
- Create GDN
- Select the Branch/location. Click Initiate Goods Issue (for GDN).
- Packages tab appears → approve/reject items.
- Save and finalize → Stock decreased only after proper dispatch.
GDN Packages Tab & Package Handling – O2VEND ERP
The Packages tab in GDN manages all outbound shipments at the package level, ensuring accurate dispatch, courier selection, and shipment tracking.
Packages Tab – Handling Goods Dispatched
Once a GDN is created, the Packages tab becomes the central area for managing all package-related operations.
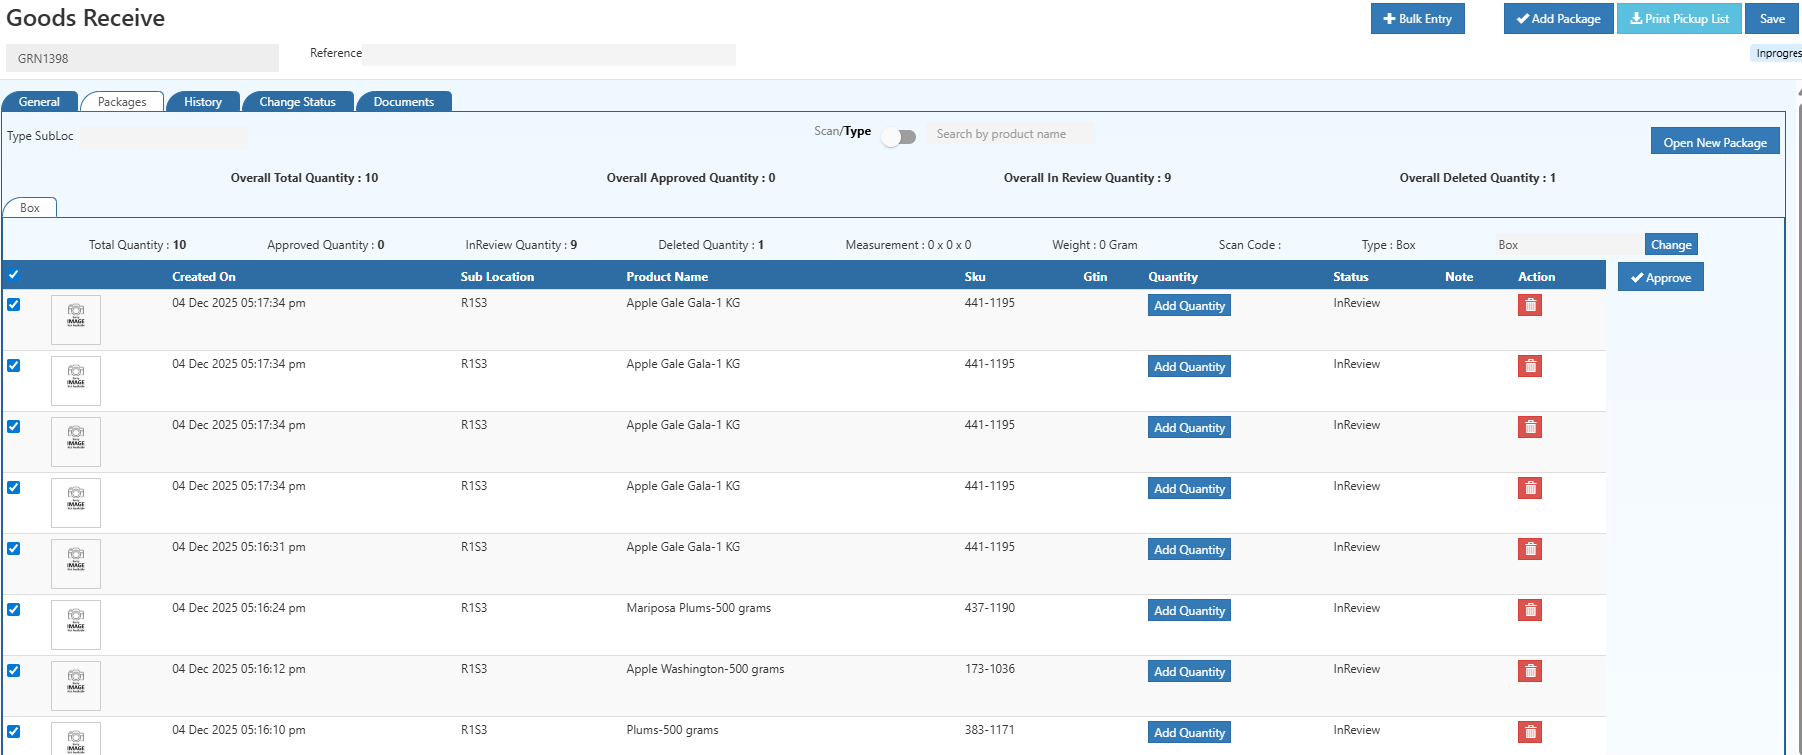
Packages Section – How It Works (Step-by-Step)
This section helps you add products, verify quantities, and approve items before finalizing the package.
🔹 Step 1: Select/Create a Package
Choose an existing package or click Initiate goods Issue to start adding items.
🔹 Step 2: Scan or Search Products
Use the Scan/Type toggle to:
- Scan barcode to add products instantly, or
- Type the product name/SKU to search and add.
🔹 Step 3: Review Product List
All added items appear in the list with details:
- Created On
- Sub Location
- Product Name
- SKU / GTIN
- Quantity Status
🔹 Step 4: Add Quantity
Click Add Quantity for each product to update the received quantity.
🔹 Step 5: Verify Each Item
Check:
- Correct product added
- Quantity
- Sub-location
- Status (InReview)
🔹 Step 6: Delete Wrong Items
Click the Delete icon if an item is incorrect or was added by mistake.
🔹 Step 7: Approve Items
After all quantities and details are correct:
- Select the items
- Click Approve
Approved items move out of InReview and become part of the final package.
Purpose
To ensure all scanned/added items are verified and approved in the correct order before completing the package.
Frequently Asked Questions (FAQ) – O2VEND GDN
1. What is a GDN in O2VEND ERP?
A GDN (Goods Dispatched Note) is an ERP record of all outbound shipments. It ensures accurate stock deduction, dispatch verification, and proper documentation for warehouse operations.
2. How is stock deducted when processing a GDN?
Stock is deducted only after performing Goods Issue, ensuring accurate real-time inventory updates and preventing errors in outbound stock.
3. Can I add multiple packages or bulk items in a GDN?
Yes. Use the Bulk Entry feature to upload multiple products via Excel, or add several packages with dimensions, weight, and courier details for accurate dispatch.
4. What happens if there is a delivery or dispatch issue?
You can update the status using Change Status or Revert. The system logs all actions, enabling audit, error correction, and shipment verification.
Refer Related Links – O2VEND ERP
- Goods Receive Note (GRN) Workflow – Manage incoming shipments, stock receipt, and inspection in O2VEND ERP.
- Print Barcode Label Guide – Step-by-step instructions for printing barcode labels and managing warehouse inventory.
- Manufacturing Voucher – Functional Workflow Guide – Learn how to handle production entries, tracking, and manufacturing processes in O2VEND.
- Stock Transfer Guide – Efficiently manage internal stock transfers, inventory updates, and warehouse routing.