O2VEND Documentation
  • Tutorials
Search Results for

    Show / Hide Table of Contents
    • Getting Started
    • O2VEND Store
      • My Stores
        • Create Store
      • My Account
        • My Profile
        • Manage Billing
        • Support Desk
    • Dashboard
      • Dashboard
    • Orders
      • Quotation
      • Request For Quotation
      • Sales Order
      • Work Order
      • Purchase Order
      • Subscription
      • ActiveCarts
    • Vouchers
      • Sales
        • Manage Sales
        • Create Sales Invoice
        • Cancel Sales Invoice
        • How to create GDN(Goods Delivered Note)
        • How to add lot for products in GDN
        • How to view sales details
      • Services
        • Services
      • Purchase
        • Manage purchase
        • Create Purchase Invoice
        • Cancel purchase Invoice
        • How to create GRN(Goods Received Note)
        • How to add lot for products in GRN
        • How to print a barcode label in purchase
        • How to view purchase details
      • Credit Note
      • Debit Note
      • Receipt
      • Payment
      • Journal
      • Contra
    • Inventory
      • Stock Quantity (Alt+I)
      • Stock History
      • Print Barcode Label
      • Delivery Challan
      • Receipt Challan
      • Stock Transfer
      • Manufacturing Voucher
      • Stock Take
      • Incoming Packages
      • Outgoing Packages
    • Catalog
      • Product
      • Brand
      • Categories
      • Option
      • Attributes
      • Attributes Categories
      • Attributes Templates
      • Price List
      • Bulk Product Price update
      • Bulk Product Updates
      • Sku Rules
      • Pricing Rules
    • Parties
      • Customers
      • Customer Groups
      • Supplier
      • Supplier Group
    • Inbox
      • SMS
      • E-Mail
      • Whatsapp
      • Configuration
    • Accounting Books
      • Ledgers
      • Chart of Accounts
      • Day Book
      • Cash Book
      • Sales Book
      • Purchase Book
      • Account Group Book
    • Reports
      • Order Reports
        • Web Orders Progress Report
        • Back Order Items Report
        • Purchase Order Pending Item Report
        • Sales Order Pending Item Summary
        • Sales Shipping Status Report
        • Sales Order Summary
        • Sales Order Progress Report
        • Purchase Order Progress Report
        • Sales Order with Product Line Item Report
        • Sales Order Packing Sheet Report
        • Back Order Report
        • Purchase Order Summary
        • Sales Order Shipment Report
        • Sales Order Shipping Address Report
      • Sales/Purchase Reports
        • Sales Invoice Report
        • Sales Invoice Summary
        • Sales Items Summary
        • Purchase Invoice Report
        • Purchase Invoice Summary
        • Purchase Items Summary
        • Receipt Report
        • Daily Settlement Report
        • Contribution Margin Report
        • Agent Sales Report
        • Agent Report
        • Employee Sales Report
        • Employee Report
      • Supplier Reports
        • Supplier Report
        • Supplier Purchase Report
        • Supplier Detail Report
      • Inventory Reports
        • Stock Summary
        • Stock Valuation Summary
        • Stock Ageing Report
        • Location Summary
        • Stock Movement Summary
        • Stock Ledger Report
        • Stock/Location Summary
        • Stock Movement And Valuation Summary
      • Products
        • Sold Product Categories
        • Product Category Summary
        • Product Sale Summary
        • Category Sale Summary
        • Brand Sale Summary
        • Reordering Stock Summary
        • Price Movement
        • Product Seasonal Demand
        • Product Stock Analysis Report
        • Stock Projection Report
      • Pos Reports
        • Cash Register Summary
        • Current Cash Registers
      • Account Reports
        • Day Book
        • Ledger
        • Cash Book
        • Sales Books
        • Purchase Books
        • Daily Sales and Payment Report
        • Balance Sheet
        • Profit and Loss Report
        • Trial Balance
      • Miscellaneous Reports
        • Output Detailed Tax Report
        • Output Tax Report Summary
        • Account Receivable Report
        • Account Payable Report
        • Gross Profit Report
        • Daily Tax Report
        • GSTR-1 Report
        • External API Logs
        • Benefit Usage
        • Offers Usage
        • Coupon Usage
        • Configuration Change History
        • VisitLog
    • Tools
      • Import
      • Export
    • OnlineStore
      • Themes
      • Theme Data
      • Shipping Methods
      • Payment Methods
      • Currency
      • Reviews
      • Zones
      • Delivery Zones
      • webstoreContentsSettings
        • Site Pages
        • Site Menus
          • Main Menu
          • Site Menus
        • Home Page Components
        • Page Header
        • Blog Categories
        • Blog
        • News Letter Subscription
        • menus
          • Main Menu
          • Site Menus
    • Analytics
      • Visitor Analytics
      • E-commerce Analytics
      • Product Analytics
      • Campaigns Analytics
    • Settings
      • Settings
      • Business Settings
        • Business Details
        • Tax Classes
        • Tax Rates
        • Operating Countries
        • Operating State or Province
        • Branches
        • Sales Channels
        • Return Rule
        • Backoffice Print Detail
        • Download Template
      • Point Of Sale
        • Quick Add Buttons
        • Print Settings
        • Payment Methods
        • Delivery Settings
        • Language
      • Agent App
        • Agent App Print Details
      • Inventory
        • Unit Of Measure
        • Location
        • Unit Of Measure Conversions
        • Stock Levels
        • Sub Location
        • Print Barcode Label Settings
        • Package Material
      • userSettings
        • vendors
        • User Date Setup
        • Employees
          • Set Up Employee Roles
          • Ecommerce
          • Point Of Sale
          • Back Office
          • Sales App
        • Vendors Commission
        • Credit Rules
        • Automatic User Code
      • Loyalty and Promotions
        • Reward Points
        • Coupons
        • Gift Vouchers
        • Offers and Discounts
        • Benefits
        • Affiliate
        • Coupon Print Setting
      • Account
        • Financial Year
        • Voucher Numbering
        • Sales Account Map
        • Voucher Numbering Rules
    • Features
      • General
      • POS
      • Webstore
      • Integration
    • Integration
      • General
      • Phonepe
      • Paytm
      • Stripe
      • Cashfree
      • Paypal
      • Razorpay
      • Shiprocket
      • Shipway
      • Amazon Shipping
      • O2VEND Webhook
      • Sendgrid
      • MSG91
      • Amazon SES
      • reCAPTCHA
      • E-invoice
      • Shopify
      • Facebook Catalog
      • Whatsapp
      • Typesense
    • Profile
      • My Profile
    • Manage Physical Stores
      • Login
      • Sales Bill
        • Manage sales orders
        • How to add products to a customer's shopping cart
        • How to apply discounts/coupons
        • How to search products in Sales Screen
        • How to add products quickly to the Cart
        • How to add serial and lot number
        • How to Print sales bills in POS
      • Receive Payments (Receipts)
      • Delivery
      • Invoice Receipts
      • Manage Cash Register
      • Reprint
      • Dashboard
      • POS Offline
      • Stock Transfer
    • O2VEND App
      • Install O2VEND App
      • Home
      • Customers
      • Orders
      • Products
      • Receipts
      • Stock Movement
    • Webhooks
      • Webhook
      • Examples of JSON format data via webhook
      • Testing webhook

    Shiprocket Integration in O2VEND

    Integrating Shiprocket to O2VEND is a great way to streamline shipping and order fulfillment. Shiprocket's robust features and easy integration enhance the efficiency of handling orders, shipping, and tracking on O2VEND.

    Easily integrate Shiprocket by following these straightforward steps:

    STEP-1: Click Here to Registration

    Shiprocket Integration in O2VEND

    STEP-2: Sign up by entering your email, password, and phone number. Once done, click the "Submit" button.

    STEP-3: Complete KYC Process.

    STEP-4: Access Side Menu.

    STEP-5: Select Setup & Manage.

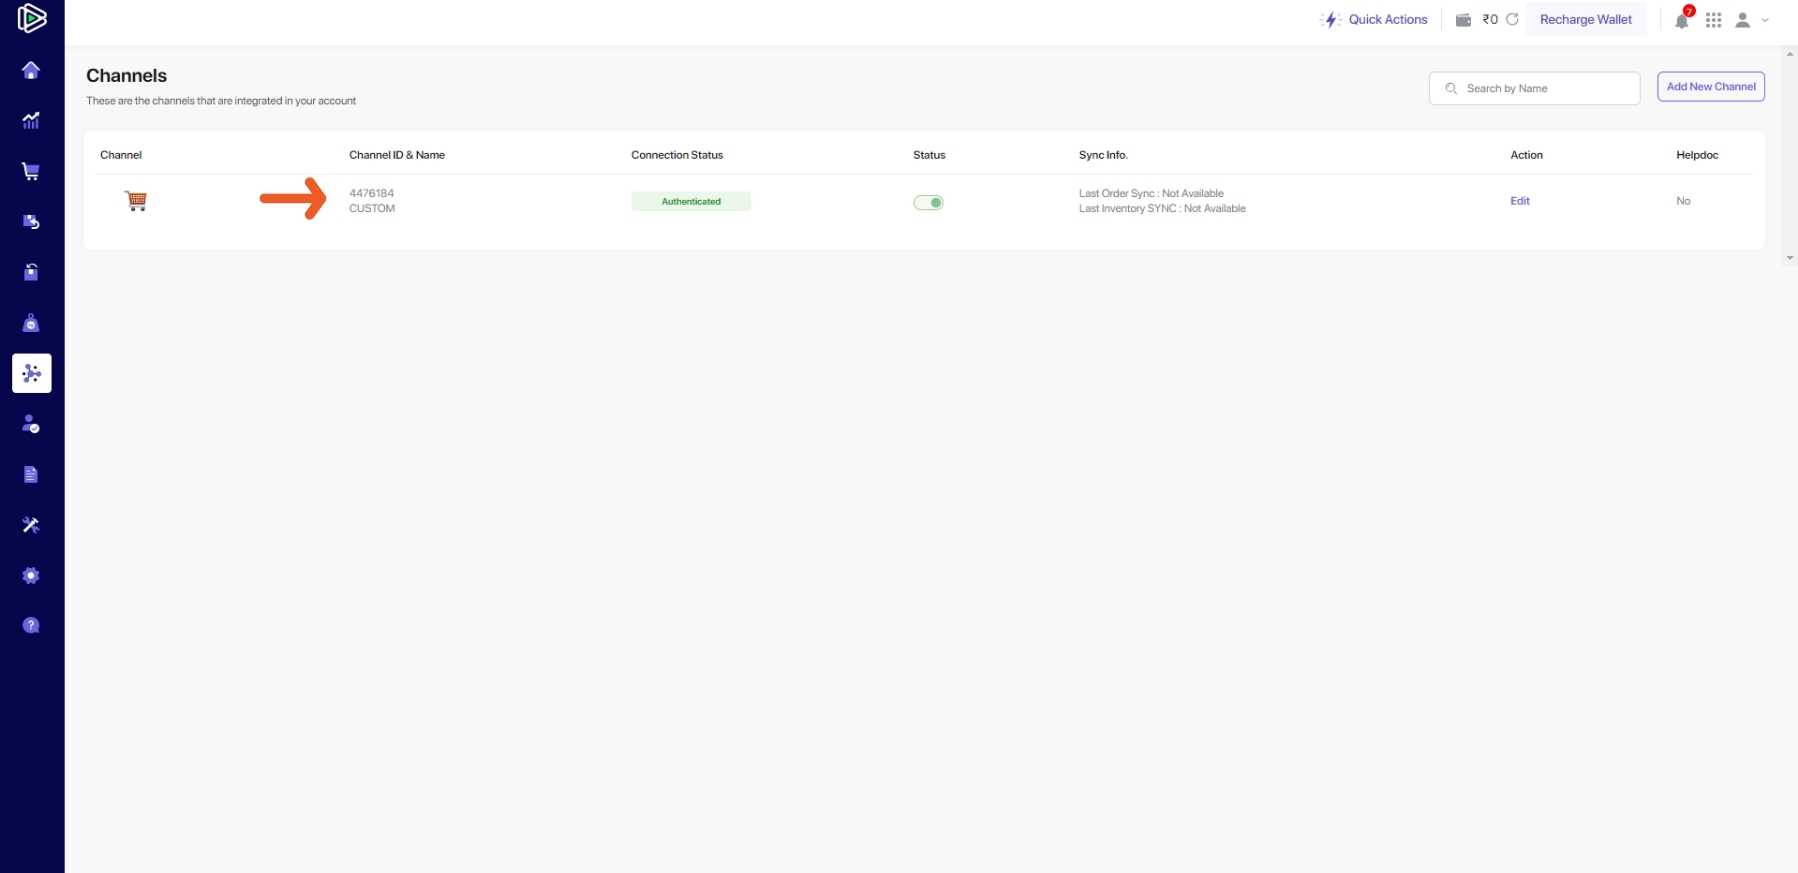
    STEP-6: Click the Channel Button.

    STEP-7: In the channel settings, locate your unique Channel ID. Keep it for your records or any needed configurations.

    Shiprocket Integration in O2VEND

    STEP-8: Navigate to the side menu bar and locate the settings option.

    STEP-9: In Settings, Select the API section and continue with the setup.

    STEP-10: Initiate the creation of an API user by clicking the designated button.

    Shiprocket Integration in O2VEND

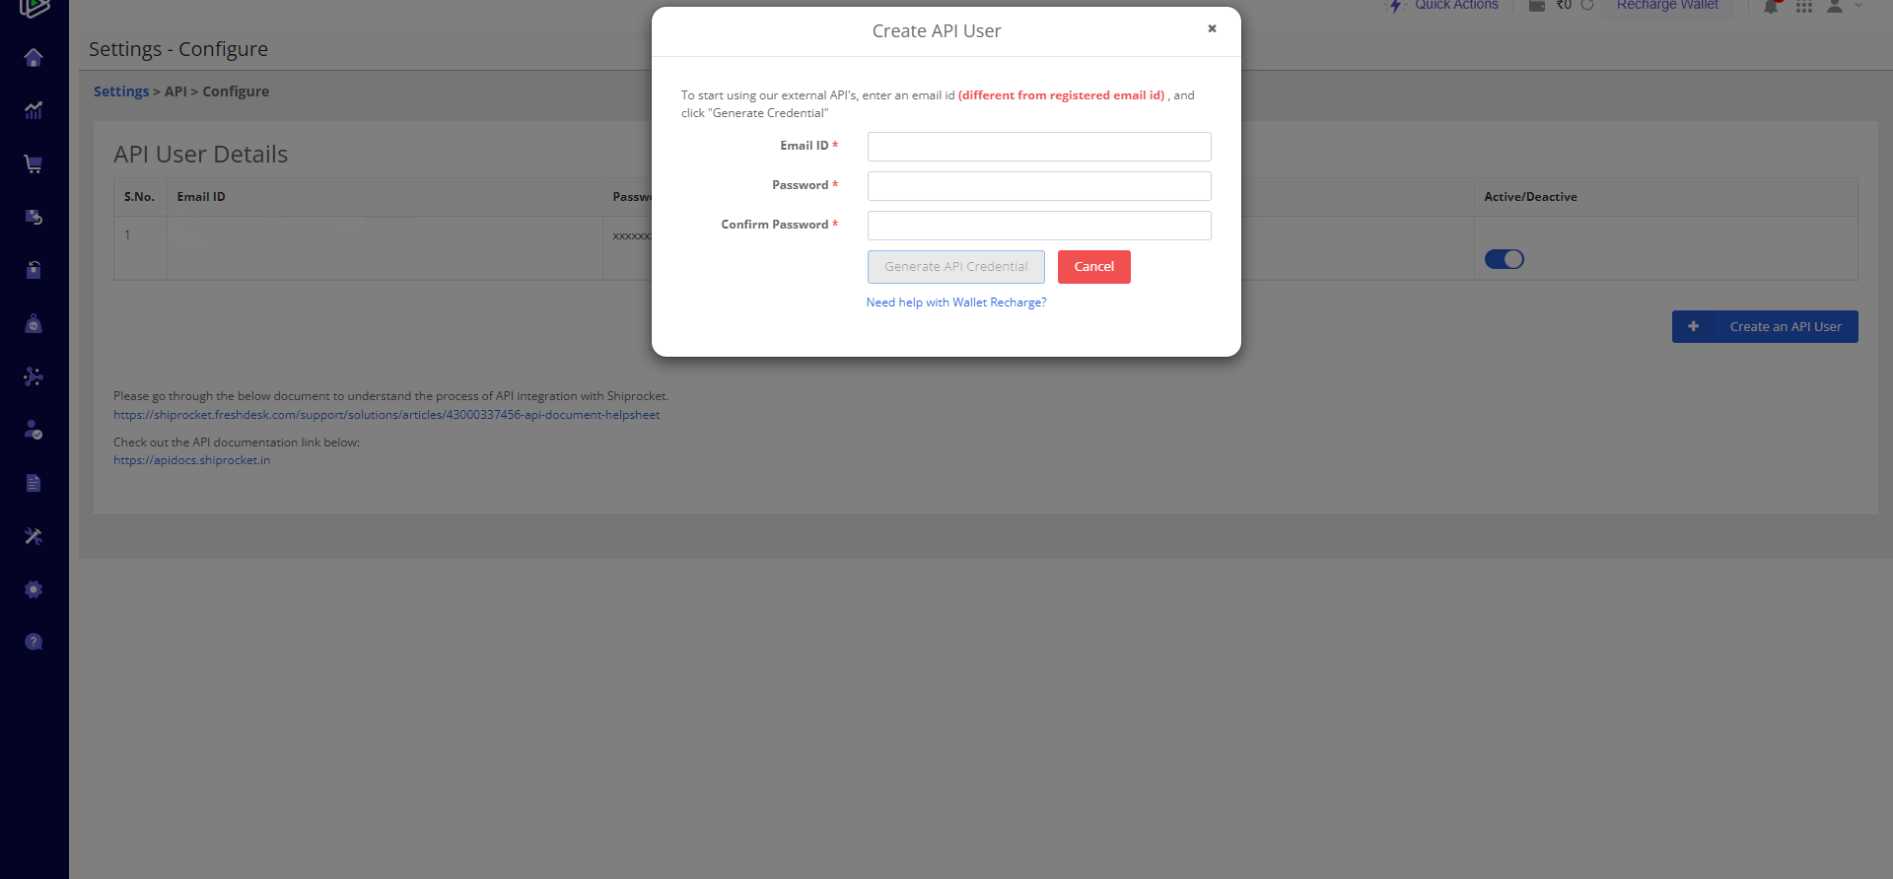
    STEP-11: Modify the information in the create API user box, ensuring the email-id entered differs from the registered email-id.

    STEP-12: Trigger the generation of API credentials by selecting the Generate API Credential option.

    STEP-13: Copy both email and password after the generation process is complete.

    Shiprocket Integration in O2VEND

    STEP-14: Go to the Shiprocket page, click the settings button

    STEP-15: Click the icon below to see your Manage pickup address.

    STEP-16: Access the Edit pickup address box by selecting the appropriate option.

    STEP-17: If you need to update your pickup address, Simply make the desired edits and save the changes.

    STEP-18: Access the O2VEND Back Office, log in, and click the settings button.

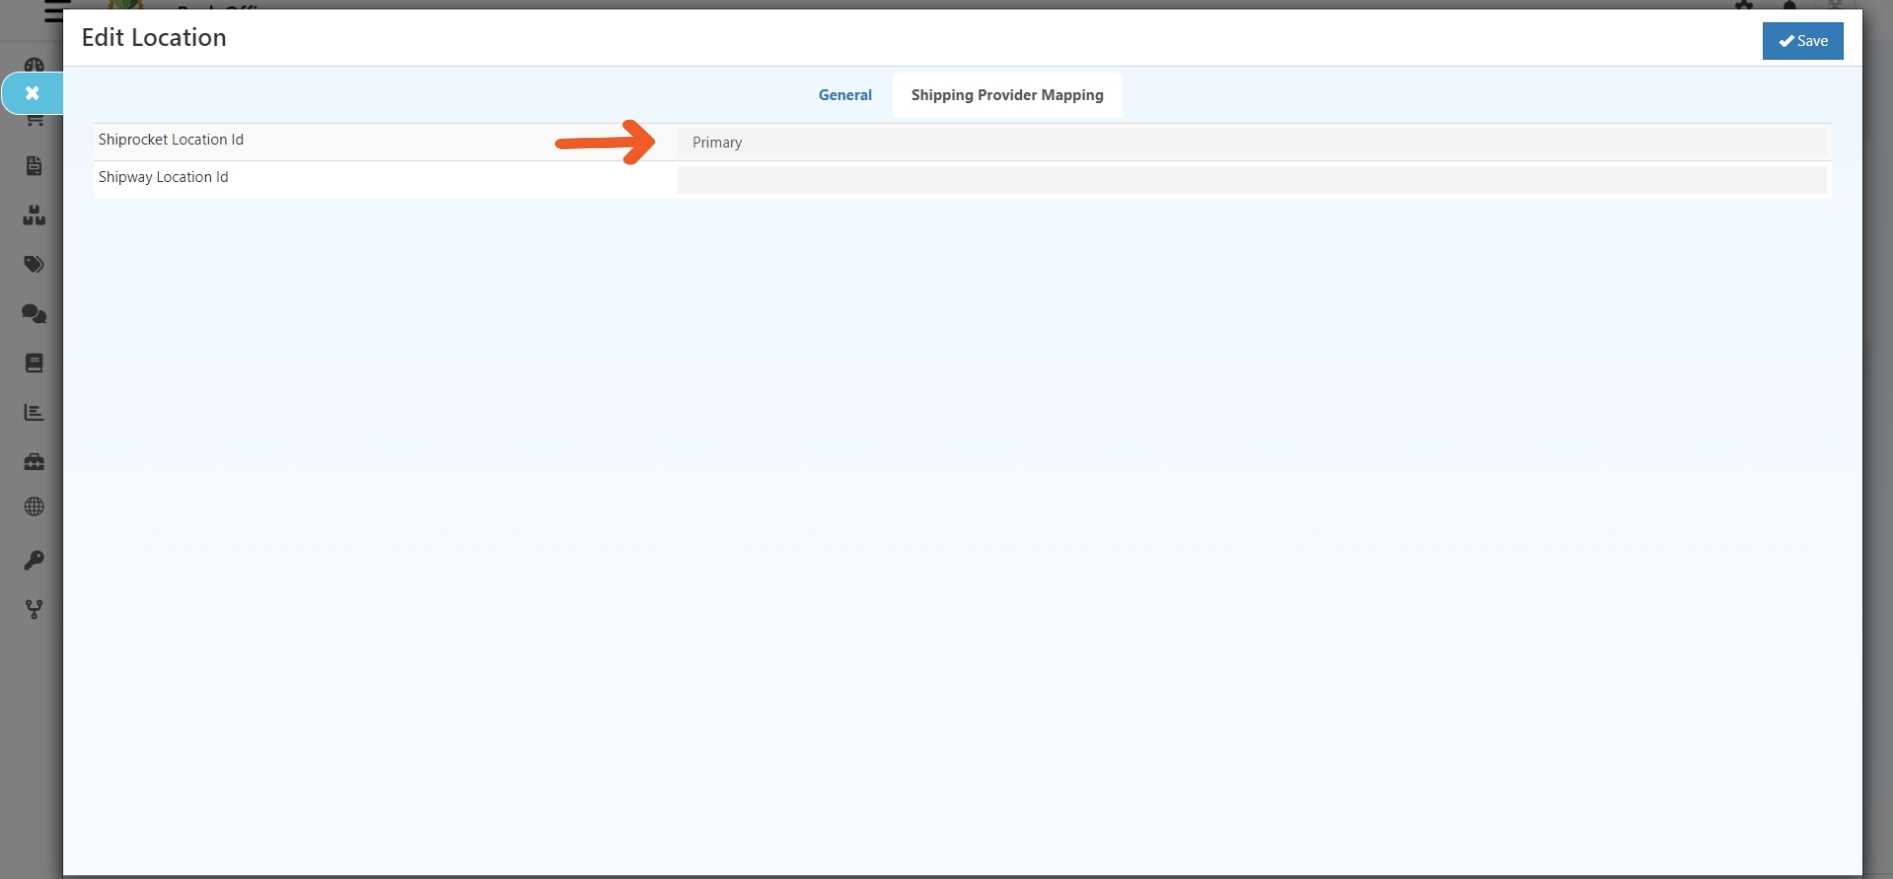
    STEP-19: Click the Inventory section and locate the desired location for editing.

    STEP-20: Edit the selected location, then proceed to the shipping provider mapping within the edit location menu.

    STEP-21: Paste the Shiprocket location ID copied before and save.

    Shiprocket Integration in O2VEND

    O2VEND Integration: Connecting with Shiprocket in Easy Steps

    STEP-1: Log in to the O2VEND Backoffice

    STEP-2: Proceed to the integration option in the side menu.

    Shiprocket Integration in O2VEND

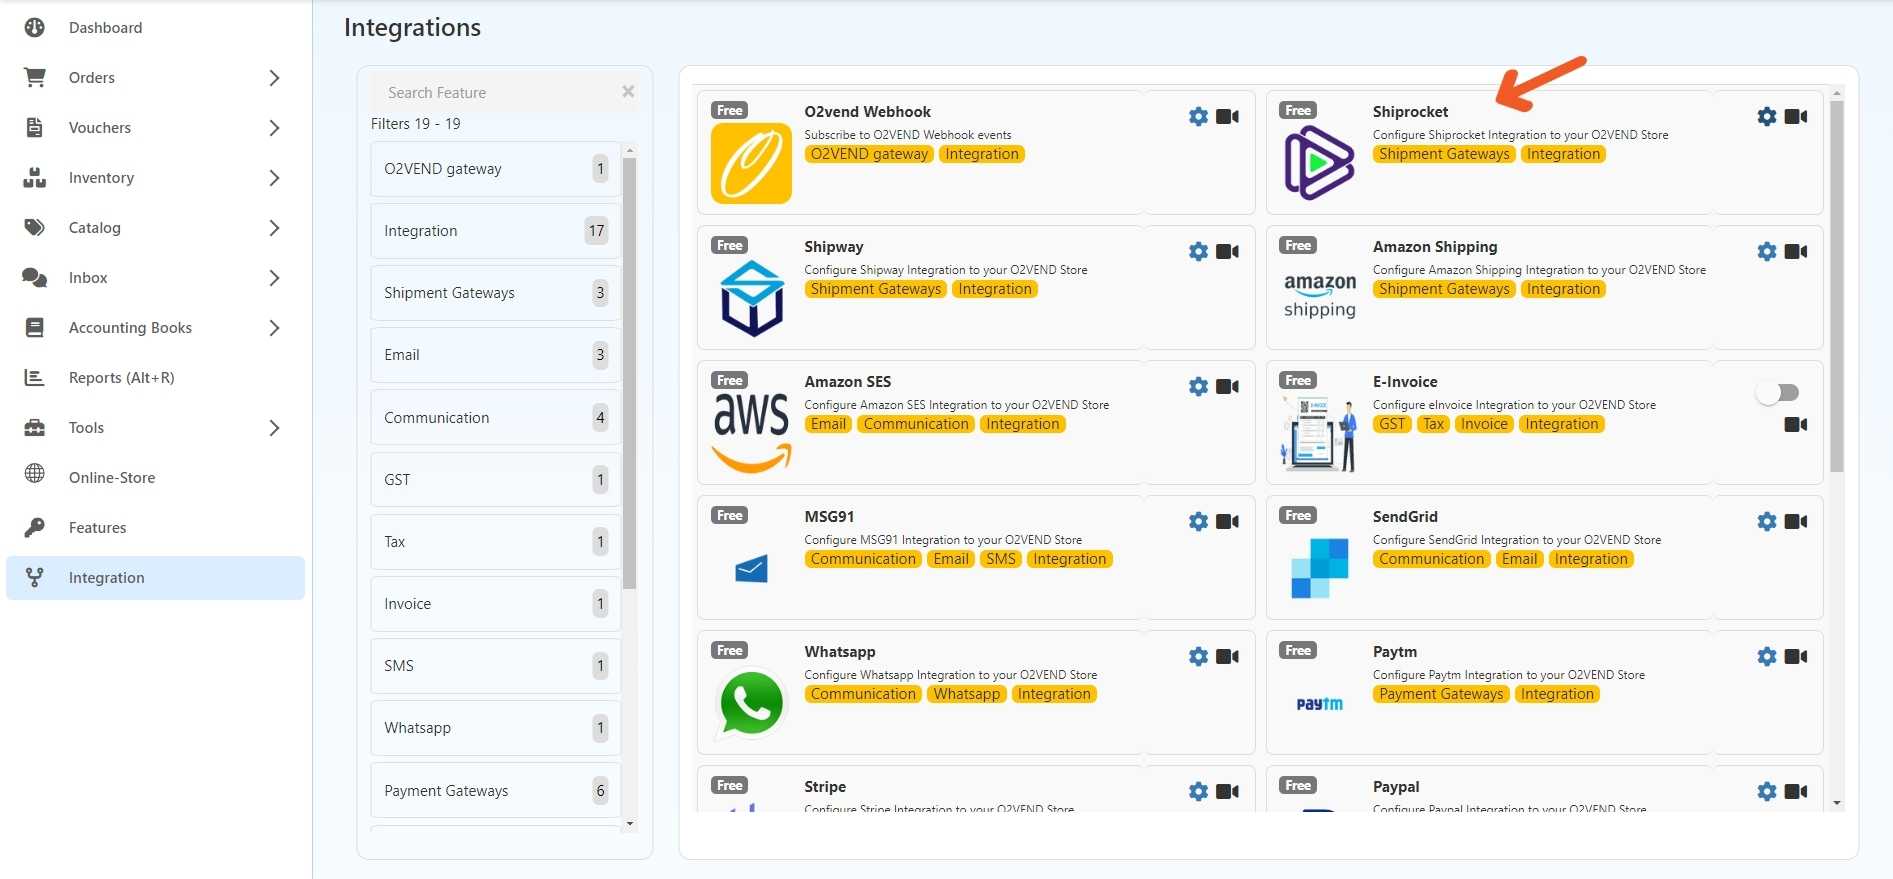
    STEP-3: Click the Shiprocket settings button to configure the integration with your O2VEND store.

    STEP-4: Enter your User email ID and password (copied from "Generate API Credential"), Along with the channel ID.

    STEP-5: Set the default pickup PIN code and choose the desired attributes.

    STEP-6: Always keep the Is enabled button. Set to true to determine if the couriers will shown on the goods issue page.

    STEP-7: Clicking the Shiprocket Shipping Rate column shows that Shiprocket is now active.

    Shiprocket Integration in O2VEND

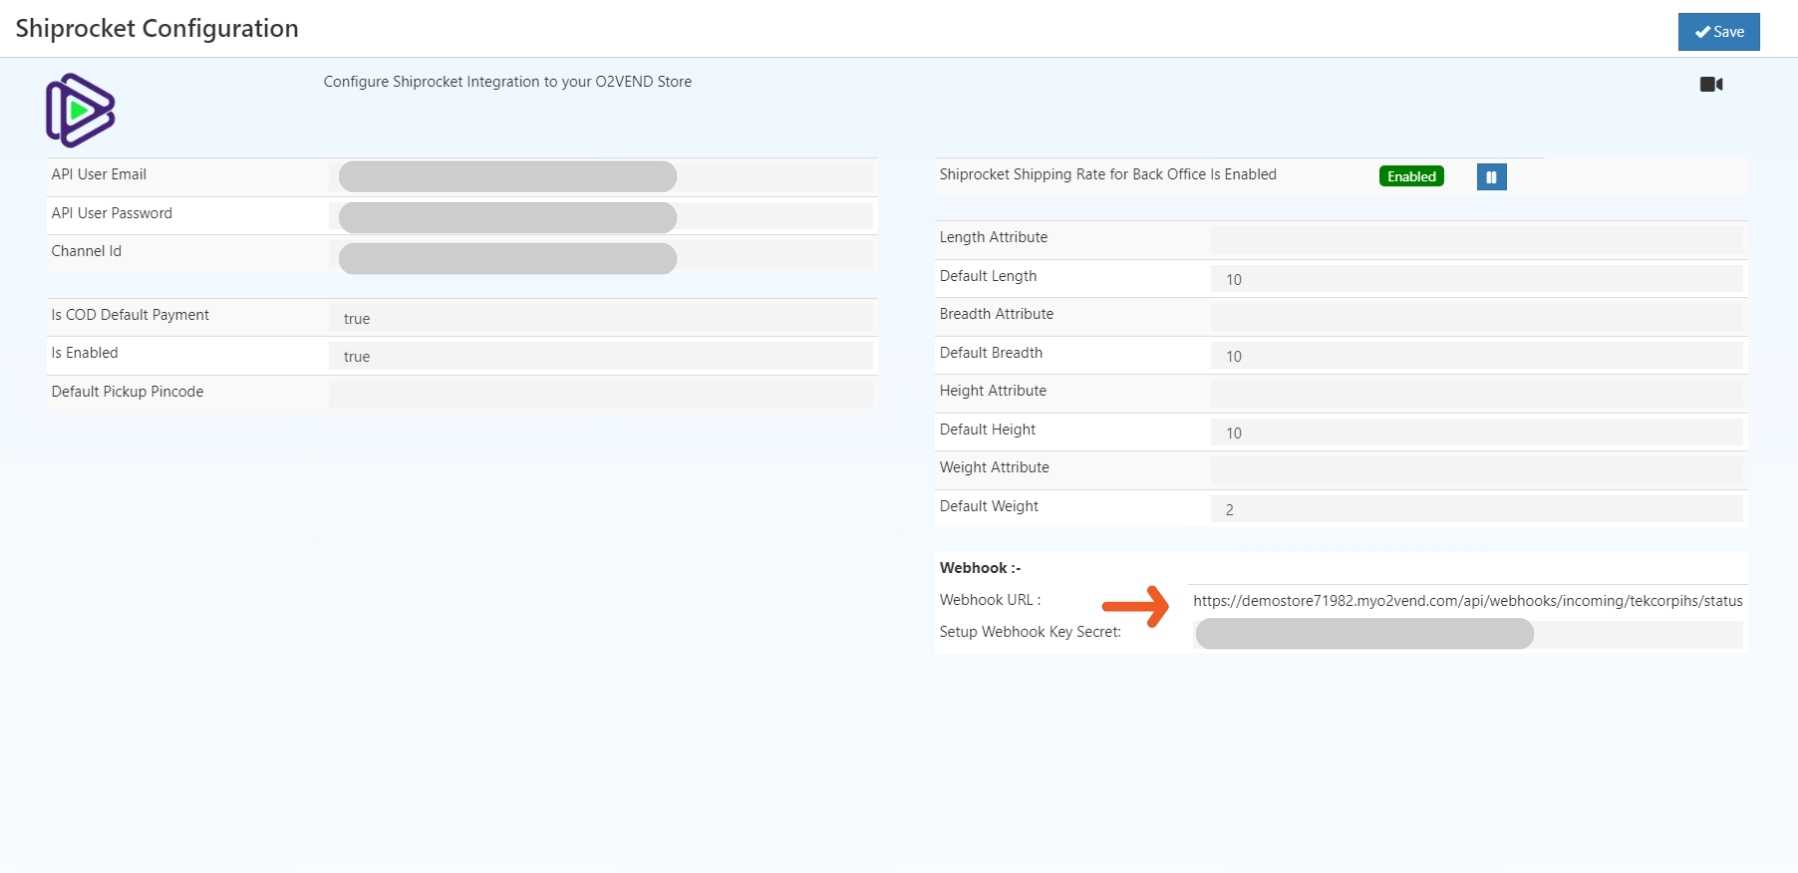
    STEP-8: To update your shipping status, copy the webhook URL and set up the Webhook Key Secret in the Shiprocket configuration box within the O2VEND Backoffice.

    STEP-9: Navigate to the Shiprocket side menu bar, then choose the settings option.

    STEP-10: In the API section, go to webhooks settings and turn on the webhook feature.

    STEP-11: Paste webhook URL and Key Secret keys into their respective boxes.

    Shiprocket Integration in O2VEND

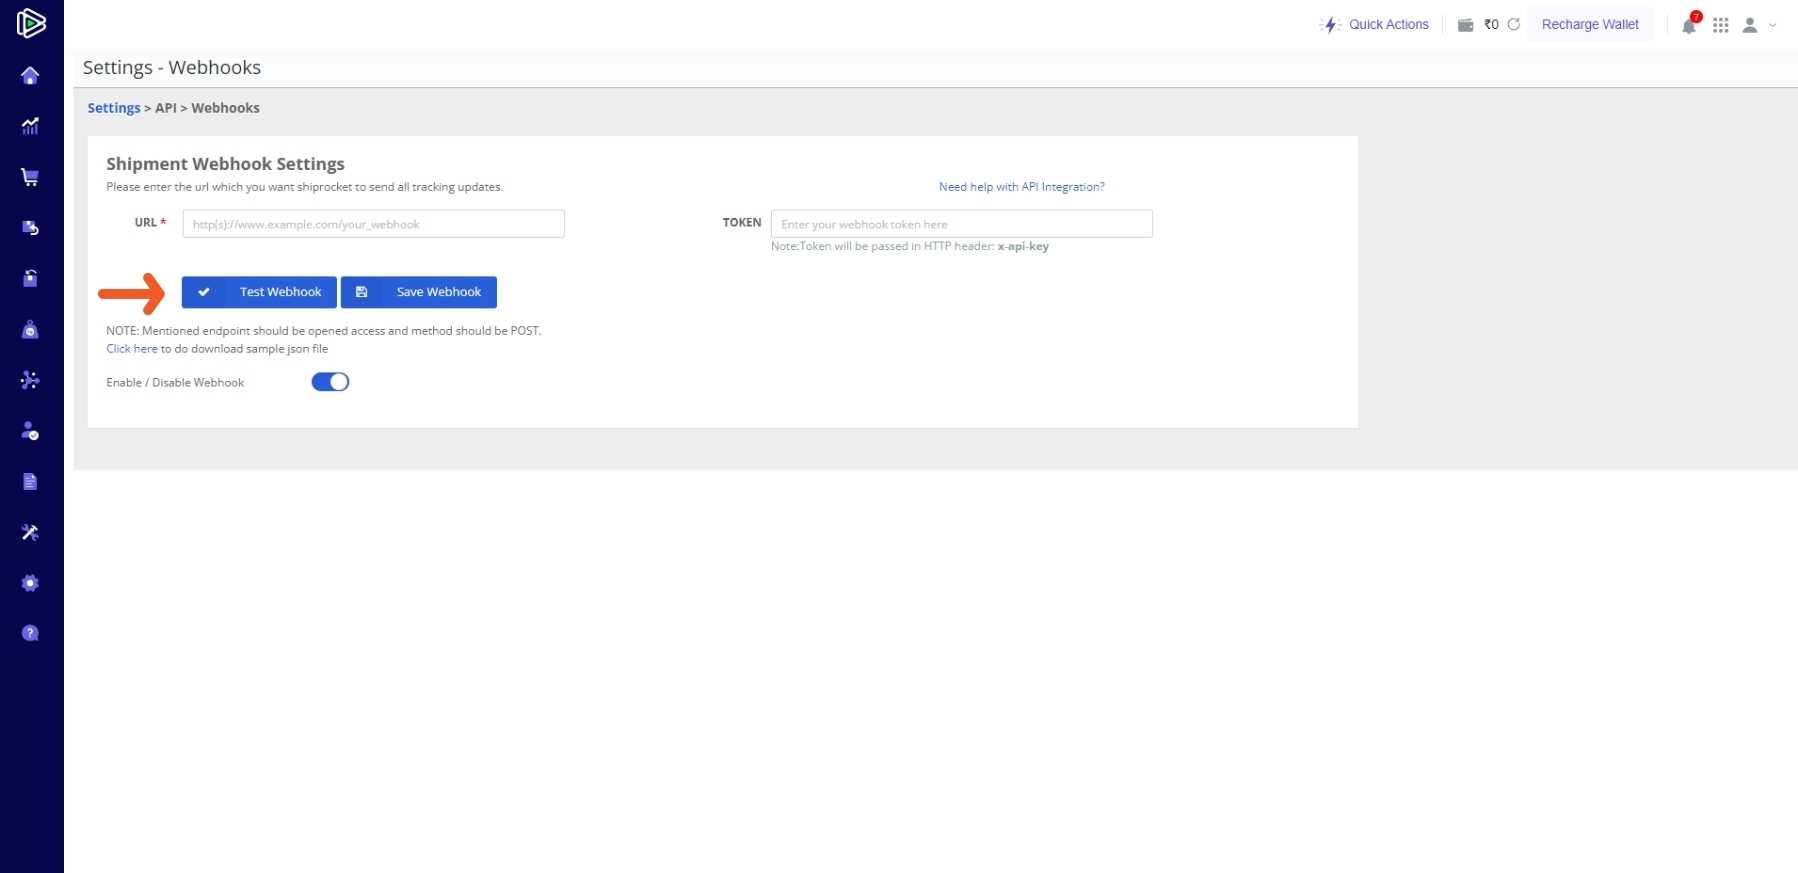
    STEP- 12: Choose the Test Webhook option and save the webhook.

    STEP-13: The endpoint has been saved.

    Here's a step-by-step guide on how to process your orders

    STEP-1: Log in to the O2VEND Back Office using your credentials.

    STEP-2: On the side menu, choose the Order Option.

    STEP-3: Within the Orders section, locate and open the Sales Order area.

    STEP-4: Start creating a new sales order and make sure all the details are correct.

    STEP-5: From the generated orders, access the Issue Goods option and input relevant details.

    Shiprocket Integration in O2VEND

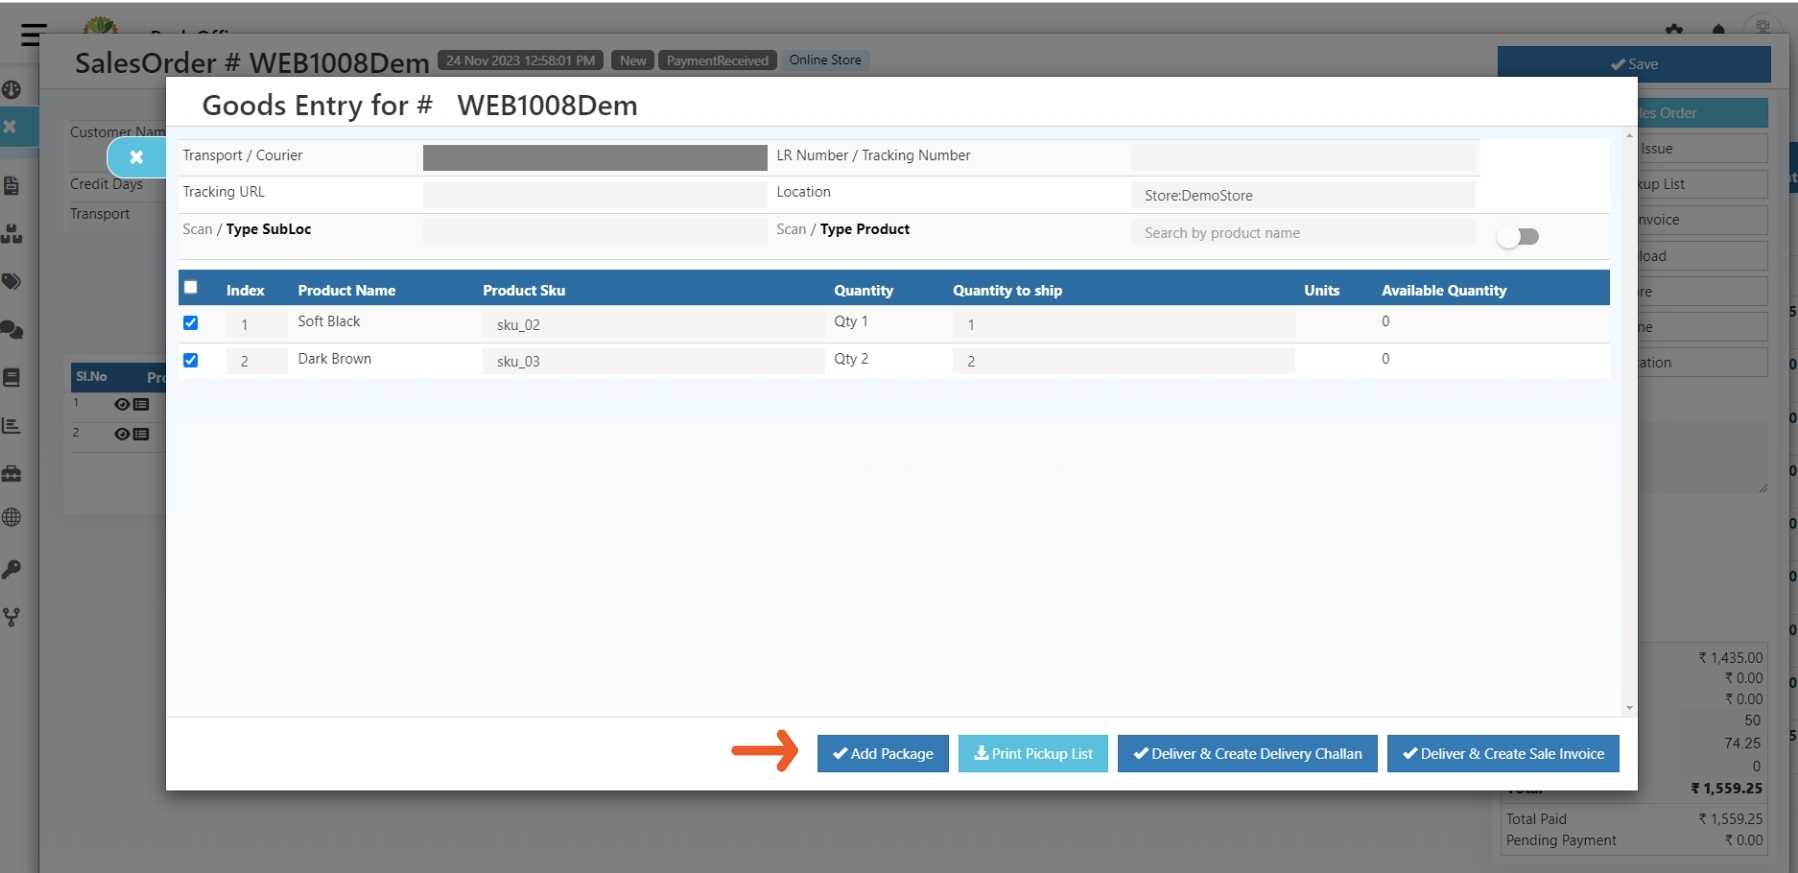
    STEP-6: Select the item from the orders list and Click Add Package.

    Step-7: click the Fetch Courier.

    Shiprocket Integration in O2VEND

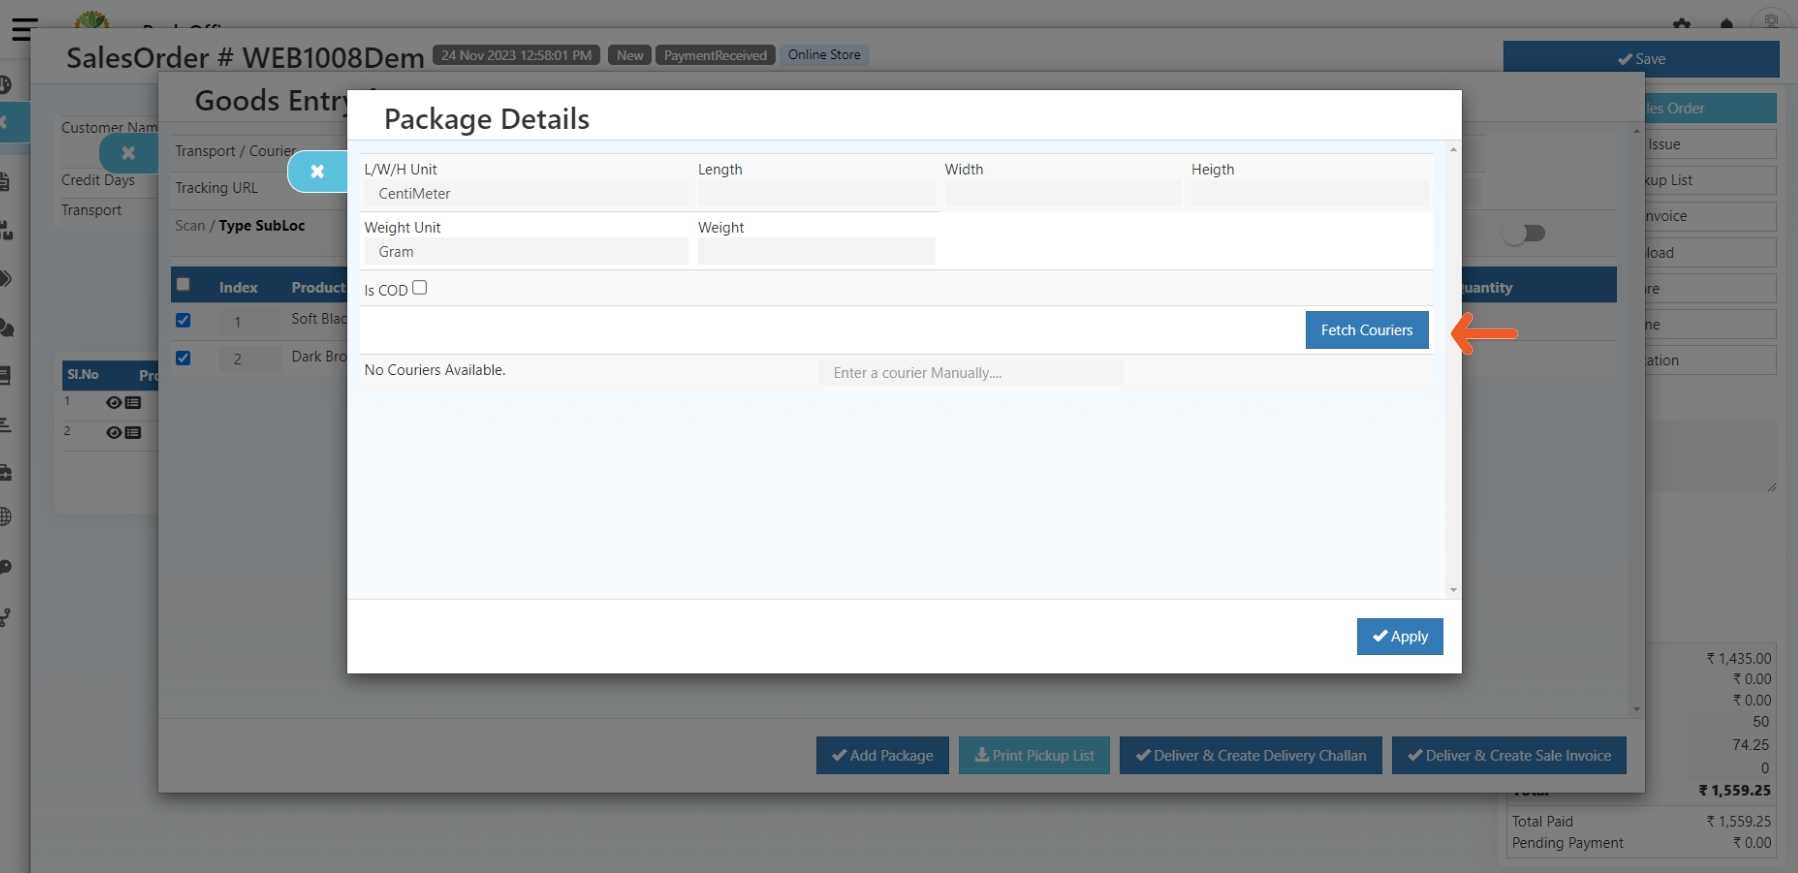
    STEP-7: Provide the required package details and get the courier to complete the order smoothly.

    Important

    First, recharge your wallet; it's essential before placing any courier orders. If you don't add money to your Shiprocket wallet, Your order won't be created on the Shiprocket order page.

    • Edit this page
    In this article
    © 2019–2025 Jeyan Technologies Private Limited • www.o2vend.com • Create your own store