• Tutorials

    Show / Hide Table of Contents
    • Getting Started
    • O2VEND Store
      • My Stores
        • Create Store
      • My Account
        • My Profile
        • Manage Billing
        • Support Desk
    • Store Setup
      • Initial Store Setup
    • Dashboard
      • Dashboard
    • Orders
      • Quotation
      • Sales Order
      • Purchase Order
      • ActiveCarts
    • Vouchers
      • Sales
        • Manage Sales
        • Create Sales Invoice
        • Cancel Sales Invoice
        • How to create GDN(Goods Delivered Note)
        • How to add lot for products in GDN
        • How to view sales details
      • Purchase
        • Manage purchase
        • Create Purchase Invoice
        • Cancel purchase Invoice
        • How to create GRN(Goods Received Note)
        • How to add lot for products in GRN
        • How to print a barcode label in purchase
        • How to view purchase details
      • Credit Notes
      • Debit Notes
      • Receipt
      • Payment
      • Journal
      • Contra
    • Inventory
      • Manage Stocks
      • Stock History
      • Print Barcode Label
      • Delivery Challan
      • Receipt Challan
      • Goods Entries
      • Stock Transfer
      • Stock Take
    • Catalog
      • Set Up Products
        • General
        • Variations
        • Attributes
        • Stock Levels
        • Pricing
        • SEO
      • Product Categories
      • Product Brand
      • Product Option
      • Attributes
      • Attributes Group
      • Product Templates
      • Price List
      • Bulk Product Price update
      • Bulk Product Updates
    • Communication
      • Communication
    • Accounting Master
      • Master
    • Reports
      • Order Reports
        • Sales Order Summary
        • Purchase Order Summary
        • Sales Order Shipment Report
        • Sales Order Pending Item Report
        • Purchase Order Pending Item Report
        • Sales Order Pending Item Summary
      • Inventory Reports
        • Stock Summary
        • Location Summary
        • Stock/Location Summary
        • Reordering Stock Summary
        • Stock Valuation Summary
      • Products
        • Sold Product Categories
        • Category Product Return
        • Product Sale Summary
        • Product Seasonal Demand
      • Pos Reports
        • Cash Register Summary
        • Current Cash Registers
      • Sales/Purchase Reports
        • Sales Report
        • Purchase Report
        • Sales Summary
        • Purchase Summary
        • Receipt Report
        • Sales Items Summary
        • Daily Settlement Report
      • Account Reports
        • Ledger
        • Cash Book
        • Day Book
        • Sales Books
        • Purchase Books
      • Miscellaneous Reports
        • Output Detailed Tax Report
        • Output Tax Report Summary
        • OutStanding Report
        • Gross Profit Report
        • GSTR-1 Report
      • Financial Reports
        • Balance Sheet
        • Profit And Loss Report
        • Trial Balance
    • Settings
      • Settings
      • Store Settings
        • Business Details
        • Tax Classes
        • Tax Rates
        • Operating Countries
        • Operating State or Province
        • Return Rule
      • Users
        • User Role Management
          • Set Up Employee Roles
          • Ecommerce
          • Point Of Sale
          • Back Office
          • Sales App
        • customers
        • Supplier
        • vendors
        • Customer Groups
        • User Date Setup
        • Credit Rules
      • Loyalty and Promotions
        • Reward Points
        • Coupons
        • Benefits
        • Affiliate
      • Point Of Sale
        • Quick Add Buttons
        • Print Settings
        • Payment Methods
        • Delivery Settings
      • Web Store
        • Themes
        • Theme Data
        • Shipping Methods
        • Payment Methods
        • Currency
        • Reviews
        • Review Replies
        • Zones
      • Web Store Content
        • Site Pages
        • Site Menus
          • Main Menu
          • Site Menus
        • Home Page Components
        • Page Header
        • News Categories
        • News
        • News Letter Subscription
      • Stock Settings
        • Unit Of Measure
        • Location
        • Delivery Zones
        • Unit Of Measure Conversions
        • Stock Levels
        • Branches
        • Sub Location
        • Print Barcode Label Settings
      • Account
        • Financial Year
        • Voucher Numbering
    • Features
      • General
      • POS
      • Webstore
      • Integration
    • Profile
      • My Profile
    • Manage Physical Stores
      • Login
      • Sales Bill
        • Manage sales orders
        • How to add products to a customer's shopping cart
        • How to apply discounts/coupons
        • How to search products in Sales Screen
        • How to add products quickly to the Cart
        • How to add serial and lot number
        • How to Print sales bills in POS
      • Receive Payments (Receipts)
      • Delivery
      • Invoice Receipts
      • Manage Cash Register
      • Reprint
      • Dashboard
      • POS Offline
      • Stock Transfer
    • O2VEND App
      • Install O2VEND App
      • Home
      • Customers
      • Orders
      • Products
      • Receipts
      • Stock Movement
    • Webhooks
      • Webhook
      • Examples of JSON format data via webhook
      • Testing webhook

    Page Header

    The O2VEND platform allows you to add custom CSS styles and JavaScript to the webpages of your ecommerce site by configuring the page headers feature. This can help you to further customize and enhance the appearance and functionality of your site.

    You can insert custom CSS styles by going to the page headers feature and then to the theme section, where you can find the option to add custom CSS styles. You can also make use of the page header section of the platform to add the CSS code. Once you have added the custom CSS styles, before publishing them ensure that they are correct and that they look the way you want them to.

    You can also insert custom JavaScript to the webpages of your site by using the custom code section or the footer section of the platform. This can help to enhance the functionality of your site by adding additional features or interactivity. You should be careful while adding custom Javascript as it can break the site if not implemented correctly. It's better to consult with a developer before adding any javascript.

    By configuring the page headers feature, you can add custom CSS styles and JavaScript to your ecommerce site, which can help to improve the appearance and functionality of your site. This can help to create a more visually appealing and user-friendly design and increase the overall experience for your customers.

    Example:

    Google Analytics is a popular web analytics service that can provide valuable insights into the traffic and behavior of your ecommerce site. To add Google Analytics to your site using O2VEND platform, you can use the custom code feature in the page headers section of the platform.

    Here's an example of how you can add the Google Analytics tracking code to your ecommerce site in O2VEND platform:

    Go to the page headers section in the O2VEND platform.

    Navigate to the custom code or footer section.

    Copy the tracking code provided by Google Analytics. This code will begin with .

    Paste the code in the custom code section or the footer section of O2VEND platform.

    Save the changes and publish the code to your site.

    Verify the installation of the code by logging in to your Google Analytics account.

    Once you've added the Google Analytics tracking code to your site, you'll be able to see detailed analytics data on the behavior of your visitors. This can help you to gain insights into how people are using your site, which can help you to improve the user experience and increase conversions. You can also set up different goals, conversion, and funnels in the GA to track the visitors activities, conversions and behavior.

    It's important to note that you need to have a Google Analytics account and a tracking code generated to be able to implement it to your website. Also, keep in mind to verify the installation after adding the code and make sure that it's working properly.

    For example, a customer selects some items, adds the item to their cart, confirms, and proceeds to the checkout, but then for some reason, the sale never actually happens. Web analytics makes it possible for store owner to dig through the exact data to figure out what happened and how to correct their sales process to help for avoid this in the future.

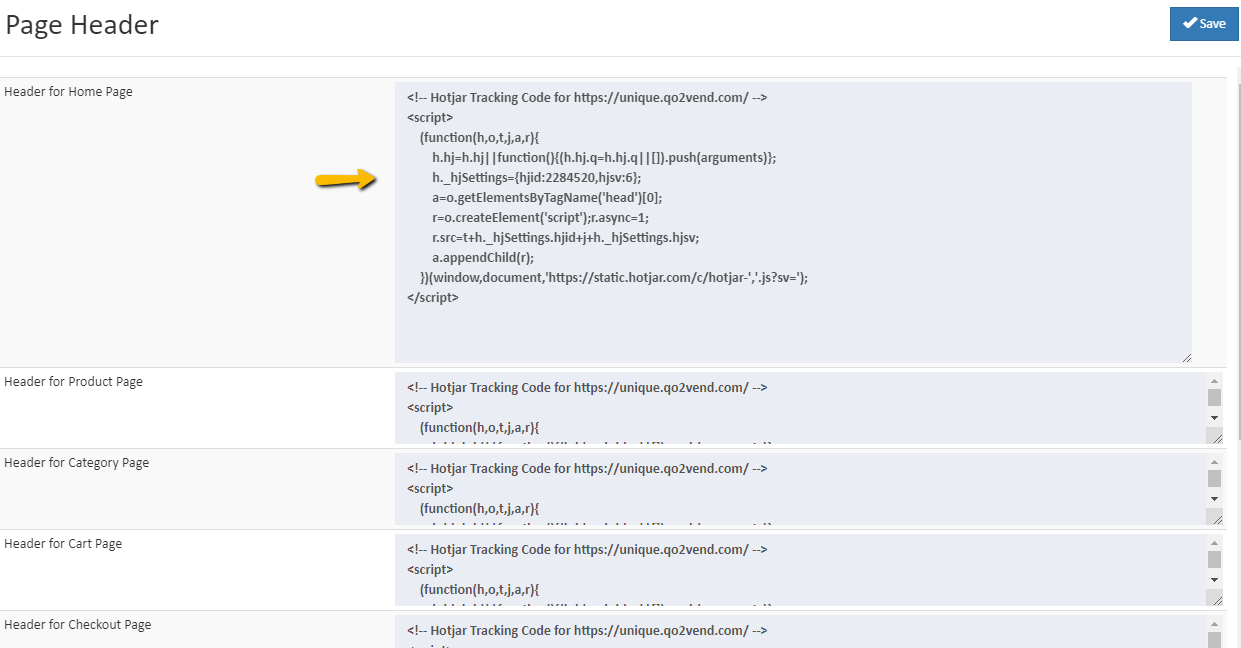
    How to add page header

    1. Open Back Office.
    2. Go to the Settings menu and see Page Header in the web store content.
    3. Click and open Page Header.
    4. Insert the analytics code in this section. For example Hotjar
    5. Our o2vend page header helps to insert a styles, google analytics, hotjar and html tag.
    6. When you want to track site search results or catagory as events then it provides deeper insights into which specific products or category people looking for in your store.
    • Improve this Doc
    Back to top Generated by DocFX