Set Up Products
The "setup products" section in O2VEND is a powerful tool that allows you to easily create and manage products for both online and physical stores. This section provides a user-friendly interface that makes it simple to add new products, update existing products, and manage all of your product information in one place.
When creating a new product, you can enter all of the relevant information, such as product name, description, price, and images. You can also assign the product to a specific category or collection, making it easy for customers to find the products they are looking for. Additionally, you can also add options for products such as size, color, and other variations.
In addition to creating new products, you can also update existing products by making changes to the product information, pricing, images, and other details. You can also add or remove products from specific categories or collections, making it easy to keep your product listings up-to-date.
The O2VEND platform also allows you to manage inventory for your products, you can set a specific number of products in stock, and track the inventory in real-time as orders are placed. This can help you avoid overselling or running out of stock.
General Sections
The "setup products" section in O2VEND provides a user-friendly interface that makes it simple to add all of the relevant information for a new product. Here's a general overview of the process for adding a new product:
Product Name: The first step is to add a product name. This is the name that will be displayed on your website and in your store's catalog.
SKU: The next step is to add a SKU (Stock Keeping Unit) which is a unique identifier for each product, this helps in keeping track of the inventory.
GTIN: You can also add a GTIN (Global Trade Item Number) which is a unique identifier for a product that is used by retailers and manufacturers.
Price: Next, you'll need to add the price of the product. You can also set the prices for different variations of the product, such as different sizes or colors.
Alt tag: You can also add an alt tag for images, this is a short description of the image, this is helpful for users who are visually impaired, as well as for search engine optimization.
Product Descriptions: Finally, you can add a product description. This is where you provide detailed information about the product, including its features, benefits, and any other important details.
Additional options: You can also add additional options, such as weight, dimensions, and other relevant information that may be necessary for shipping or inventory management.
Once all of the information has been added, you can then save the product and it will be ready to be displayed on your website. You can also edit or delete the product later if needed. The O2VEND platform allows you to manage all of your products in one place, making it easy to keep your product listings up-to-date and accurate.
Create Product
Create a new product along with its variations and all details.
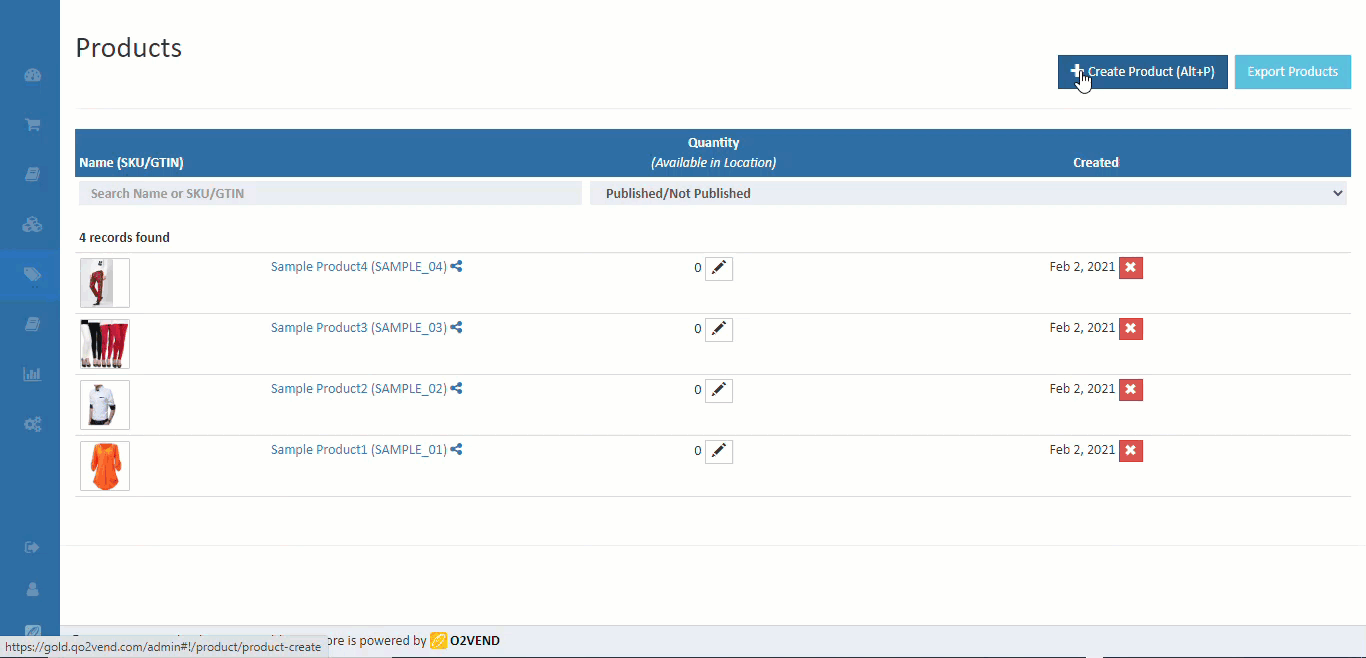
How to create a product
Follow the simple steps below to create a product.
- Open Back Office
- Go to Catalog Menu.
- Click and open Products section.
- To create a new product - click Create Product Button in the top right corner.
- Fill in all the needed information in the related tabs.
- Press Save button at the end of the page to save the product.
General
Product Name
When adding a new product to the "Create product" section in O2VEND, one of the first pieces of information you'll need to provide is the product name. The product name is a crucial piece of information as it will be displayed under the product image on your website and in your store's catalog. The product name is also used to create a "slug" name, which is a unique URL that is used to access the product page on your website.
When entering a product name, it's important to keep in mind that it should be clear, concise, and accurately describe the product. This will make it easy for customers to find the product they are looking for and understand what it is. Additionally, the product name will also be used as the title of the product page, so it should be optimized for search engines to improve the visibility of the product page on search engines.
It's also important to note that the product name will be used to create the "slug" name. The slug name is the unique URL that is used to access the product page on your website. It is created by taking the product name and converting it into a format that is suitable for use in a URL. This means that any spaces or special characters will be removed, and the name will be converted to lowercase.
SKU and GTIN
The option to enter a SKU (Stock Keeping Unit) and/or a GTIN (Global Trade Item Number) code for the product. These codes are used to uniquely identify the product and can be used for inventory management and tracking.
The SKU or GTIN code is also used to create a barcode for the product, which can be used in physical stores to scan and add the product to the billing cart. This can help streamline the checkout process and make it more efficient for customers. The Barcode Label for the product can be printed out and attached to the product for easy scanning.
It's important to note that the SKU and/or GTIN can be used across both online and physical stores, so you can use the same codes to track inventory and manage products no matter where they are sold. This can help you to have a better control over your inventory and make sure that you always have the right amount of products on hand.
Brand
The option to select the brand of the product. This can be helpful for customers as they can filter and browse products by brand, making it easier for them to find the products they are looking for.
To create a brand, you can navigate to the "Product Brand" section, here you can create a new brand by providing the brand name and logo. Once a brand is created, it will be available in the list of brands when adding or editing a product. This allows you to easily associate a product with a specific brand and helps in organizing the products on your website.
It's important to note that creating a brand is an optional step, if you don't have a specific brand for your products, you can leave it blank.
For creating Brands see Product Brand Section.
Category
The option to assign the product to one or more categories. This can help customers to easily find the products they are looking for by browsing through different categories.
A product can be mapped to multiple categories, this means that a single product can be assigned to multiple categories, this is useful if a product belongs to different types or subcategories. For example, a dress can be assigned to the categories of "Women's Clothing" and "Summer Collection" at the same time.
The O2VEND platform allows you to create and manage categories, you can create a new category by providing the category name and description, and also you can edit or delete existing categories if needed. This feature allows you to easily organize your products and make them easy to find for customers.
How to assign category
Select one or more categories the product belongs to. (see Categories for managing Categories)
Select Tax Class
The option to choose the appropriate tax class for the product. This is an important step as it affects how much tax is charged on the product and determines the final price that the customer will pay.
The tax class is a set of rules that determine the tax rate that will be applied to a product. Different tax classes can be created for different types of products or services, such as standard, reduced, or zero-rated. The tax rate for each class can be set in the system configuration, and it can be different for different regions or countries.
When choosing a tax class for a product, it's important to ensure that you select the appropriate class that matches the product's characteristics and tax regulations. This will ensure that the correct amount of tax is charged and that the final price for the customer is accurate.
For more details on how to create tax classes - see Tax Class and Tax Rate sections.
Units
The option to choose the unit of measure for the product. The unit of measure is the way that the product is quantified, and it can be used to display the product quantity in a standard and consistent way.
A unit of measure can be something like feet, meters, inches, each, or dozen. It's usually the unit that the item is sold in, and it helps customers understand the quantity of the product they are purchasing. For example, if a product is sold by the meter, the customer will know that they are buying a certain length of the product.
It's important to choose the appropriate unit of measure for the product, this can help customers understand the quantity of the product they are purchasing and also helps in inventory management.
Ordering Units
The option to choose the unit of measure for the product in the ordering units field. This field allows you to select the unit of measure that the product will be sold in, and it will be used to display the product quantity on your website and in your inventory management system.
The unit of measure can be something like feet, meters, inches, each, or dozen. It's usually the unit that the item is sold in, and it helps customers understand the quantity of the product they are purchasing. For example, if a product is sold by the meter, the customer will know that they are buying a certain length of the product.
It's important to choose the appropriate unit of measure for the product, this can help customers understand the quantity of the product they are purchasing and also helps in inventory management.
Call For Pricing
The option to enable the "Call for Pricing" feature for products that do not have a set price point. This feature is useful for products that require custom pricing or for which the price may vary depending on the customer's specific needs.
When "Call for Pricing" is enabled, the product card and the details page will display a "Call for Price" button instead of a price. This makes it clear to customers that they need to contact the store in order to receive a quote for the product. This can help increase customer engagement, as it gives customers the opportunity to speak with a representative and receive personalized pricing information.
Price
One of the important pieces of information you'll need to provide is the price of the product. The price is the amount that the customer will need to pay to purchase the product.
When entering the price, you can enter the price in the currency that you have set up in your store settings. You can also enter the price with or without tax, depending on your store settings. If the tax rate is set up in the system, the final price including the tax will be displayed to the customer.
You can also set different prices for different variations of the product, such as different sizes or colors. This can be useful if the price of a product varies depending on the specific variation that the customer chooses.
It's important to ensure that the price you enter is accurate and up-to-date. This will ensure that the customer is charged the correct amount for the product and that your store's accounting is accurate.
MRP
The option to enter the MRP (Maximum Retail Price) of the product. The MRP is the highest price at which a product can be sold and is determined by the manufacturer or distributor.
Entering the MRP of the product can be useful for a few reasons:
Some of the themes display a discount % based on the MRP of the product. This allows customers to see how much they are saving by purchasing the product at a lower price.
It can provide customers with a frame of reference for the product's value. If customers see that a product is being sold for less than its MRP, they may be more likely to purchase it.
It can also be helpful for inventory management, as it allows you to monitor the pricing of products and ensure that you are not selling them at a loss.
It's important to keep in mind that MRP is not always the same as the selling price and it's not always mandatory to enter the MRP, it depends on your business requirements.
Cost
The option to enter the cost of the item. The cost is the amount that the store pays to purchase the product from the supplier or manufacturer.
Entering the cost of the item can be useful for a few reasons:
It allows you to calculate the profit margin on each product, which can help you determine which products are the most profitable for your store.
It can also be used to set prices for your products, as you'll need to factor in the cost of the product when determining how much to charge customers.
It can also be helpful for inventory management, as you can use the cost information to monitor your expenses and ensure that you are not overspending on products.
It's important to keep in mind that the cost of the item is not always the same as the selling price, and it may change over time. It's important to keep the cost information up-to-date to ensure that your store's accounting is accurate.
Special Price
The option to enter a special price for the product. A special price is a discounted price that can be offered for a designated period of time. This can be used to promote products or to clear out inventory.
When a special price is entered, the special price will appear on the product page instead of the regular price during the specified time period. This can help to increase sales by making the product more appealing to customers.
You can specify the start and end dates for the special price, and also the special price will be automatically removed when the end date is reached. This ensures that the special price is only offered during the designated time period and prevents confusion for customers.
It's important to keep in mind that the special price should be lower than the regular price, this will help increase customer's interest in purchasing the product.
Special price Start date and End date
By setting the start and end dates for the special price promotion, you can ensure that the special price is only offered during the designated time period. This can help to create a sense of urgency for customers and encourage them to make a purchase before the special price expires.
It's important to keep in mind that the end date should be after the start date, and also make sure to set the end date in a reasonable time frame, this will help increase customer's interest in purchasing the product.
Featured
he option to enable the "Is featured" feature for the product. When this feature is enabled, the product becomes a featured product.
A featured product is a product that is highlighted and promoted on the website, usually on the homepage or in a special featured products section. This can help to increase visibility and sales for the product.
The "Is featured" feature can be used to promote new products, best-selling products, or products that are currently on sale. It can also be used to rotate the featured products periodically, this can help to keep the website fresh and dynamic.
Tip
Featured products are used in Featured Home Page Components.
A featured product can help to increase visibility and bring more attention from customers. When a product is marked as featured, it is usually displayed in a prominent location on the website, such as the homepage or in a special featured products section. This can help to increase visibility for the product and make it more likely for customers to notice it.
Published
The option to enable the "Is Published" feature for the product. When this feature is enabled, the product becomes active and visible to customers on the website.
When a product is not published, it is considered an inactive product and is considered as a draft. It will not be visible to customers on the website and will not be available for purchase. This can be useful when you are still working on adding or editing the product's details, and you are not ready to make it available to the customers.
Enabling the "Is Published" feature is the final step in making the product available for purchase on the website or on POS or any other channel. It's important to make sure that all the details of the product are correct and complete before publishing the product.
Lot Enabled
The option to enable the "Lot Enabled" feature for the product. When this feature is enabled, it allows the product to be assigned a lot number.
A lot number is an identification number assigned to a certain quantity or groups of products from a single manufacturer. It's used for traceability and inventory management purposes, allowing a store to track and identify specific groups of products. Lot numbers can also be used to track expiration dates and other important information.
When "Lot Enabled" is set to true, it allows you to add a lot number to the product. This can be useful for products that have expiration dates or that need to be tracked for other reasons.
It's important to note that Lot feature is usually used for products that have a short shelf life or that need to be tracked for quality control purposes, such as food products or pharmaceuticals.
Allowed To Order
The option to enable the "Is Allowed To Order" feature for the product. When this feature is enabled, it allows the product to be added to the cart and be purchased by the customer.
When "Is Allowed To Order" is set to true, it makes the "Add to Cart" button visible on the product page, allowing customers to add the product to their shopping cart and proceed to checkout. If this feature is not enabled, the "Add to Cart" button will not be visible, and customers will not be able to purchase the product.
This feature can be used to control the availability of products on the website. For example, if a product is out of stock, you can disable this feature to prevent customers from ordering the product until it's back in stock.
Allow negative stock
The option to enable or disable the "Allow negative stock" feature for the product. This feature controls how the inventory for the product is checked during the cart checkout process.
When "Allow negative stock" is disabled, the system checks the product's inventory during the cart checkout process. If there is no stock available for the product, the product will be shown as "Out of Stock" and customers will not be able to purchase it.
On the other hand, when "Allow negative stock" is enabled, the system does not check the product's inventory during the cart checkout process. This means that customers will be able to purchase the product even if there is no stock available.
This feature can be useful for businesses that sell products that are pre-ordered or backordered. It also can be useful for some businesses that don't want to limit the quantity of their products and they are willing to take the risk of selling more than they have in stock.
Description
The option to enter a detailed description of the product. This description is used to provide customers with more information about the product and its features.
The description of the product is usually displayed on the product details page, depending on the theme selected for the website. This page is where customers can find more information about the product, including its features, specifications, and any other relevant details.
The product description should be detailed and informative, providing customers with all the information they need to make an informed decision about whether to purchase the product. It should be written in clear and simple language and should be free of any grammatical or spelling errors.
Tip
Use the editor tools to colour and style text.
Short Description
A short product description is a brief summary of the key features and benefits of a product. It is typically displayed on the product details page, under the product name, and is used to give customers a quick overview of what the product is and what it can do for them. The length and content of a short product description will vary depending on the product and the theme selected, but it should be clear, concise, and compelling to encourage customers to learn more and make a purchase.
Tip
Use the editor tools to colour and style text.
Product Images
Product images are a crucial part of any product listing, as they allow customers to see the product in detail and get a better sense of what they are buying. O2VEND suggests having multiple detailed images for each product to showcase different angles, features and details that the product has. These images can be added by clicking on the "Add Images" button in the product listing, and selecting the desired images from your device. The first image that is uploaded will be set as the thumbnail image for the product, which is the main image that will be displayed on the product listing page. It is important to ensure that images are high quality and well-lit, as this can have a big impact on customer's perception of the product and their likelihood of making a purchase.
Tip
Edit the images using the edit button shown in the images. Crop the image with the image editor. Drag and drop images to make it easy to change the location of ecommerce images.
Purchase Account
The purchase account name is the financial account that is used to track the cost of the product when it is purchased. This information is used for accounting and financial reporting purposes. When creating a new product listing, you may be prompted to select the purchase account name for the product. This can typically be done by selecting from a drop-down list of available account names or by entering the name of the account manually. It is important to ensure that the correct account name is selected, as this will ensure that the financial data for the product is accurate and up-to-date.
Sales Account
The sales account name is the financial account that is used to track the revenue generated by the product when it is sold. This information is used for accounting and financial reporting purposes. When creating a new product listing, you may be prompted to select the sales account name for the product. This can typically be done by selecting from a drop-down list of available account names or by entering the name of the account manually. It is important to ensure that the correct account name is selected, as this will ensure that the financial data for the product is accurate and up-to-date. Sales account is also known as income account and it is used to record all revenue generated from sales of product or service.
Alt Text
Adding an alt text (also known as "alt tags" or "alt attributes") to images on a website is an important part of improving the website's accessibility and search engine optimization (SEO). Alt text is a short text description that is added to an image's HTML code, and it is used to provide information about the image for users who may be unable to see it, such as those using screen readers.
Google uses the information provided in alt text to understand what an image is about, which can help to improve the website's visibility in image search results. By including relevant and descriptive alt text, you can make it more likely that your images will appear in search results and that users will be able to find them. Additionally, by including alt text, you make your website more accessible to users with visual impairments, who use screen readers to navigate the web.
How to add a Alt text for an image
- Click create or edit product details page.
- Click the edit icon of the product image and variant image.
- Add the good Alt text of your products in the alt text field.
- Click the OK button.
- Click the Save button.
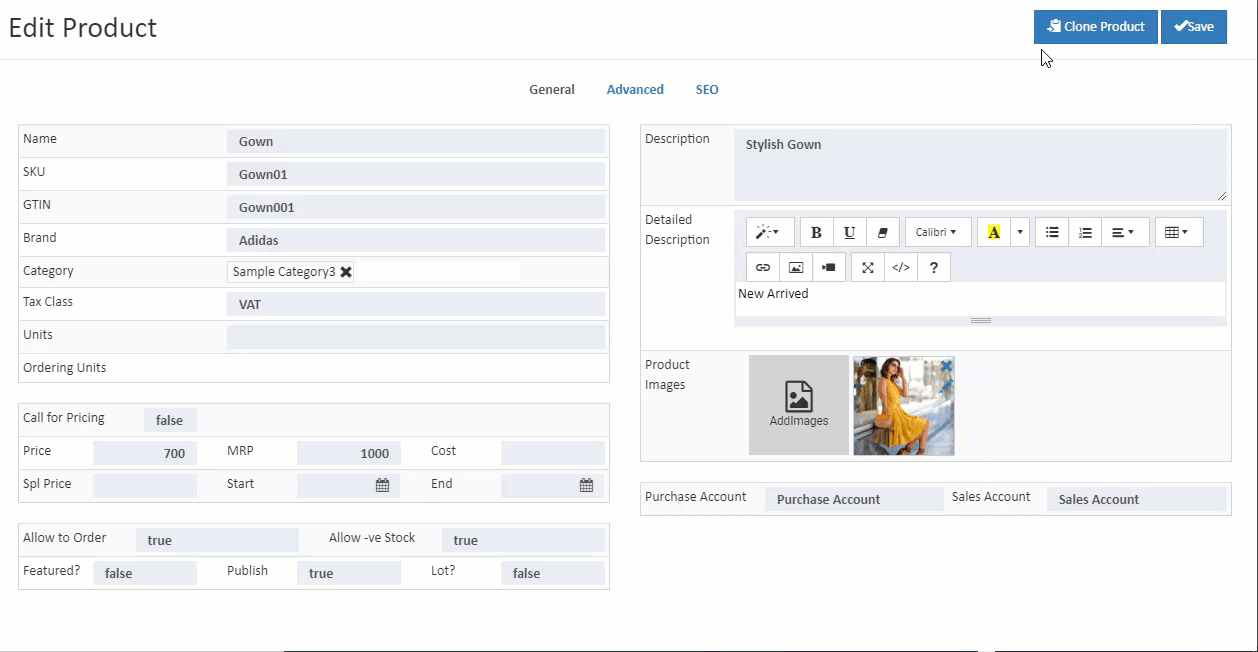
Edit Product
Edit a product along with its variations and all details.
How to edit a product
Follow the simple steps below to update a product.
- Open Back Office
- Go to Catalog Menu.
- Click and open Products section.
- A list of already existing products will be shown.
- Click Product Name shown in the product list against the product to be edited.
- Update all the needed information in the related tabs.
- Press Save button at the end of the page to save the updated product.
Clone Product
Cloning a product with all its details to another product with a different name refers to the process of creating a new product listing that is an exact copy of an existing product, but with a different name. This can be useful when you need to create a new product that is similar to an existing one, but with a few small changes. By cloning the product, you can save time and effort that would otherwise be spent on manually entering all of the details for the new product.
How to clone a product
Follow the simple steps below to clone a product.
- Open Back Office
- Go to Catalog Menu.
- Click and open Products section.
- A list of already existing products will be shown.
- Click Product Name shown in the product list against the product to be edited.
- In the Edit Product screen, click Clone Product in the right top corner.
- Enter the new product name.
- Press Save to create a cloned product.
Tip
Clone products and edit the cloned products later with relevant information. The process will speed up product creations.
Update Product Quantity
Update product quantity in the product list page.
How to update quantity
Follow the simple steps below to add a product quantity.
- Open Back Office
- Go to Catalog Menu.
- Click and open Update Quantity.
- Select the warehouse in the drop-down for the products in the warehouse.
- Click the write symbol in center, enter Adjusted Quantity for the products. The Adjusted Quantity will be added to the current quantity and will be displayed.
- Enter Notes.
- Press Save Button.
Tip
Use Export Products options to export the product details into a comma-separated CSV file.