O2VEND ERP – Goods Receive (GRN) & Incoming Packages Workflow
Learn how to track incoming shipments, manage GRNs, and print shipping labels efficiently in your warehouse management system. The Incoming Packages page provides a comprehensive list of all warehouse shipments arriving at your facility.
Definition: Goods Receive Note (GRN)
A Goods Receive Note (GRN) is a warehouse document used to record and verify incoming packages, supplier deliveries, and purchase order stock receipts in O2VEND. It is essential for warehouse inventory management, stock verification, and updating inward stock movement.
In O2VEND, the Goods Receive Note (GRN) forms the core of the warehouse inward process. It documents every purchase order stock receipt, validates supplier deliveries, and supports accurate stock verification.
This page is a key part of the inbound logistics workflow in O2VEND, providing complete visibility of incoming stock, improving warehouse operations, and ensuring accurate inventory tracking throughout the transit and receiving process.
Navigation To Incoming Packages / GRN
GRN entries can also be accessed through the Incoming Packages list for quick navigation inside O2VEND GRN workflows.
- Open the Back Office.
- Go to the Inventory menu.
- Click and open the Incoming Packages section.
GRN Overview – Goods Receive in O2VEND ERP
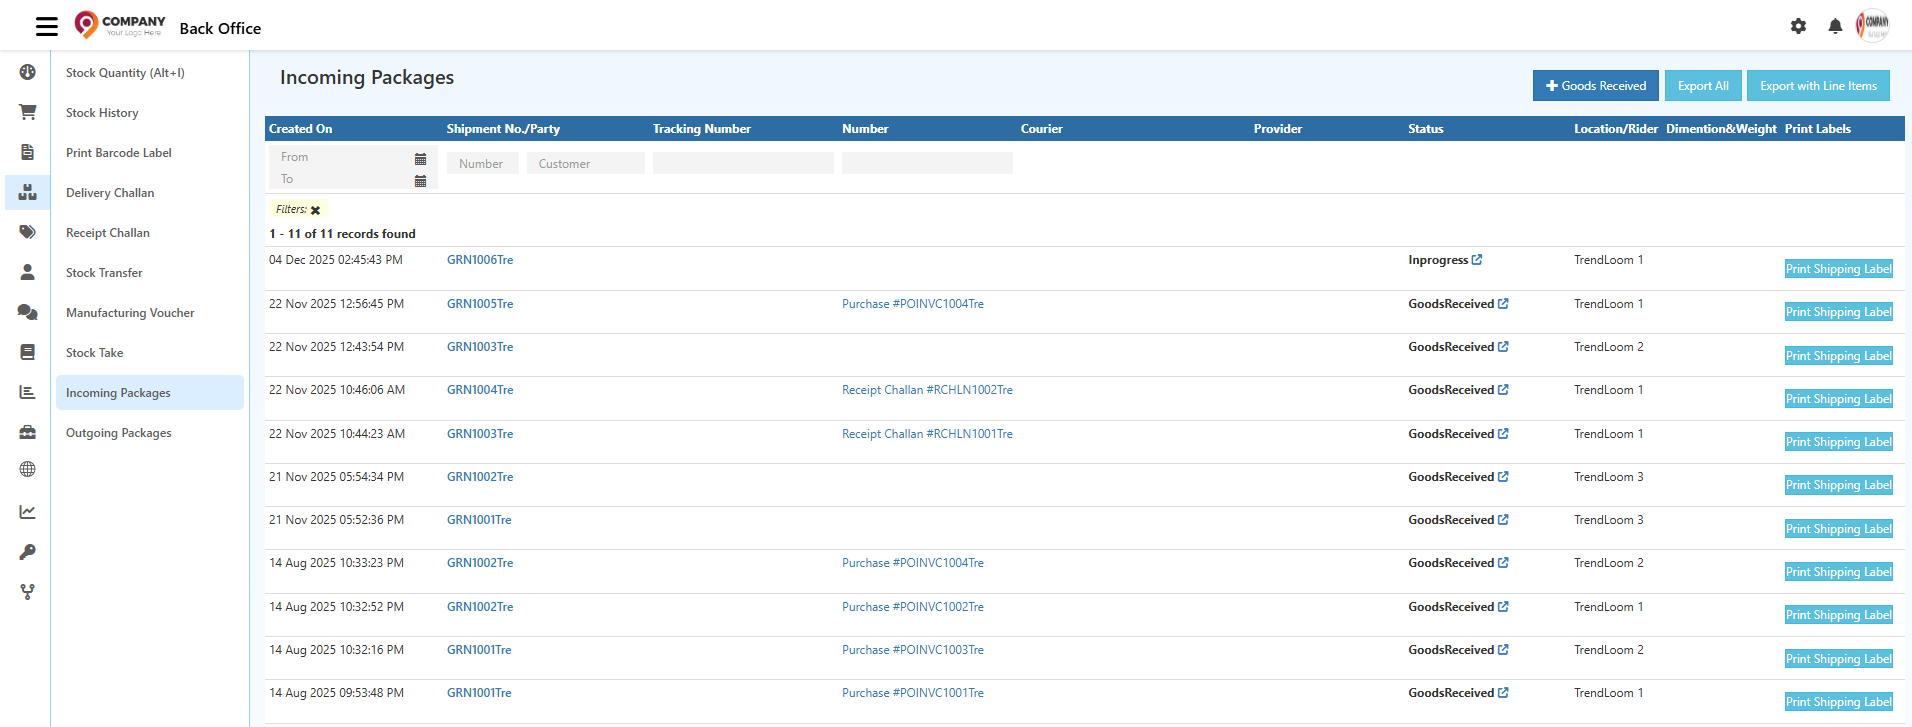
The Goods Receive (GRN) workflow in O2VEND ERP manages all incoming packages and stock receipt processes. This screen displays shipments with dates, references, courier and transporter details, tracking numbers, and status. It supports warehouse teams in accurate stock verification, inventory updates, and linking shipments to Purchase Orders (POs) or Receipt Challans.
Creating a GRN ensures:
- Efficient warehouse inventory management
- Real-time stock updates
- Proper tracking of incoming shipments
- Compliance with audit and reporting requirements
- Smooth handling of customer returns and supplier deliveries

Columns & Their Functions in GRN
Created On
Shows the date and time the GRN or incoming package was created.
Shipment No / Party
Displays shipment reference number and supplier/vendor details. Clicking opens detailed shipment information.
Tracking Number
Shows courier LR or tracking number for real-time shipment tracking.
Number
Internal document reference like Purchase Invoice Number or Receipt Challan Number.
Courier
Name of the delivery partner handling the shipment.
Provider
Indicates shipment source (e.g., Supplier, Branch, or Internal Location).
Status
Shows the current stage of the incoming shipment:
- GoodsReceived – Stock received, GRN created
- InTransit – Shipment on the way
- OutForDelivery – Courier delivering
- Delivered – Shipment arrived
- Exception – Issue reported
- AttemptFail – Delivery failed
Location / Rider
Warehouse/store receiving the shipment and assigned rider.
Dimension & Weight
Package size and weight for logistics and storage.
Print Labels
Generates shipping labels for the incoming packages.
Filters Section
- Date Filter (From / To) – Filter shipments by creation date
- Shipment No / Number – Search by internal document number
- Customer – Filter customer returns
- Tracking Number – Search by LR/courier tracking ID
Top Buttons for GRN
Goods Received
Creates Goods Receive (GRN) entry when shipment arrives. Updates inventory instantly.
Export All
Exports all incoming packages to Excel for audit or reporting.
Export with Line Items
Exports product-level details for each shipment.
Step-by-Step Process to Create a GRN (Goods Receive)
1. Open the Goods Receive Screen
Navigate to Back Office → Inventory → Goods Receive or access via Purchase Invoice / Receipt Challan.

2. Enter Transport & Courier Details
- Transport / Courier – Delivery partner
- Rider – Delivery person
- LR Number / Tracking Number – Shipment ID
- Tracking URL – Courier tracking link
3. Verify Reference & Receiving Location
- Reference – Purchase Order / Receipt Challan
- Branch / Location – Receiving warehouse or store
- Sub-location – Rack/shelf/bin
4. Choose Item Entry Mode
- Scan Mode – Scan barcode
- Type Mode – Manual product selection
5. Review the Product List
Includes Product Name, SKU, Ordered Quantity, Units, Sub-location.
6. Enter Received Quantities
Enter verified stock quantity for each item.
7. Assign Units & Sub-Locations
Set Units (PCS, Box, KG) and Sub-location for accurate warehouse placement.
8. Add Packages
Include Length, Width, Height, Weight, COD option, Courier selection.
9. Use Bulk Entry
Upload Excel file with SKU, Quantity, Units, Sub-location for faster entry.
10. Review Summary Before Saving
Confirm courier info, location, product quantities, sub-locations, and package details.
11. Save the GRN
- Updates inventory in real-time
- GRN status changes to GoodsReceived
- History records all actions
Top Actions in Goods Receive (GRN)
The top action bar in the Goods Receive screen contains key functions used during stock inward.
Each button supports a specific workflow—bulk imports, packaging, printing, and invoice generation.
Bulk Entry (Bulk Import)
Purpose:
A fast method to upload large lists of received products (ideal for wholesale operations, distributors, or bulk purchase orders).
How It Works:
- Open Goods Receive.
- Click Bulk Entry.
- Upload an Excel file containing the product list.
- Map imported columns to system-defined fields.
- Confirm mapping and click Import to add all items instantly.

Supported Column Mapping
| Entity Column | Import Column | Description |
|---|---|---|
| Sku | Sku | Unique product identifier |
| GTIN | Gtin | Barcode / Global Trade Item Number |
| ProductName | Name | Product title or description |
| Quantity | Quantity | Total units received |
| Unit | Units | UOM (PCS, BOX, PACK, KG) |
| SubLocation | Sub Location | Storage bin / rack / shelf |
Tip:
Ensure imported column names match the expected format for accurate mapping.
Print Pickup List
Generates a printed list of all items included in the GRN.
Useful for:
- Warehouse verification
- Quality checks
- Physical cross-check during receipt
- Internal audit and inventory matching

Reference Field
The Reference shows the internal system reference number linked to:
- Purchase Order
- Receipt Challan
- Shipment
- Previous workflow documents
Used for cross-verification and traceability.
Tabs Overview
The GRN consists of four functional tabs:
General
Main working area where courier info, location, scan mode, and product details are managed.
History
Chronological activity log including:
- Created by
- Quantities modified
- Status updates
- System-level events
Change Status
Used to update the current workflow state of the GRN.
Documents
Stores attachments such as:
- Supplier invoices
- Delivery challans
- Packing lists
- Shipment labels and proofs
Status List (Change Status Tab)
Each status reflects a stage in the receiving workflow:
| Status | Meaning |
|---|---|
| GoodsReceived | Supplier shipped; pending internal verification |
| InTransit | Goods are on the way |
| OutForDelivery | Goods out for final delivery to location |
| Delivered | Delivered to destination; awaiting GRN creation |
| AttemptFail | Delivery attempt failed |
| Exception | Issues such as damage, mismatch, incorrect shipment |
| Unknown | Status not tracked by the courier |
| ReStocked | Additional/returned items placed back into inventory |
| GoodsReceived | Stock physically received and recorded |
| GoodsReturned | Items returned to supplier |
| Accepted | Verified and accepted after inspection |
| GoodsUnderInspection | Quality check in progress |
| PickedUp | Returned items collected by logistics partner |
| Inprocess | GRN processing underway |
General Tab — Field Explanation
Transport / Courier
Name of the logistics partner delivering the shipment.
Rider
Delivery executive’s name for identification.
LR Number / Tracking Number
Logistics Receipt (LR) number or courier tracking ID.
Tracking URL
Direct tracking link for shipment traceability.
Reference
Internal system-generated reference number.
Branch / Location
The warehouse or store where the stock is received.
Scan / Type Mode
- Scan: Barcode scanning for fast entry
- Type: Manual product search
Receiving Address
Auto-filled or selected based on the location chosen.
Product Table — Field Descriptions
| Field | Description |
|---|---|
| Product Name | Name of the received product |
| Product SKU | Unique stock-keeping unit |
| Quantity | Ordered quantity or supplier-confirmed quantity |
| Sub Location | Bin/rack/shelf where the item will be placed |
| Quantity to Receive | Enter the quantity received (supports partial receipt) |
| Units | Unit of measure (PCS, KG, BOX, PACK) |
| Lot Number | Batch or manufacturing lot for tracking |
| Expiry Date | Expiry date for FEFO-based products |
| Allot Lot | Assign or create lot number during receiving |
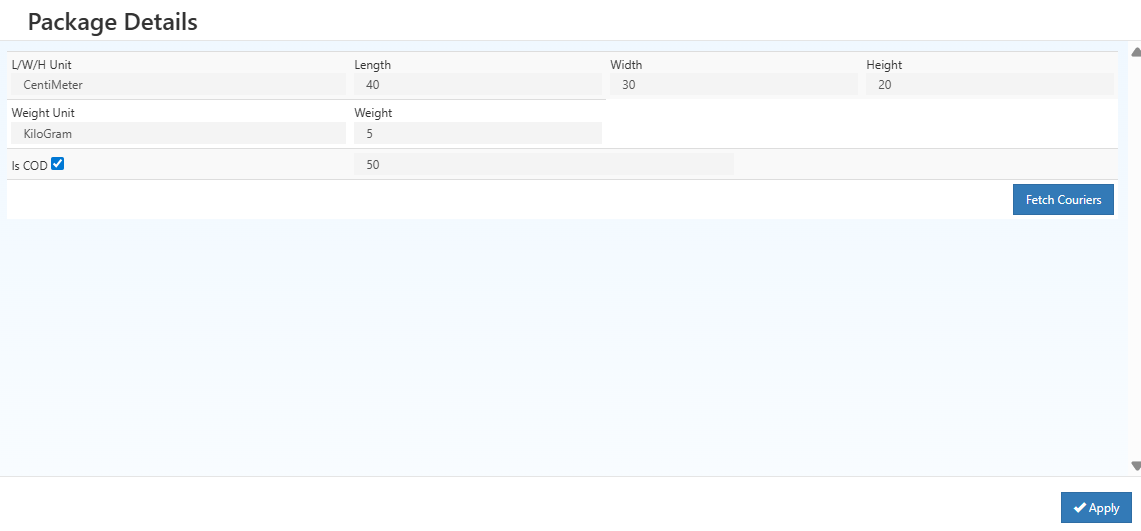
Add Package Panel
Click Add Package to open the package entry popup.

Package Fields
- L/W/H Unit: Dimension unit (Inches or CM)
- Length: Longest side of package
- Width: Horizontal side
- Height: Vertical depth
- Weight Unit: (GRAM / KG)
- Weight: Total package weight
- Is COD: Mark if package is Cash-on-Delivery
- Fetch Couriers: Retrieve available courier partners based on size & weight
- Apply: Saves package details to GRN
Initiate GRN – Location Routing Logic (O2VEND ERP)
Location Inward Route Configuration
The Initiate Goods Receive (GRN) button in O2VEND appears only when the location’s inward routing is configured correctly.
This routing ensures that incoming stock is inspected, verified, and approved before updating inventory.
Inward Route Requirement – Draft_Inspection
- Location Field:
Inward Route - Required Value:
Draft_Inspection
What This Setting Does
- Enables the Initiate Goods Receive button.
- Ensures manual inspection of all incoming goods.
- Activates the Packages tab where users can:
- Approve received items
- Reject damaged/incorrect goods
- Adjust quantities (shortage / excess)
- Confirm stock before final posting
This route is essential for purchase stock inward, warehouse inward, and inter-location transfers.
2. Initiate Goods Receive – Button & Tab Behavior
| Action | Required Condition | System Output |
|---|---|---|
| Initiate Goods Receive | Inward Route = Draft_Inspection |
✅ Button visible → Packages tab enabled |
This logic ensures inspection happens before stock hits inventory.
3. GRN Button Troubleshooting
If the GRN button is not showing, verify the inward route configuration. Locations using the Draft_Inspection workflow will require manually initiating the GRN.
If the Initiate Goods Receive button does not appear:
- Go to Back Office → Locations → Edit Location
- Verify the field Inward Route = Draft_Inspection
- Save the location
- Reopen the GRN page → Button appears
GRN button visibility is location-based, never order-based.
Correct routing = smooth inward inspection, inventory accuracy, and error-free stock posting.
4. Workflow Example – Using Draft_Inspection Route
- Configure the location:
- Set Inward Route = Draft_Inspection
- Create a GRN
- Click Initiate Goods Receive
- System opens the Packages tab
- Approve / reject / adjust item quantities
- Save and Finalize GRN
- Stock is updated successfully
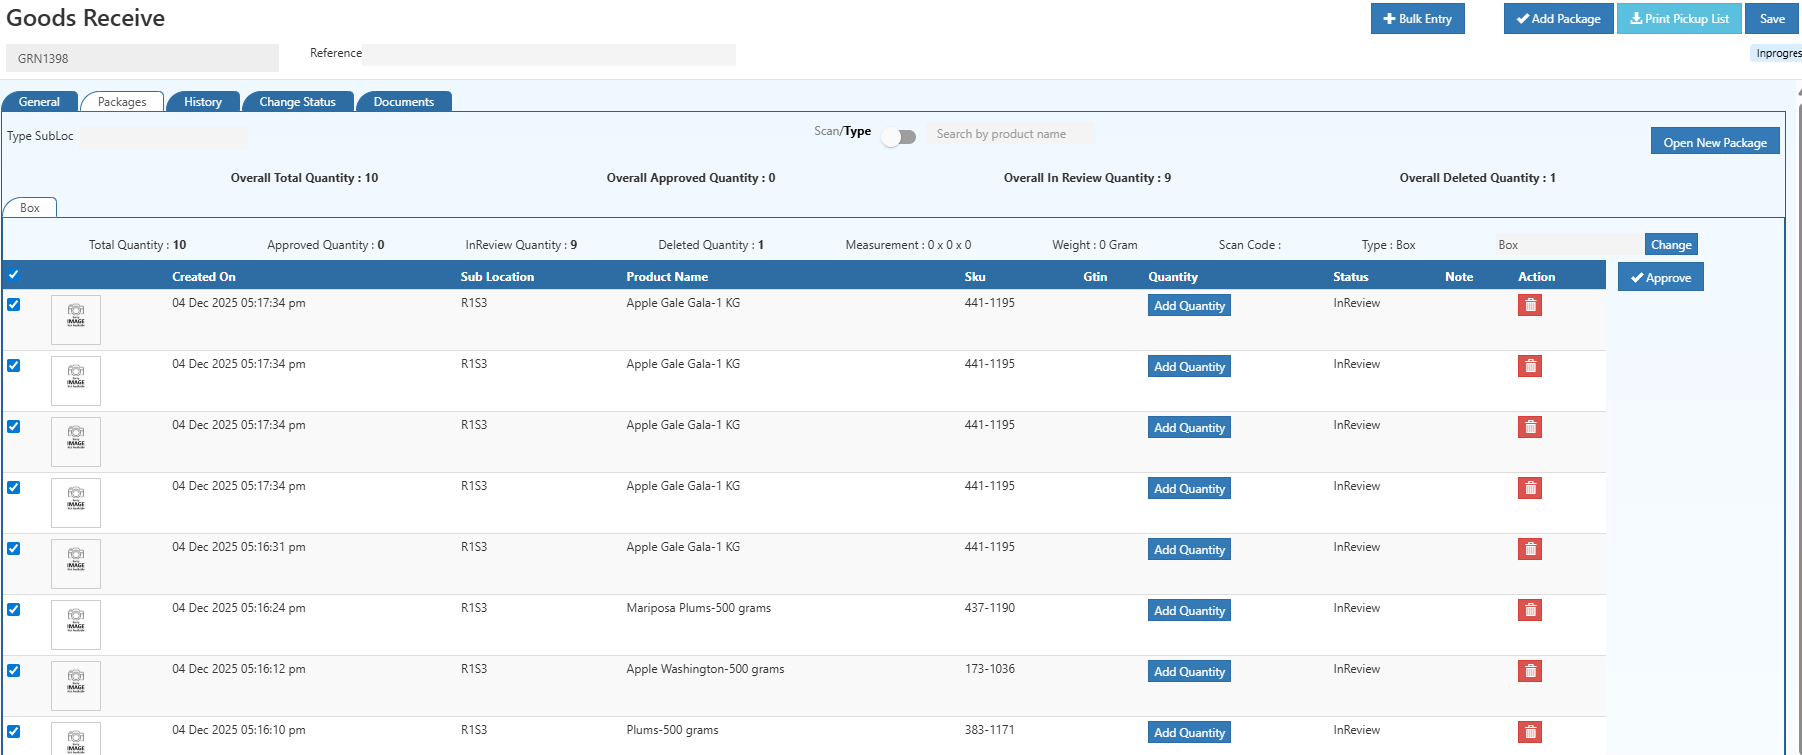
GRN Packages Tab & Package Material Handling – O2VEND ERP
The Packages tab plays an essential role in the warehouse inward process by validating quantities added in Incoming Packages.
The Packages tab in O2VEND is used to manage all received goods at the package level during the GRN process.
It ensures proper tracking, inspection, and approval before stock is updated in the warehouse.
Packages Tab – Handling Goods Receive in O2VEND
Once the Goods Receive (GRN) process is initiated, the Packages tab becomes the central area for managing all package-related operations.
This tab allows users to organize received stock, assign products to packages, and approve quantities before updating warehouse inventory.

Package Management Steps
1. Packages Tab Overview
The Packages tab displays all details for the GRN packages:
- Sub-location of each package
- Total quantity of products per package
- Quantities Approved, In-Review, and Deleted
This overview ensures that warehouse managers can track all incoming stock at a package level and maintain inventory transparency.
2. Open a New Package
Create a new package entry for the GRN if items are received in multiple physical packages.
Each package entry allows for organized storage and tracking within the warehouse.
3. Select Package Material & Add
- Choose a predefined package material (e.g., Medium Box, Small Box, Pallet)
- The system automatically applies dimensions, weight, and labels for proper handling
- Ensures correct packaging standards for safe storage and dispatch
Need a new package material? Navigate to Package Material Settings to create it, set dimensions, and labels.
4. Add Products to Package
- Scan product barcodes OR manually type the product name
- Enter the quantity for each item
- Status automatically defaults to In-Review
⚠️ Only Approved quantities will reflect in inventory. Unapproved or rejected items do not update stock.
5. Approve Product Quantities
- Review all added items in the package
- Approve products received in good condition
- Reject damaged or incorrect items
- This step ensures inventory accuracy and prevents stock discrepancies
6. Save and Finalize GRN
- Save all package and product entries
- Click Approve to finalize the GRN
- Warehouse stock is updated automatically, reflecting verified quantities.
Benefits of the Packages Tab Workflow
- Validates every received product before inventory posting
- Provides traceability for auditing and quality checks
- Minimizes errors in stock entry
- Enhances warehouse management and supply chain transparency