O2VEND Retail ERP
  • Getting Started
  • Ecommerce
  • Back Office
  • POS
  • Agent App
  • PIM
  • Communication
  • CMS
  • OMS
  • WMS
  • O2C
  • Accounting
  • Reports
  • Themes and Apps
Search Results for

    Show / Hide Table of Contents
    • Overview
    • Features
      • Product Management Features
        • Product Management
        • Product Attributes
        • Product Variations
        • SKU Length for Variations
        • Product Pricing
        • Product Margin Settings
        • Product Cost Configuration
        • Product Tax Settings
        • Additional Tax Setup
      • Inventory Management Features
        • Inventory Management
        • Stock Management
        • GRN (Goods Receipt Note)
        • GDN (Goods Delivery Note)
        • Disable Lot Popup Option
      • Order & Sales Features
        • Order Management
        • Point of Sale (POS)
        • Credit Sales & Invoice Return
        • Outstanding Management
        • Voucher Management
        • Guest Checkout Option
      • Marketing & SEO Features
        • SEO Optimization
        • URL Configuration
        • Schema Markup Setup
        • Segmentation
      • Communication & Notification Features
        • Email Settings
        • Communication Settings
        • Notifications
        • Web Notifications
      • System & Security Features
        • Application Settings
        • General Settings
        • Date Configuration
        • IP Restrictions
        • White Listing
        • Print Configuration
        • Option Settings
    • Integrations
      • Marketplace Integrations
        • Amazon Integration
        • Flipkart Integration
        • Myntra Integration
        • Shopify Integration
        • Unicommerce Integration
      • Payment Gateway Integrations
        • Razorpay Integration
        • PayU Integration
        • Paytm Integration
        • PhonePe Integration
        • Cashfree Integration
        • Stripe Integration
        • Paypal Integration
      • Shipping & Logistics Integrations
        • Shiprocket Integration
        • Shipway Integration
        • eShipper Integration
        • Amazon Shipping Integration
        • XpressBees Integration
        • GetDelivered Integration
      • Communication Integrations
        • WhatsApp Integration
        • MSG91 Integration
        • SendGrid Integration
        • Amazon SES Integration
        • Email Integration
      • Marketing & CRM Integrations
        • HubSpot Integration
        • Typesense Integration
      • Tax & Compliance Integrations
        • e-Invoice Integration
        • e-Way Bill Integration
        • Tax Configuration
      • Security & Technical Integrations
        • reCAPTCHA Integration
        • Webhook Integration
        • Custom CDN Domain Setup
      • Inventory & Store Integrations
        • Inventory Integration
        • Storefront Integration
        • Display Configuration
        • General Settings
    • Product Enhancements
      • Affiliate Program Management
      • Back Office Management System
      • Checkout Process Settings
      • Coupon Code Management
      • Currency Configuration Settings
      • Delivery Zone Configuration
      • Discount Management System
      • Product Display Settings
      • Geo IP Location Detection
      • GTIN Product Code Management
      • Invoice Management System
      • Marketing & Campaign Tools
      • Menu Management Settings
      • Pricing Rule Configuration
      • Purchase Management Module
      • Referral Program Settings
      • Return Management Process
      • Sales Management System
      • Shipment & Delivery Tracking
      • SMS Notification Settings
      • Sub Location Management
      • Vendor Management System
      • Product Video Integration
      • Web Store Configuration
      • WhatsApp Integration Settings
    • Blog Categories Setup
    • Blog Management
    • Email Settings
    • Home Page Components
    • Main Menu Management
    • Newsletter Subscription Settings
    • SMS Settings
    • WhatsApp Settings
    • Communication Template Setup
    • Page Header Settings
    • Site Menu Management
    • Site Pages Management

    Setup Menus

    The menu is an important part of an ecommerce website, as it allows customers to navigate through the site and find the products they are looking for. It is essential that the menu is easy to use, well-organized, and intuitive.

    The O2VEND platform provides options to set up and customize the menu of your ecommerce store. You can create and organize different sections in the menu such as categories, products, collections and more. It allows you to create a hierarchical structure of the menu, which makes it easy for customers to find products and navigate through the store.

    You can customize the menu by adding or removing items, changing the order of items, and organizing items into subcategories. This allows you to create a menu that is tailored to your business and provides the best user experience for your customers.

    It also provide an option to set the menu items as sub-menu, that help to navigate to different sections, this also allows you to group the related items under the same section.

    The O2VEND platform also allows you to customize the appearance of the menu, you can change the color, font, and layout of the menu to match the overall look and feel of your store. This can help to create a cohesive and professional-looking website.

    Tip

    The Pages are comes under the Menus.

    How to create Menu

    1. Open Back Office.
    2. Go to Web Store Personalize menu and Click Site Contents.
    3. Click and open Menus. The available menus will shown.
    4. Click Create Menu in the top right corner.
    5. Enter the menu name and press Save button.
    6. It will move to the Edit Menu Page.
    7. Select menu items from the Add Menu Items Section and Click Add Button.
    8. Added Menu items will show in the Items.
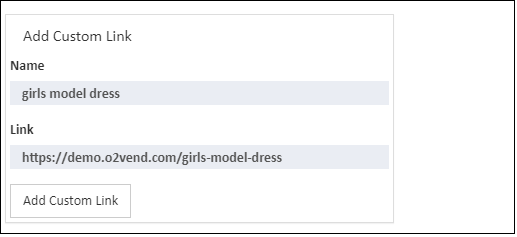
    9. In case of external link to be added use Add Custom Link section and press Add Custom Link button.
    10. Press Save button.
    Setup Menus Setup Menus
    Tip

    Drag and Drop the Menu items to change the menu item order of display.

    Tip

    To Filter the menu items Name and Type box is used.

    Name

    Name of the selected menu is present in the Name field.

    Items

    The selected menu items are present in the Items. To remove any menu item click delete icon.

    Warning

    The Menu only show in the footer page when IsPublished is selected.

    Main menu

    How to design a ecommerce header using the Smart menu

    1. Open Back Office.
    2. Go to Web Store Personalize menu and Click Site Contents.
    3. Click and open Main Menus.
    In this article
    Back to top _includes/footer.html
    © 2019–2026 Jeyan Technologies Private Limited • www.o2vend.com • Create your own store