O2VEND Shopify Integration Guide – Sync Products, Orders & Inventory Easily
Learn how to integrate O2VEND with Shopify to automatically sync products, inventory, and orders. This step-by-step guide helps you manage your ecommerce and retail operations smoothly from one platform.
Integrating O2VEND with Shopify allows you to connect your online store with your back-office system. It keeps your product data, stock levels, and order details updated across both platforms without manual effort.
For businesses handling online sales, maintaining accurate data can be difficult. With this integration, updates made in one system—such as product changes, inventory updates, or new orders—are automatically reflected in the other.
This helps maintain consistency, reduce errors, and prevent issues like overselling or incorrect stock levels.
Why Integrate O2VEND with Shopify?
Connecting O2VEND with Shopify helps simplify your daily operations and improves overall efficiency.
Centralized Product Management
Manage all your products in one place and keep them synced with your Shopify store.
Real-Time Inventory Synchronization
Stock levels are updated automatically whenever a sale happens, ensuring accurate inventory.
Seamless Order Management
Orders from Shopify are synced to O2VEND, making it easy to track and process from one dashboard.
Reduced Manual Effort
Automation reduces manual data entry, minimizes errors, and saves time.
In the following sections, we will walk through the step-by-step process of connecting Shopify with O2VEND, including the configuration steps required to successfully integrate both platforms.
Step 1 – Navigate to Sales Channels in O2VEND
To begin the integration process, log in to the O2VEND Back Office and navigate to the Sales Channels configuration page.
From the main dashboard:
- Go to Settings
- Under Business Settings
- Click Sales Channels
The Sales Channels section allows you to connect external ecommerce platforms and marketplaces. This is where you can configure integrations such as Shopify and manage channel-level synchronization settings.

O2VEND back office settings showing Sales Channels option for integration setup
Step 2 – Create a New Sales Channel
After opening the Sales Channels page, you will see a list of existing channels configured in your system.
To connect your Shopify store:
- Click the Create Channel button.
- Enter the required channel details.
- Select the appropriate Channel Type for the integration.
Creating a new sales channel allows O2VEND to establish a connection with external platforms and manage synchronization between systems.
 O2VEND manage sales channels screen showing create channel option
Step 3 – Configure Shopify Channel Details
Once the channel is created, the Channel Details configuration page will open. This page allows you to define the connection parameters required for integrating Shopify with O2VEND.
In this configuration screen, you will see fields such as:
- Channel Name
- Channel Group
- Provider (Shopify)
- Store URL
- API Token
- Shopify Location ID
These fields allow O2VEND to authenticate and communicate with your Shopify store to synchronize products, inventory, and order information.

Shopify channel configuration settings in O2VEND showing URL token and webhook settings
Step 4 – Create a Channel Group for Shopify Integration
Before configuring the Shopify channel, you must first create a Channel Group in O2VEND.
A channel group defines how products, pricing, warehouses, and branches are mapped for a specific sales channel.
This step ensures that the correct product data and inventory are synchronized between O2VEND and Shopify.
To create a Channel Group:
- Navigate to Sales Channels in the O2VEND Back Office.
- Select the option to Create Channel Group.
- Enter the Channel Group Name (for example: Shopify Channel Group).
- Add a short Description if required.
Next, configure the following mapping settings:
- Product – Defines which products will be available in the channel.
- Category – Maps product categories.
- Brand – Assigns brand information.
- Price List – Selects the price list used for the Shopify store.
- Zone – Determines the operational zone.
- Currency – Defines the currency used for transactions.
- Warehouse – Specifies the warehouse from which inventory will be synced.
- Branch – Select the branch responsible for the channel operations.
After completing the configuration, click Save to create the channel group.
 O2VEND create channel group screen showing product category brand price list warehouse and branch configuration
Next Step – Retrieve Shopify Integration Credentials
In the next section, we will explain how to retrieve the following information from your Shopify store:
- Shopify Store URL
- API Access Token
- Shopify Location ID
- Setup Webhook Signature
These details are required to complete the integration and allow secure communication between O2VEND and Shopify.
Once these credentials are added to the channel configuration, you will be able to enable product synchronization, order syncing, and inventory updates between the two platforms.
How to Get Shopify URL, API Token and Location ID from Shopify
To complete the integration between O2VEND and Shopify, you need to collect a few credentials from your Shopify store. These credentials allow O2VEND to securely communicate with Shopify and synchronize products, orders, and inventory.
In this section, we will explain how to generate the Admin API Access Token from Shopify and use it in the O2VEND channel configuration.
Step 1 – Open Shopify Settings
Log in to your Shopify admin dashboard.
From the left navigation menu, scroll down and click Settings. This section contains all configuration options for your Shopify store including apps, integrations, and API access.
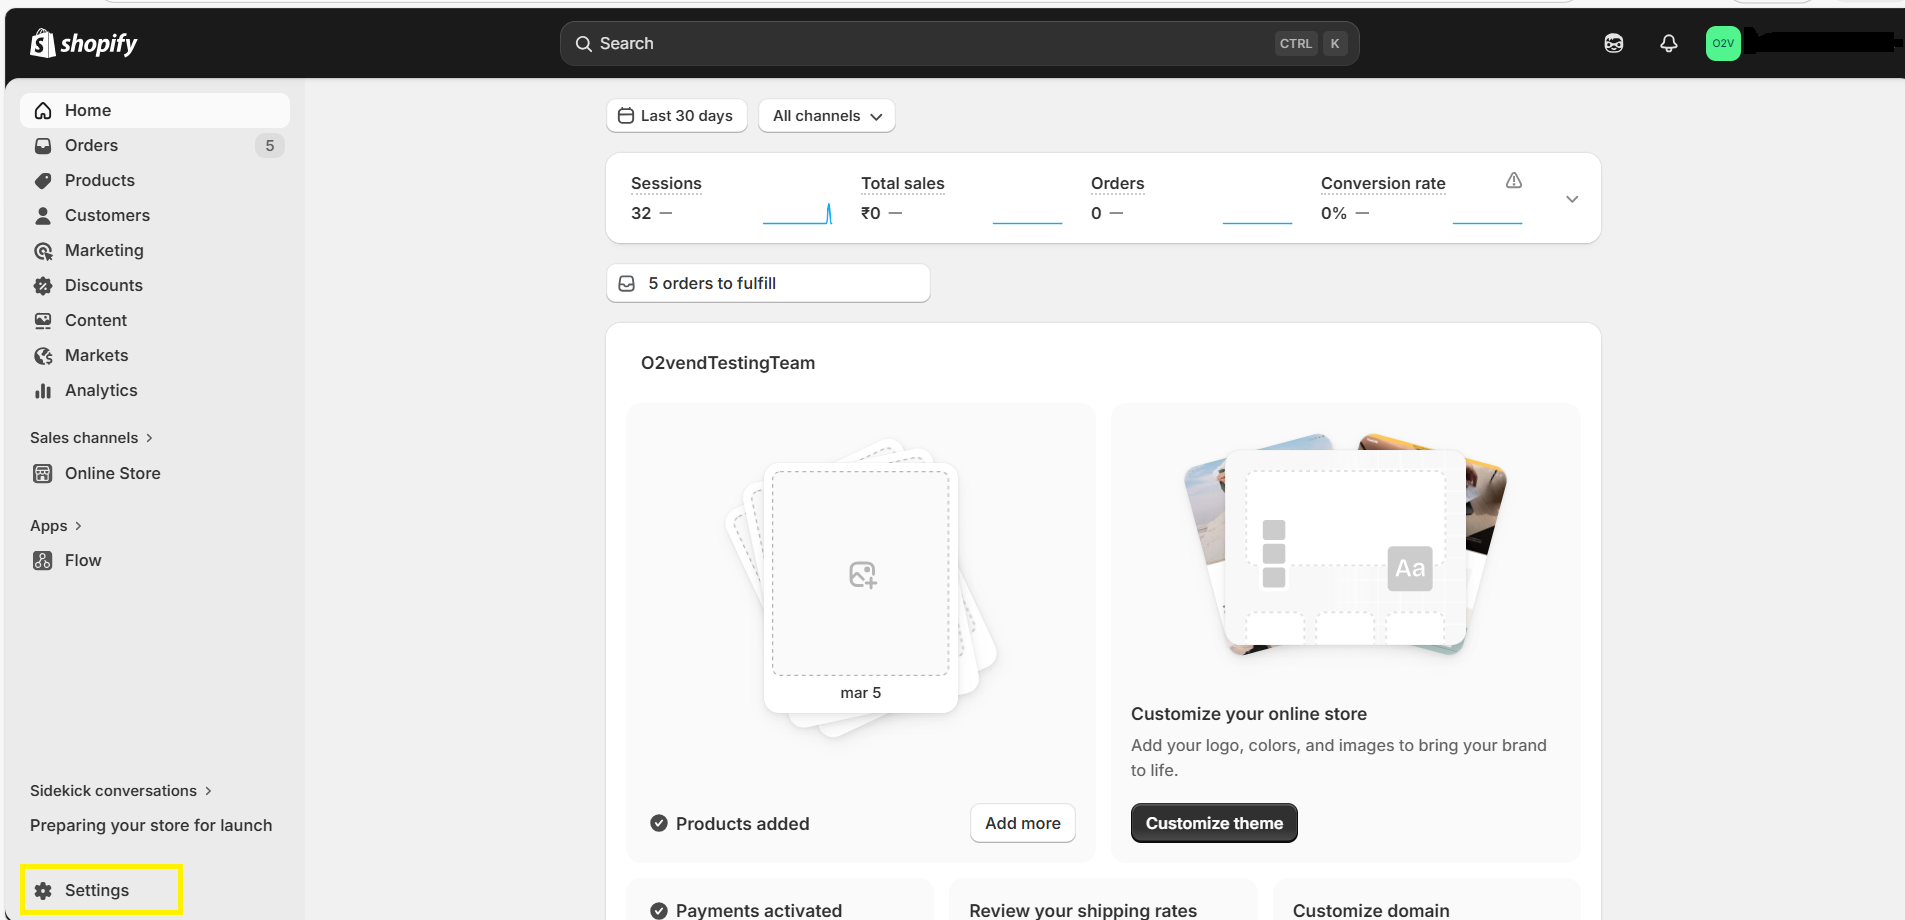
Shopify admin dashboard showing settings option in the bottom left menu
Step 2 – Open App Development Settings
Inside the Settings page:
- Click Apps and Sales Channels
- Select Develop Apps
The Develop Apps section allows you to create custom applications that can interact with your Shopify store using Shopify APIs.
These apps are required when integrating external systems such as O2VEND.
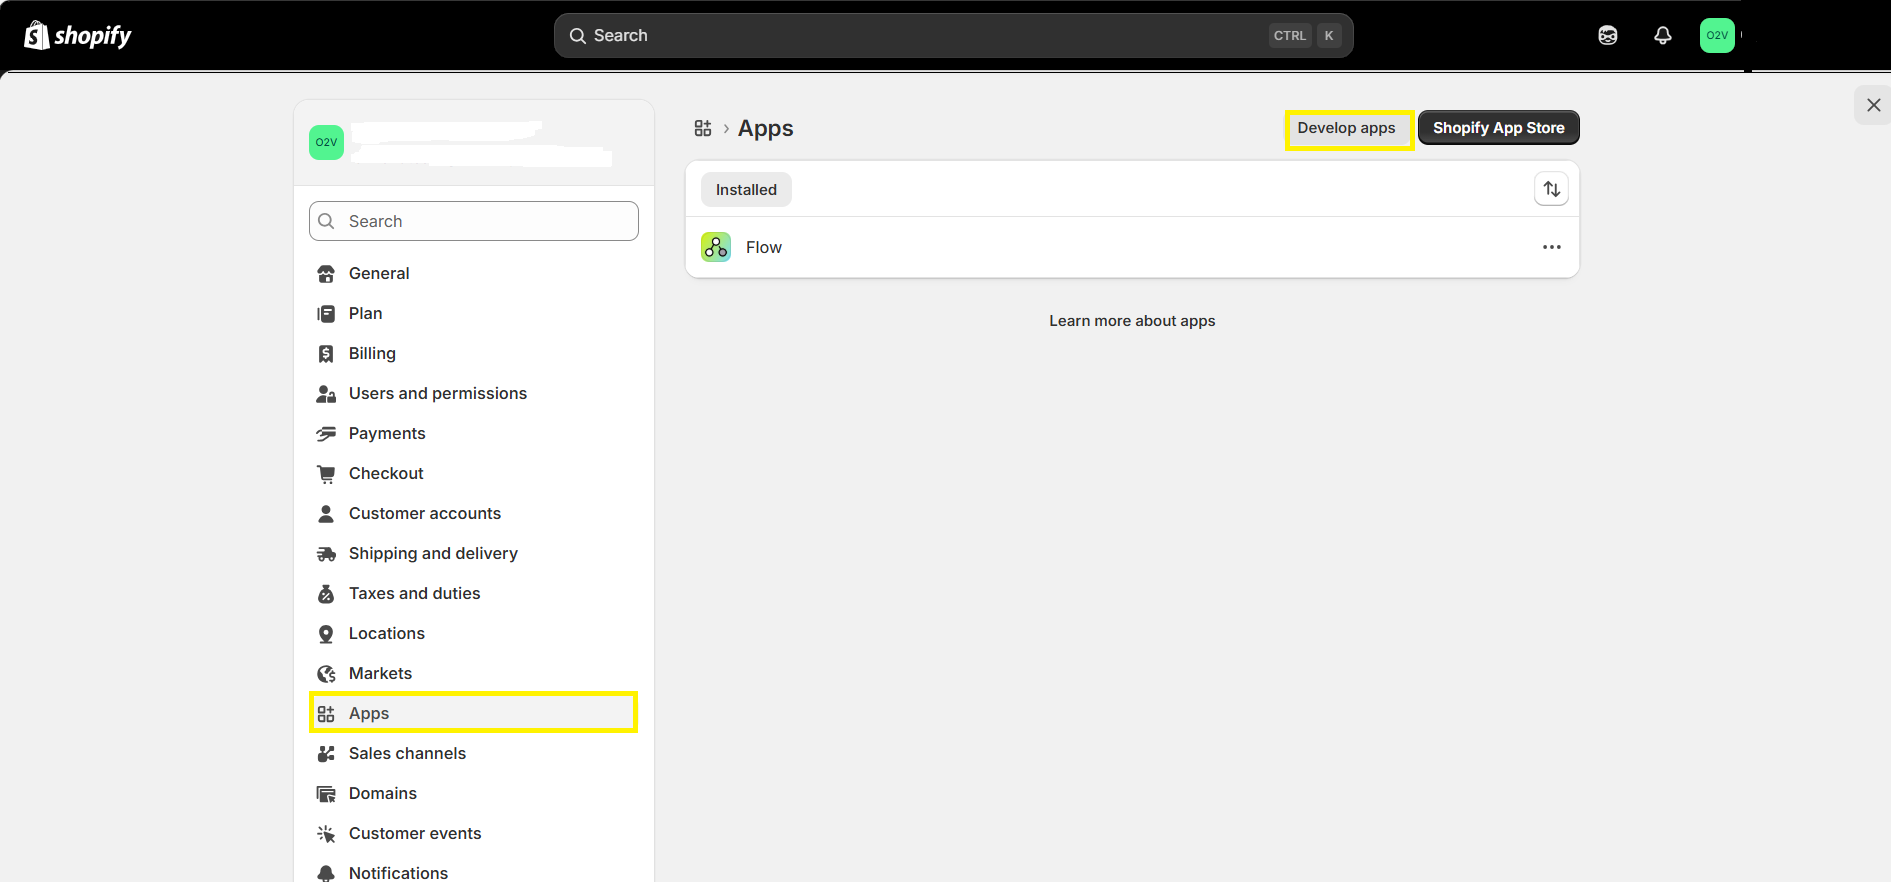 Shopify develop apps section used to create custom API apps for integrations
Step 3 – Create a Custom App
Inside the App Development page:
- Click Create an App
- Enter an App Name (for example: O2VEND Integration)
- Assign the App Developer if required
- Click Create App
Creating a custom app allows you to generate API credentials that external systems can use to securely connect with your Shopify store.
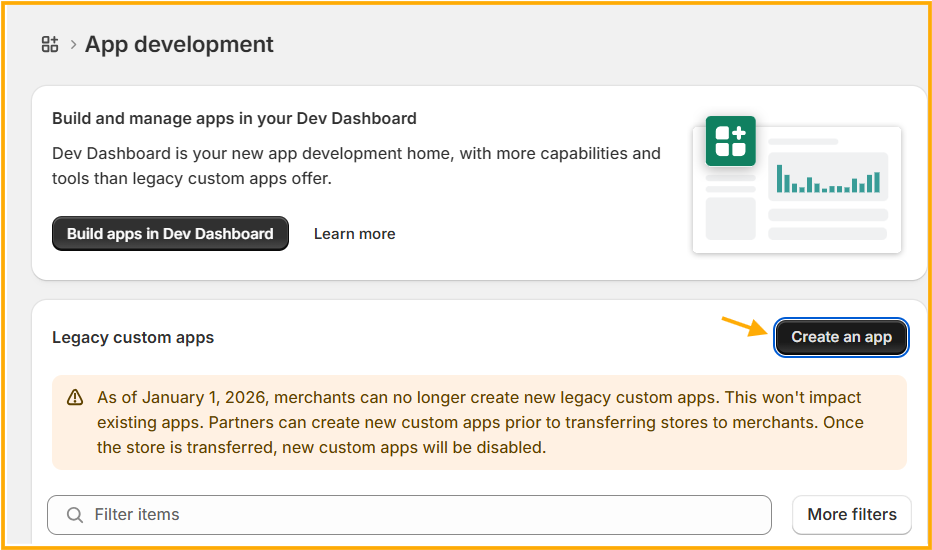
Shopify create custom app screen used to generate API credentials
Step 4 – Generate Admin API Access Token
After creating the app:
- Open the API Credentials section
- Shopify will generate an Admin API Access Token
Copy this token immediately because Shopify will only show it once.
This Admin API Access Token is required for the integration.
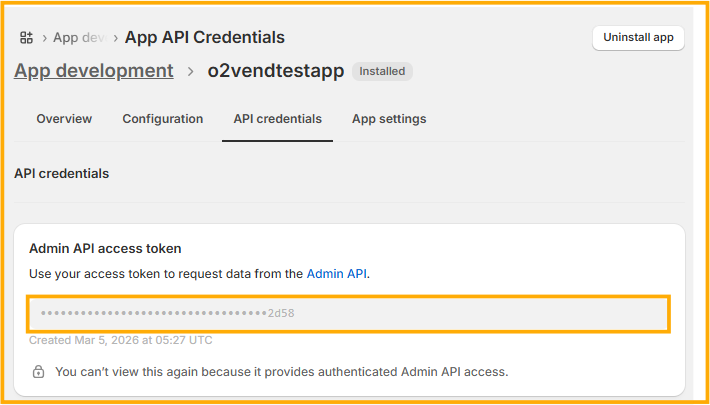
Shopify API credentials screen showing the Admin API access token used in O2VEND setup
Step 5 – Add the Token in O2VEND
Now go back to the O2VEND Shopify Channel Configuration screen.
Paste the copied Admin API Access Token into the Token field.
This token allows O2VEND to authenticate and communicate with your Shopify store for:
- Product synchronization
- Inventory updates
- Order management
- Customer synchronization
After entering the token, save the configuration to complete this part of the integration.
Step 6 – Get Shopify Store Domain
To connect Shopify with O2VEND, you need to provide the Shopify Store Domain in the channel configuration.
Follow these steps to retrieve the domain from Shopify.
Open Shopify Settings
- Log in to your Shopify admin dashboard.
- From the left navigation menu, click Settings.
- Inside the Settings page, select Domains.
The Domains section displays the primary domain and any additional domains connected to your Shopify store.
Copy the Store Domain
In the Domains page:
- Locate the Primary Domain of your Shopify store.
- Copy the domain name (example:
yourstorename.myshopify.comor your custom domain).
Add Domain in O2VEND
Return to the O2VEND Shopify Channel Configuration page and paste the copied domain in the URL field.
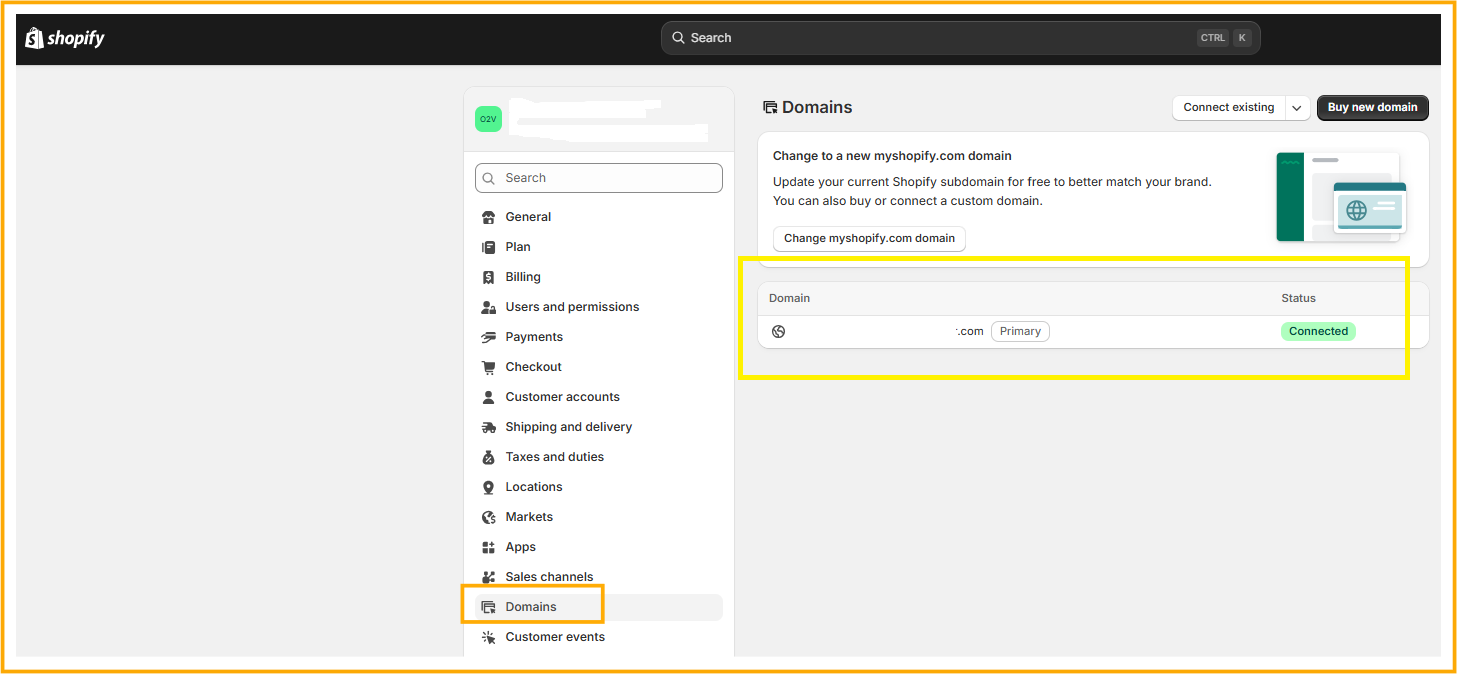 Shopify settings page showing domains configuration for store URL
This domain allows O2VEND to communicate with your Shopify store APIs and synchronize data between both systems.
After entering the domain, save the configuration to proceed with the integration setup.
Step 7 – Get Shopify Location ID
The Shopify Location ID is required to sync inventory between O2VEND and Shopify.
This ID identifies the exact inventory location used in your Shopify store.
Follow the steps below to retrieve the Location ID.
Open Product Inventory in Shopify
- Log in to your Shopify admin dashboard.
- From the left navigation menu, click Products.
- locate the Inventory section.
Copy the Location ID from the URL
After clicking the Inventory section, check the browser URL.
The URL will contain a numeric value which represents the Location ID.
Example: https://admin.shopify.com/store/your-store-name/inventory?location_id=123456789
In this example: 123456789
This number is the Shopify Location ID.
Add Location ID in O2VEND
- Go back to the O2VEND Sales Channel Configuration page.
- Find the field Shopify Location ID.
- Paste the copied Location ID in this field.
- Click Save.
This step ensures that inventory updates are synchronized correctly between Shopify and O2VEND.
Step 8 – Get Shopify Webhook Signature
The Webhook Signature is used to verify that webhook notifications sent from Shopify are authentic and secure.
This signature allows O2VEND to validate incoming webhook requests from Shopify.
Follow the steps below to retrieve the Webhook Signature from Shopify.
Open Shopify Notifications Settings
- Log in to your Shopify admin dashboard.
- From the left navigation menu, click Settings.
- Inside the Settings page, select Notifications.
Navigate to Webhooks
Scroll down to the Webhooks section.
This section allows you to configure notifications that Shopify sends to external systems when specific events occur, such as order creation, order updates, or customer creation.
Click Create Webhook.
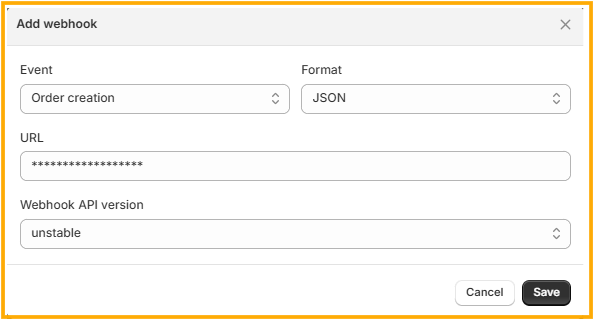
Configure Webhook
When creating a webhook, you will see the following options:
- Event – Select the event you want to track (Example: Order Creation)
- Format – Choose JSON or XML
- URL – Enter the webhook URL provided in the O2VEND Shopify channel configuration
Example events commonly used:
- Order Creation
- Order Update
- Order Cancellation
- Order Payment
- Customer Creation
After configuring the webhook, click Save.
Copy the Webhook Signature
In the Webhooks section, Shopify provides a Webhook Signature used to sign webhook notifications.
Copy the value shown under:
Your webhooks will be signed with
This value is the Webhook Signature.
Add Webhook Signature in O2VEND
- Go back to the O2VEND Shopify Channel Configuration page.
- Locate the field Setup Webhook Signature.
- Paste the copied signature value.
- Click Save.
Once configured, O2VEND will securely validate all webhook requests received from Shopify.
Shopify Webhook Configuration
To enable automatic synchronization between O2VEND and Shopify, webhooks must be configured in Shopify.
Webhooks allow Shopify to send event notifications to O2VEND whenever specific actions occur in the store, such as order creation or customer registration.
Create Webhooks in Shopify
- Log in to your Shopify admin dashboard.
- Go to Settings.
- Click Notifications.
- Scroll to the Webhooks section.
- Click Create Webhook.
While creating the webhook, configure the following:
- Event – Select the required Shopify event
- Format – JSON
- URL – O2VEND Webhook URL
- Webhook API Version – Default Shopify API version
Webhook Events Used
The following events are configured for the O2VEND integration:
- Order Creation
- Order Cancellation
- Order Update
- Order Payment
- Order Edit
- Customer Creation
Integration Behavior
After configuring the webhooks:
- Orders created in Shopify will automatically appear in O2VEND.
- Order updates or cancellations will sync to O2VEND.
- Payment updates will be reflected in O2VEND.
- New customers created in Shopify will be synchronized.
This webhook setup ensures real-time synchronization between Shopify and O2VEND.