How to Print Barcode Labels in O2VEND ERP (Step-by-Step Guide)
Barcode label printing helps keep inventory, billing, and warehouse operations organized. It gives you a simple way to create clear, scannable labels for products and packages.
What Is Barcode Label Printing?
Barcode label printing is the process of creating printed labels that contain product details and a scannable barcode. These labels help you identify items quickly, improve inventory accuracy, and make billing and warehouse work faster.
Why Use Barcode Labels?
Barcode labels help you:
- Keep inventory records accurate
- Speed up stock tracking and billing
- Maintain consistent product labeling
- Support smooth retail and warehouse operations
What Can You Configure?
The Print Barcode Label Settings module lets you control:
- Label size, spacing, and alignment
- Media type and barcode format
- Custom text, images, and fields
- Reusable templates for consistent printing
What Will You Learn?
- How to create a barcode template
- How to set label size and media type
- How to print barcode labels from Purchase and Inventory screens
- How to edit and reuse existing templates
Barcode Label Templates
Barcode templates can be created for different business needs:
- Continuous roll labels for high-volume printing
- SKU and product ID labels for quick identification
- QR code labels for digital tracking
- MRP and price tags for billing support
- Custom-designed labels for branding and packaging
How To Create A Barcode Label Template
A barcode label template defines the layout and fields used when printing product labels in O2VEND ERP. Follow these steps to create one:
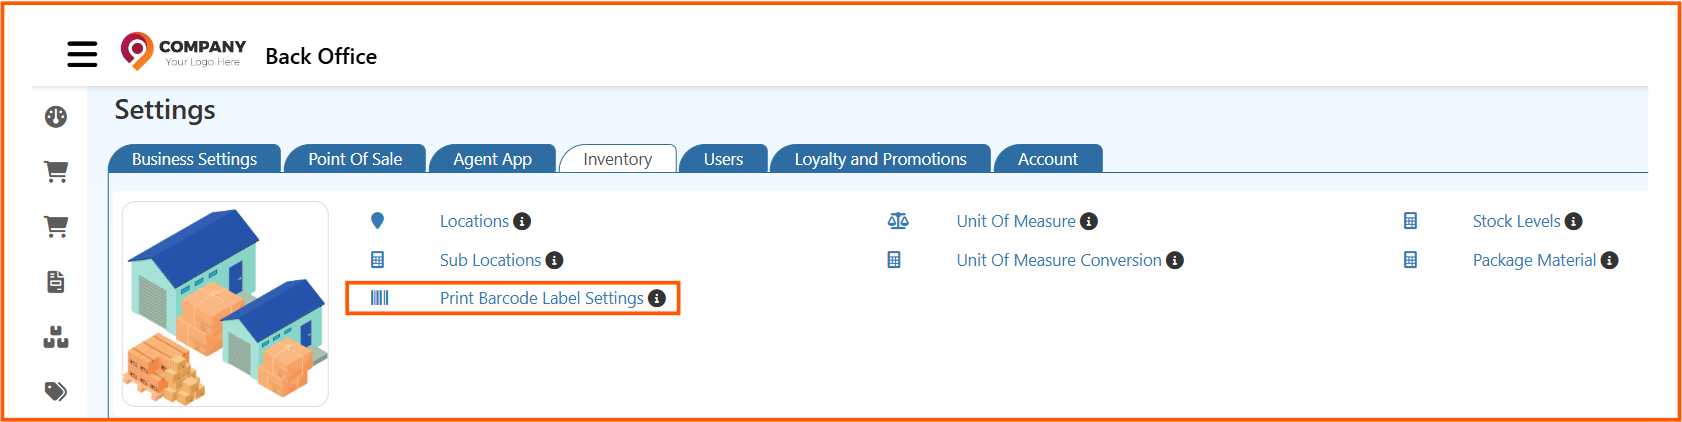
- Go to Settings > Inventory Settings > Print Barcode Label Settings.
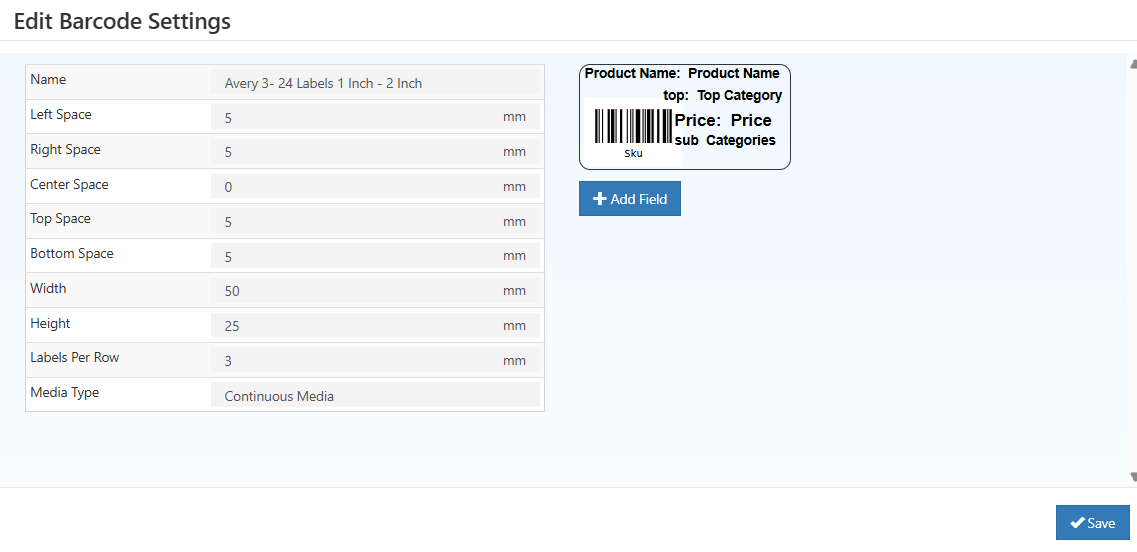
Barcode Label Format & Layout Settings Explained
The Create Barcode Settings screen in O2VEND ERP allows precise control over barcode label layout, spacing, alignment, and media format. These settings ensure that labels print correctly on thermal printers, label sheets, and continuous roll printers.
Below is a detailed explanation of each field visible in the editor.
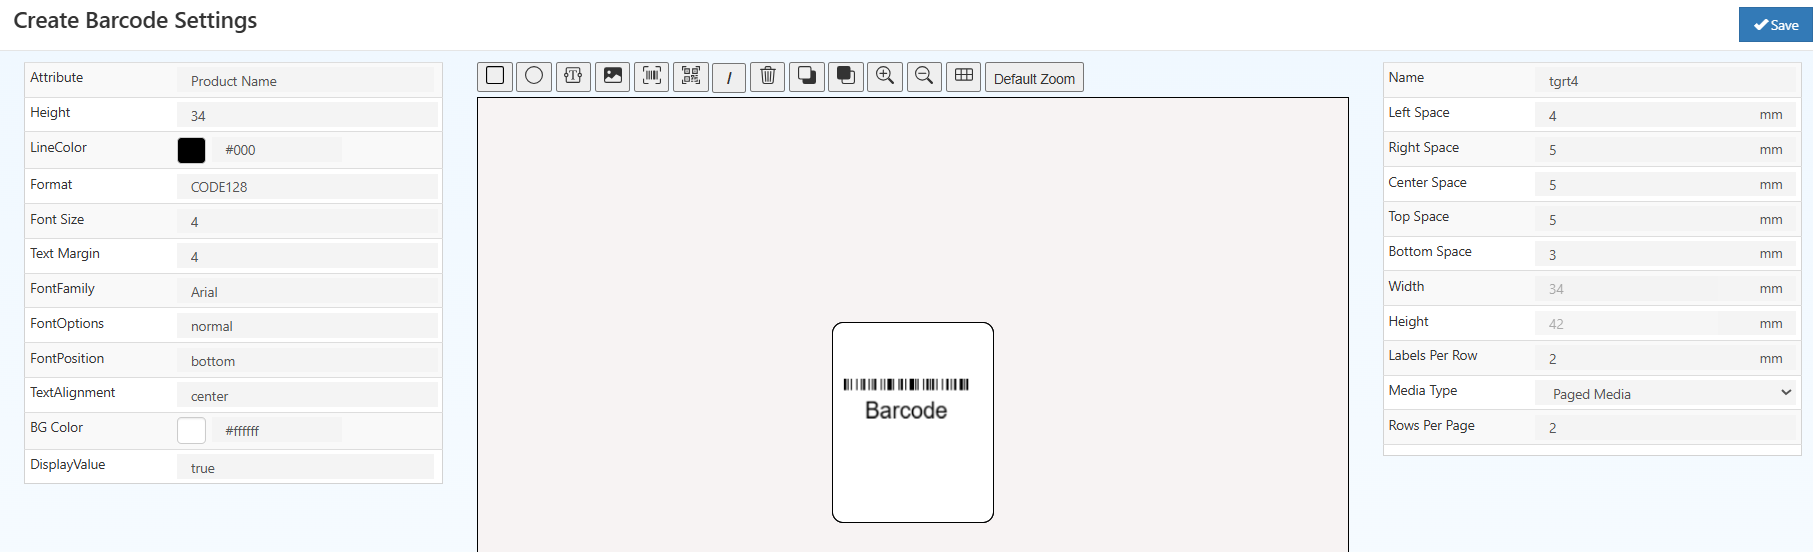
Left Panel — Barcode Attribute Settings
These options configure the selected field inside the barcode template (text, barcode, or image).
Attribute
Defines the linked product data such as SKU, GTIN, Product Name, or any custom field.
This ensures the printed label automatically updates with product information.
Height
Controls the height of the selected field.
For barcode fields, increasing height improves scanner readability.
Line Color
Sets the line/ink color of the barcode or text.
Usually remains black for optimal scanning.
Format
Specifies the barcode format (e.g., Code128, EAN13, UPC, QR).
Choosing the correct format ensures compatibility with retail or warehouse scanners.
Font Size
Controls the size of text displayed on the label.
Larger font is used for MRP or product names; smaller font for secondary information.
Text Margin
Defines the spacing between the field boundary and the printed text.
Useful to prevent text from touching the label edge.
Font Family
Allows selecting the font style (e.g., Sans Serif, Serif, Monospace).
This affects the overall appearance and readability.
Font Options
Additional font settings such as Bold, Italic, Underline.
Commonly used to highlight important information like price or SKU.
Font Position
Controls the placement of the text relative to the barcode (Top / Bottom / Center).
Example: Showing value below barcode for store readability.
Text Alignment
Aligns text to the left, center, or right within the field.
Center alignment is usually preferred for labels.
BG Color
Sets background color of the field.
Most barcode labels use white background for accurate scanning.
Display Value
Enables or disables showing the numeric barcode value below the bars.
Enabled for retail POS labels; disabled for minimalist labels.
Right Panel — Label Layout & Page Settings
These settings configure the overall size, spacing, and printing behavior of the entire label sheet or roll.
Name
The template name used to identify and reuse the layout across modules.
Left Space / Right Space / Center Space
Controls horizontal spacing between labels on the sheet.
- Left Space: Margin from the left edge
- Right Space: Margin from the right edge
- Center Space: Space between columns
These values help align labels precisely when printing on sheets like Avery.
Top Space / Bottom Space
Vertical spacing above and below each label row.
Prevents misalignment when printing multiple rows on a single page.
Width
Defines the overall label width in millimeters.
Must match physical label roll or sheet size.
Height
Specifies the label height in millimeters.
Important for ensuring consistent printing on thermal printers.
Labels Per Row
Number of labels printed horizontally in one row.
Example: 2 labels per row for small price tags.
Media Type
Select between:
- Paged Media – For sheet labels with fixed rows/columns
- Continuous Media – For roll printers where labels print continuously
Choosing correct media type ensures no cutting or alignment issues.
Rows Per Page
Number of label rows on a full page (used for Paged Media).
Required for A4/A5 label sheets.
Preview Area (Center Panel)
The middle canvas displays a live preview of the barcode label.
Actions include:
- Move fields
- Resize text, barcode, image
- Add new elements (text, barcode, image, shapes)
- Zoom for detailed viewing
- Delete or clone field items
This helps design accurate product labels without trial-and-error printing.
Toolbar Icons (Top)
Includes tools to:
- Add Text
- Add Barcode
- Add Image
- Add Lines / Shapes
- Zoom In / Zoom Out
- Align Fields
- Delete Field
These actions allow building a fully customized label layout.
Media Type Options
Paged Media
Suitable for sheet-based label printing.
Uses structured layouts with fixed rows and columns.
Continuous Media
Used with roll-based thermal printers.
Prints labels continuously without page breaks.
How to Edit Barcode Print
- Click and Open the Edit icon.
- Enter the label details:
- Name - Unique template name
- Label Height - Height of the label in mm
- Label Width - Width of the label in mm
- Labels Per Row - Number of labels printed in each row
- Gap Between Labels - Space between labels
- Click Add Field to add template elements.
- Double-click Drag Me to edit field properties.
- Choose the field type:
- Text - Product name, SKU, MRP, category
- Image - Product image, brand logo
- Barcode - SKU, GTIN, or custom barcode
- Click Save to store the barcode label template.
This setup helps maintain accurate, consistent, and high-quality barcode printing across inventory, purchase, and retail operations in O2VEND ERP.
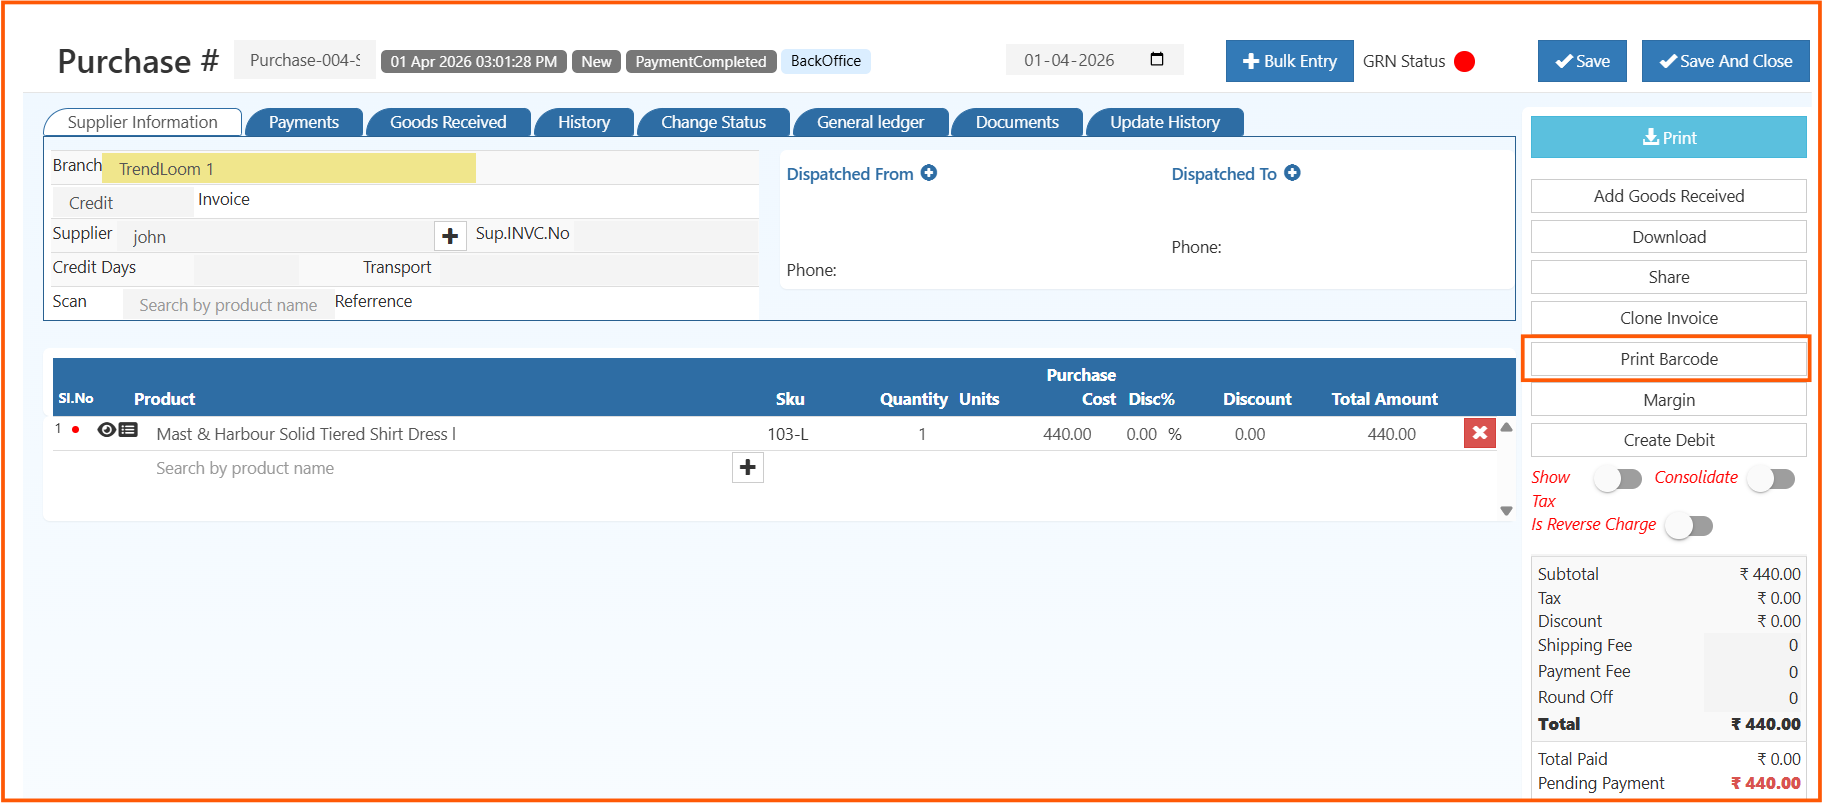
How to Print Barcode Labels from Purchase Module
- Open Back Office
- Navigate to Voucher → Purchase
- Open the purchase invoice
- Click Print Barcode
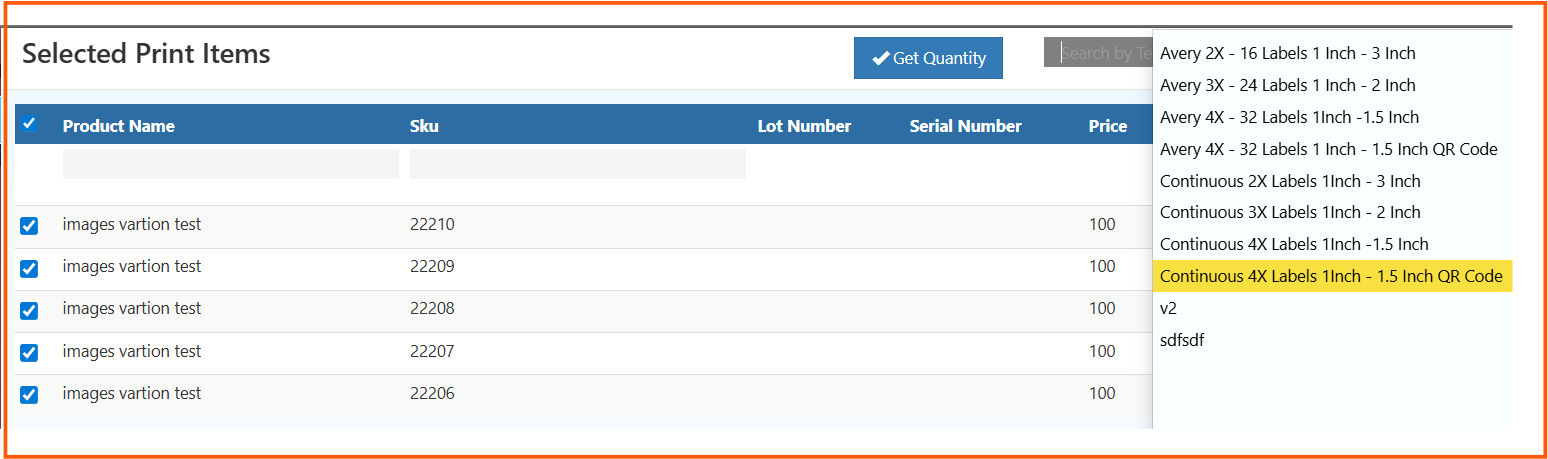
- Enter label quantity
- Select a barcode template
- Click OK to print
This is commonly used for printing labels for newly received stock.
How to Print Barcode Labels from Inventory
- Open Back Office

- Go to Inventory → Print Barcode
- Click Print Barcode
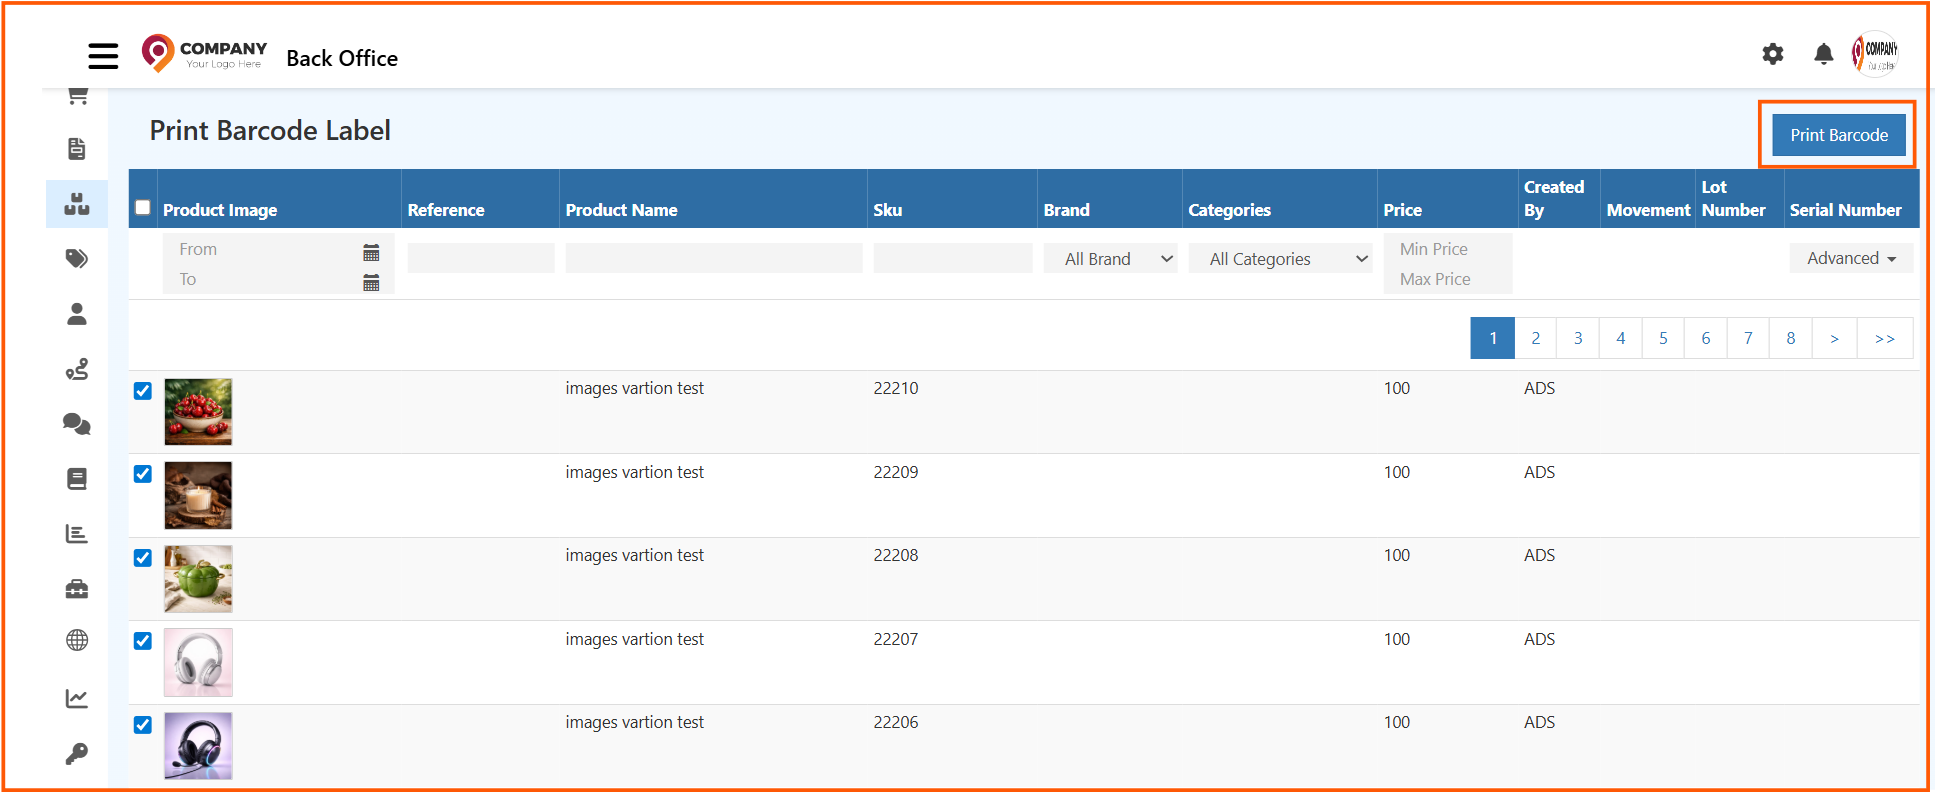
- Select a barcode template
- Click OK to print
This method is ideal for reprinting labels for existing stock.
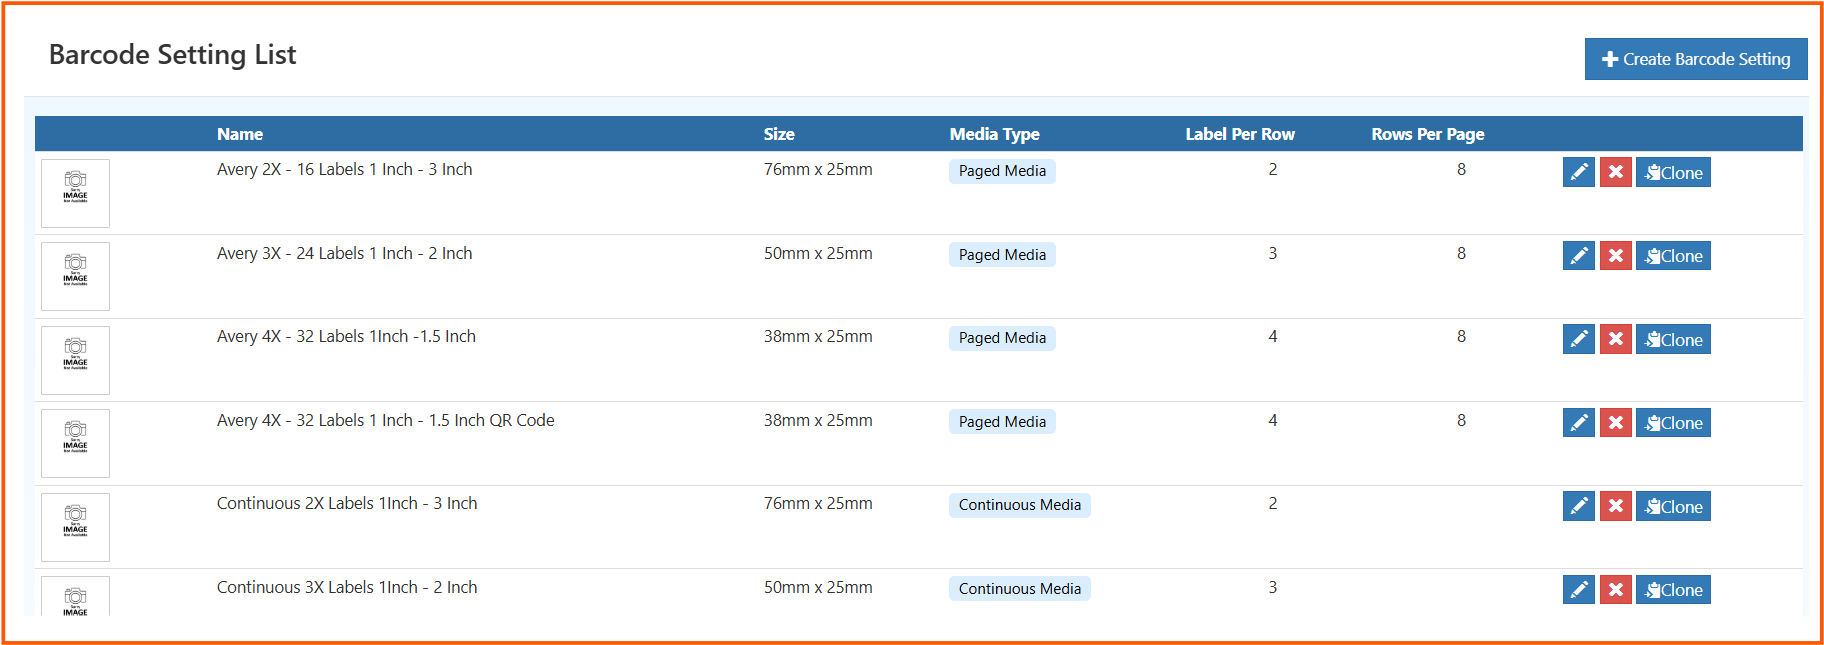
Clone Barcode Template in O2Vend
The Clone feature allows duplicating an existing barcode template instantly, helping maintain consistency and saving setup time.
How to Clone a Template
- Go to Backoffice → Settings → Inventory Settings → Print Barcode Label Settings
- Locate the barcode template to duplicate
- Click Clone
- Enter a new template name
- Make optional adjustments (size, fields, spacing)
- Click Save to apply

Why Use Clone?
- Quickly create similar barcode templates
- No need to rebuild designs from scratch
- Already configured fields, spacing, and layout are copied
- Only minor edits required based on label size or format
Where to Use Print Barcode Label in O2VEND ERP
Barcode labels can be generated directly from the following modules:
Inventory
Catalog
[Purchase]
Integrated barcode printing across modules ensures consistent product labeling and streamlined inventory operations.
Related Documentation
Related Blog Resources — Enhance Barcode Printing & Inventory Efficiency
Explore these detailed guides to streamline barcode printing and inventory workflows in O2VEND ERP:
Improve Barcode Printing Efficiency
Learn how to optimize barcode labels, enhance scan accuracy, and reduce printing errors.
Setup Barcode Printer in O2Vend ->Want to Create Your Own Barcode Labels?
Follow this detailed guide on generating barcodes for inventory tracking in O2Vend.
Generate Barcodes for Inventory Tracking ->Need Help with Barcode Setup?
Get expert guidance to configure barcode printing, templates, and label formats in O2Vend ERP.
Visit O2Vend Support ->