Package Material | Inventory Setup and Goods Issue Guide
Learn how to open Package Material in O2VEND Back Office, create package records, and use them in goods issue and shipment workflows.
what is package material?
Package material is used to define the boxes, bags, and courier packs you use during dispatch. It helps you standardize packaging for goods issue and shipment, so your team can pick the right box or bag and keep delivery details consistent across workflows.
This makes dispatch smoother, improves tracking, and keeps inventory records more organized.
Navigation
Open the page from the Back Office navigation:
Back Office > Settings > Inventory > Package Material
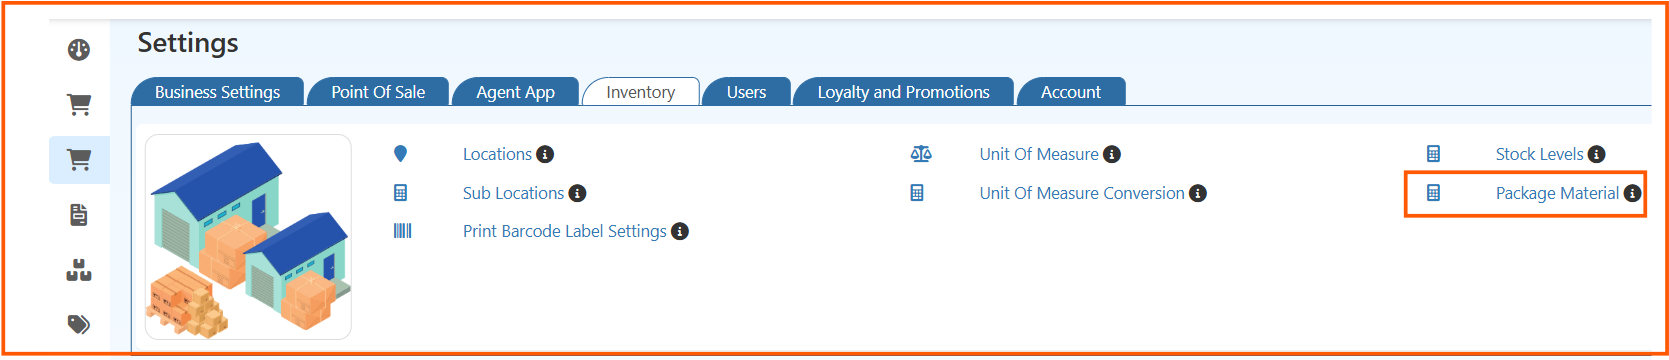
This inventory shortcut area also includes:
- Locations
- Sub Locations
- Print Barcode Label Settings
- Unit Of Measure
- Unit Of Measure Conversion
- Stock Levels
What Does The Package Material List Show?
After opening the page, you can review all saved package materials and create a new one from the top-right button.

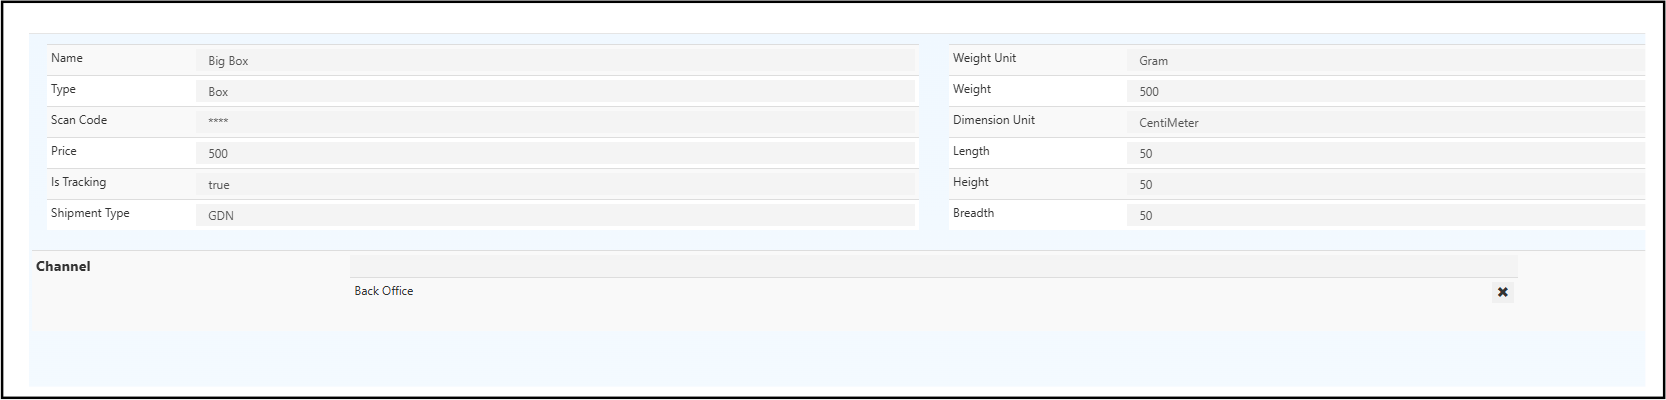
The list view shows these details:
- Name - Package material name such as box or bag
- Type - Packaging type used for the item
- Channel - Where the package material can be used
- L/H/B/ Unit - Length, height, breadth, and measurement unit
- Weight/ Unit - Package weight and weight unit
- Scan Code - Barcode or scan code for quick search
- Price - Package material price
- Tracking - Shows whether tracking is enabled
- Shipment Type - Use case such as GRN or GDN
- Actions - Edit or delete the record
The page also includes the Search by Name field for quick filtering.
How Do I Create Package Material?
- Click Create PackageMaterial.
- Enter the package name.
- Select the package Type.
- Add the Channel details if needed.
- Fill the Dimensions and Weight fields.
- Add the Scan Code, Price, and Tracking option.
- Set the Shipment Type.
- Click Save.
How Is Package Material Used In Goods Issue?
Once package material is created, you can use it while preparing a goods issue.
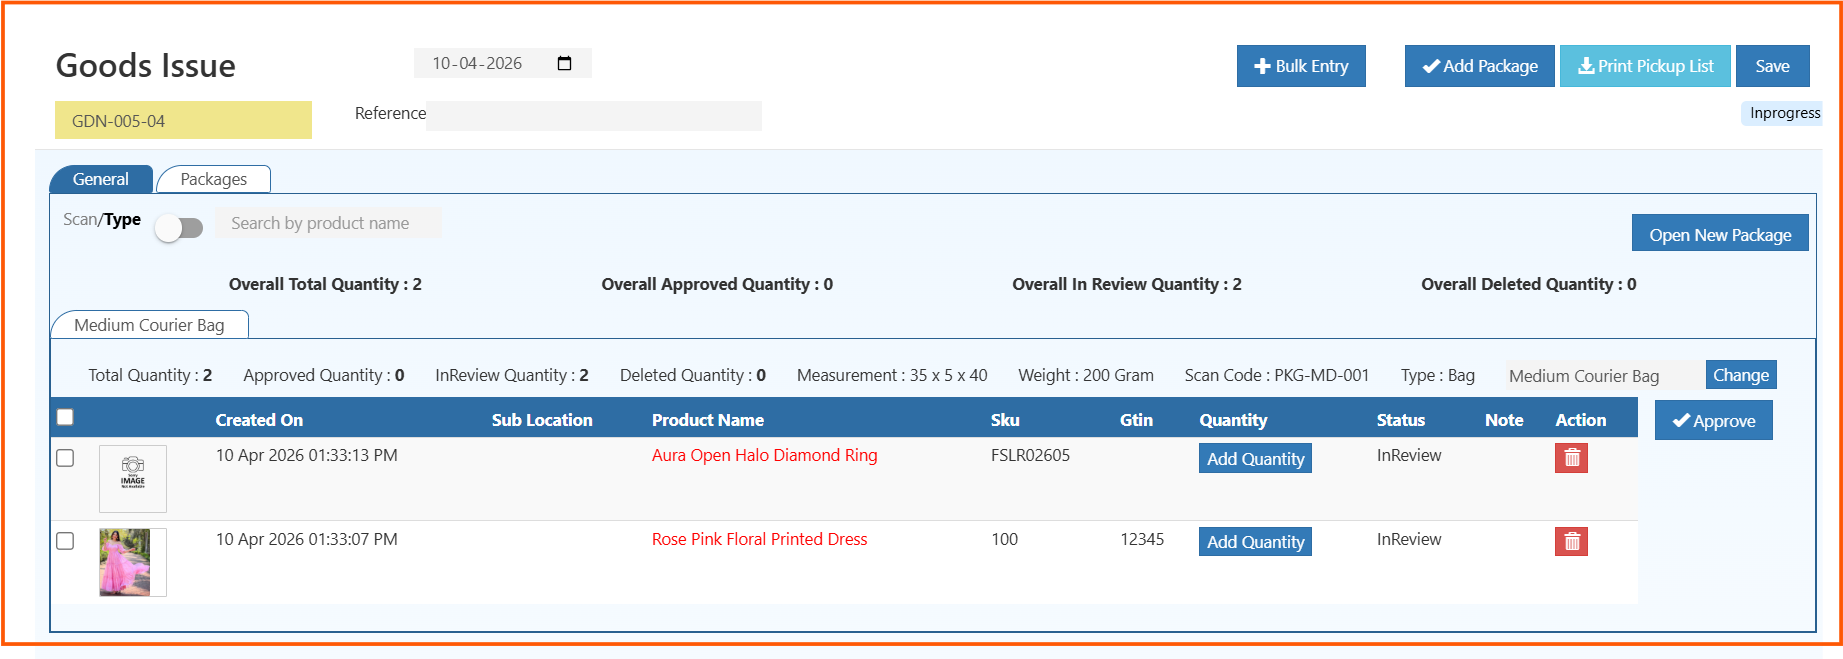
What Is The Goods Issue Flow?
- Open the Goods Issue screen.
- Click Add Package or Open New Package to start a new package.
- Select the package material you want to use, such as a bag or box.
- Add the products using Scan/Type.
- Enter the required quantity using Add Quantity.
- Check the package details before final approval.
- Click Approve or Save to complete the process.
What Do The Useful Fields Mean?
- Scan/Type - Search the product by typing the name or scanning the barcode.
- Overall Total Quantity - Shows the total number of items added to the package.
- Overall Approved Quantity - Shows how many items are already approved.
- Overall In Review Quantity - Shows items still waiting for review.
- Overall Deleted Quantity - Shows items removed from the package.
- Measurement - Displays the package size.
- Weight - Displays the package weight.
- Scan Code - Shows the package scan code used for identification.
- Type - Shows the package type, such as box or bag.
Helpful Related Links
Use these pages when you are setting up package material and shipment flow:
- Locations - Set up the warehouse or store location linked to inventory flow
- Sub Locations - Organize stock inside a location by bins or sections
- Print Barcode Label Settings - Configure barcode label printing for stock items
- Unit Of Measure - Define measurement units used in inventory
- Unit Of Measure Conversion - Convert one UOM to another for stock handling
- Stock Levels - Review stock quantities across inventory locations
- Branch - Connect inventory locations to branch records
- POS Print Settings - Match package-related print output with POS setup
- Delivery Settings - Configure delivery flow used with shipment processing
Why Is Package Material Useful?
- It keeps packaging sizes and weights consistent
- It helps the team pick the right package quickly
- It makes goods issue and shipment tracking easier
- It supports cleaner dispatch records