O2VEND Retail ERP
  • Product
  • Solutions
  • Resources
    • Blog
    • Community
    • Partnership
    • Find Partner
    • Developer
  • Pricing
  • Docs
    • Getting Started
      • Channels
        • Sales Channel
        • O2VEND to O2VEND Channel
        • Shopify Integration Guide
    • Commerce
      • Ecommerce
      • POS
      • Agent App
      • CMS
      • Themes & Apps
      • Apps
        • Sales Navigator
    • Operations
      • OMS
      • WMS
      • O2C
      • Vendor Portal
      • Supplier Portal
    • Back Office
      • Accounting
      • Reports
      • PIM
      • Communication
      • Back Office
Search Results for

    Show / Hide Table of Contents
    • Retail ERP Back Office Overview
    • Back Office Dashboard
    • Analytics & Reports
      • Visitor Analytics
      • E-commerce Analytics
      • Product Analytics
      • Campaigns Analytics
    • API & Webhook Integration
      • Webhook
      • Product Webhook Payload Guide
      • Testing webhook
    • Back Office Settings
      • Settings Overview
      • Store Settings
        • Business Details
        • Tax Classes
        • Tax Rates
        • Operating Countries
        • Operating State or Province
        • Branches
        • Sales Channels
        • Return Rule
        • Back Office Print Detail
        • Download Template
        • Order Numbering
        • Push Notification
      • POS Settings
        • Quick Add Buttons
        • Print Settings
        • Payment Methods
        • Delivery Settings
        • Language
        • POS Offline Mode
      • Agent App Settings
        • Agent App Print Details
      • Stock Settings
        • Unit Of Measure
        • Location
        • Unit Of Measure Conversions
        • Stock Levels
        • Sub Location
        • Print Barcode Label Settings
        • Package Material
      • User Settings
        • Vendors
        • User Date Setup
        • Employees
        • Vendors Commission
        • Credit Rules
        • Automatic User Code
        • User Authorization
      • User Role Mapping
        • Set Up Employee Roles
        • Ecommerce
        • Point Of Sale
        • Back Office
        • Sales App
        • Roles
      • Loyalty and Promotions
        • Reward Points
        • Coupons
        • Gift Vouchers
        • Offers and Discounts
        • Benefits
        • Affiliate
        • Coupon Print Setting
      • Account Settings
        • Financial Year
        • Voucher Numbering
        • Sales Account Map
        • Voucher Numbering Rules
    • Profile

    Stock Levels | Inventory Reorder and Safety Stock Settings

    Learn how to configure Stock Levels in O2VEND Back Office, including reorder quantity, minimum and maximum stock, lead time, and safety stock.

    Stock Levels help you control how much stock should be available for each product. By setting reorder points and safety stock, you can reduce stockouts, avoid overstocking, and keep replenishment easier to manage.

    Navigation

    Open the page from the Back Office navigation:

    Back Office > Settings > Inventory > Stock Levels

    Stock Levels Settings

    The inventory shortcut area also includes:

    • Locations
    • Sub Locations
    • Unit Of Measure
    • Unit Of Measure Conversion
    • Print Barcode Label Settings
    • Package Material

    What Do Stock Levels Control?

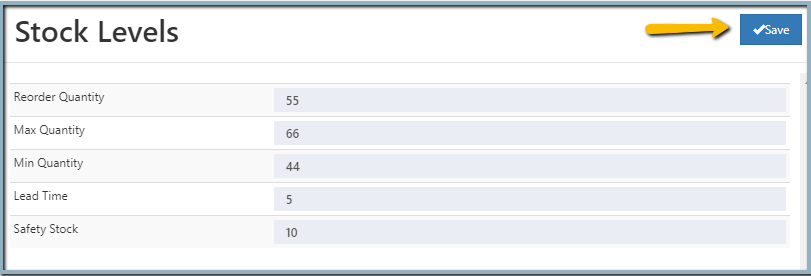
    Stock Levels define the quantity limits used to manage product availability and replenishment.

    • Reorder Quantity - The quantity that triggers a new purchase or replenishment
    • Max Quantity - The highest stock level you want to keep
    • Min Quantity - The lowest stock level before reorder planning starts
    • Lead Time - The time needed to restock after ordering
    • Safety Stock - Extra stock kept for unexpected demand or delays

    How Do I Set Up Stock Levels?

    1. Open Stock Levels from the Inventory settings.
    2. Enter the required values for each field.
    3. Review the numbers before saving.
    4. Click Save.

    Stock Levels Form

    Where Are Stock Levels Used?

    Stock levels are also visible while creating or editing a product.

    Product Stock Levels

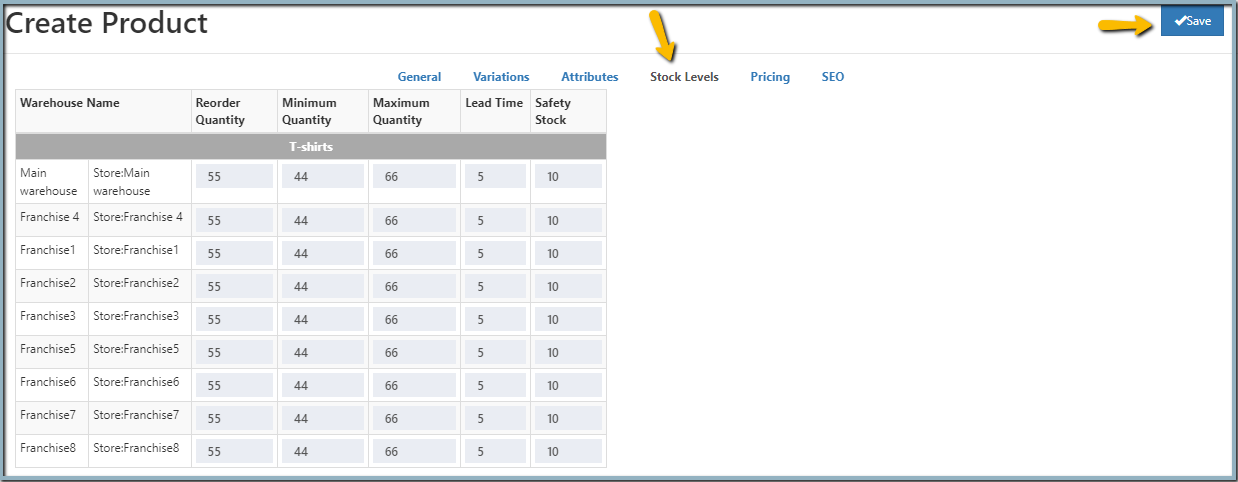
    This helps you set product-wise stock control for each warehouse or branch.

    Helpful Related Links

    Use these pages when you are setting up inventory controls:

    • Locations - Define warehouses and stores
    • Sub Locations - Organize stock inside a location
    • Unit Of Measure - Set the stock measurement unit
    • Unit Of Measure Conversion - Convert one unit of measure to another
    • Print Barcode Label Settings - Print labels for inventory items
    • Package Material - Set packaging used in dispatch workflows
    • Branches - Link inventory to branch records
    • Sales Channels - Connect stock flow with sales channels
    • Store Business Details - Review the business setup used across inventory modules

    Why Use Stock Levels?

    • It helps prevent stockouts
    • It reduces excess inventory
    • It keeps reorder planning simple
    • It supports better stock control across locations
    In this article
    O2VEND

    O2VEND Help Center for Ecommerce, Back Office, POS, Agent App, PIM, OMS, WMS, Accounting, O2C, CMS, and ERP Reports workflows.

    Get Demo Contact Sales

    Product Docs

    Ecommerce Back Office Point of Sale Agent App Warehouse (WMS)

    Module Docs

    PIM OMS Accounting Order to Cash (O2C) CMS

    Resources

    Ecommerce POS Back Office Agent App Restaurant POS Integrations

    Community and Company

    Blog Community Partnership Find Partner Developer Pricing

    © 2019-2026 Jeyan Technologies Private Limited. All rights reserved.

    Privacy Policy • Terms of Service • Cancellation & Refund