Voucher Numbering Rules Setup Guide
Learn how to create and configure voucher numbering rules in O2VEND Back Office. Use templates, date tokens, rolling numbers, and special placeholders for consistent voucher IDs.
Voucher numbering rules control how vouchers are generated and formatted for each branch, channel, and order type. Use the rule templates to create consistent and readable voucher IDs for Ecommerce, POS, Agent App, Shopify, and other sales channels.
Navigation
Back Office → Settings → Account → Voucher Numbering Rules

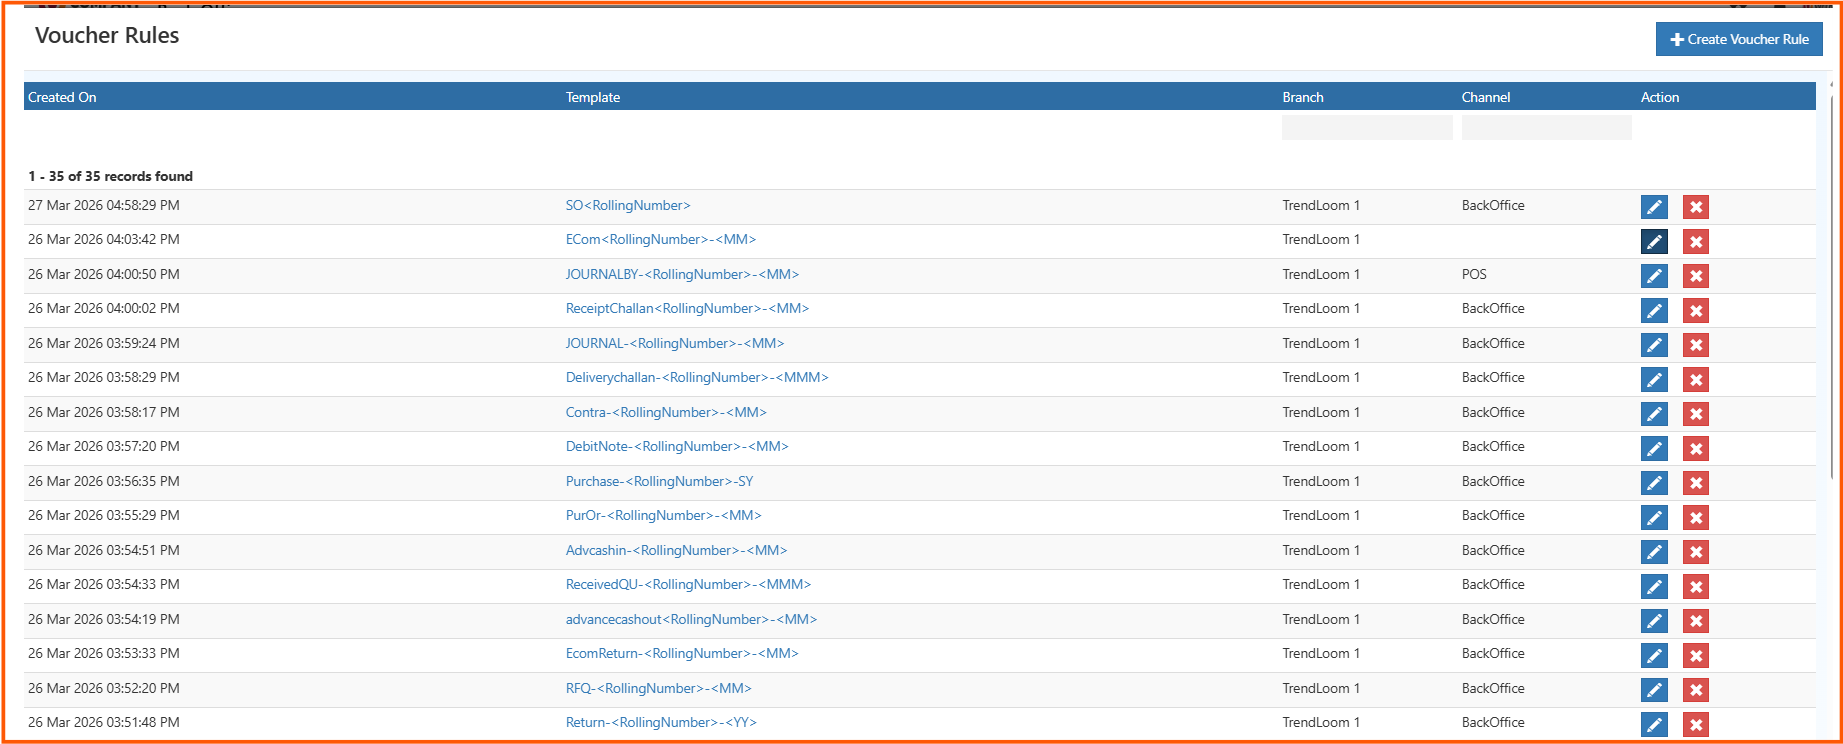
Voucher Numbering Rules List
The voucher numbering list shows all configured rules and their status. You can edit existing rules or create a new rule from this screen.
Key columns:
- Template
- Branch
- Channel
- Created On
- Actions (Edit / Delete)
Note: Voucher numbers generated for e-Invoice must stay under 16 characters to ensure valid e-Invoice generation.
 ---
---
Create a New Voucher Rule
- Click Create on the top-right of the Voucher Numbering Rules list.
- Enter the rule details.
- Choose the correct Branch, Channel, and Customer Group as needed.
- Select the applicable Order Types.
- Save the rule.
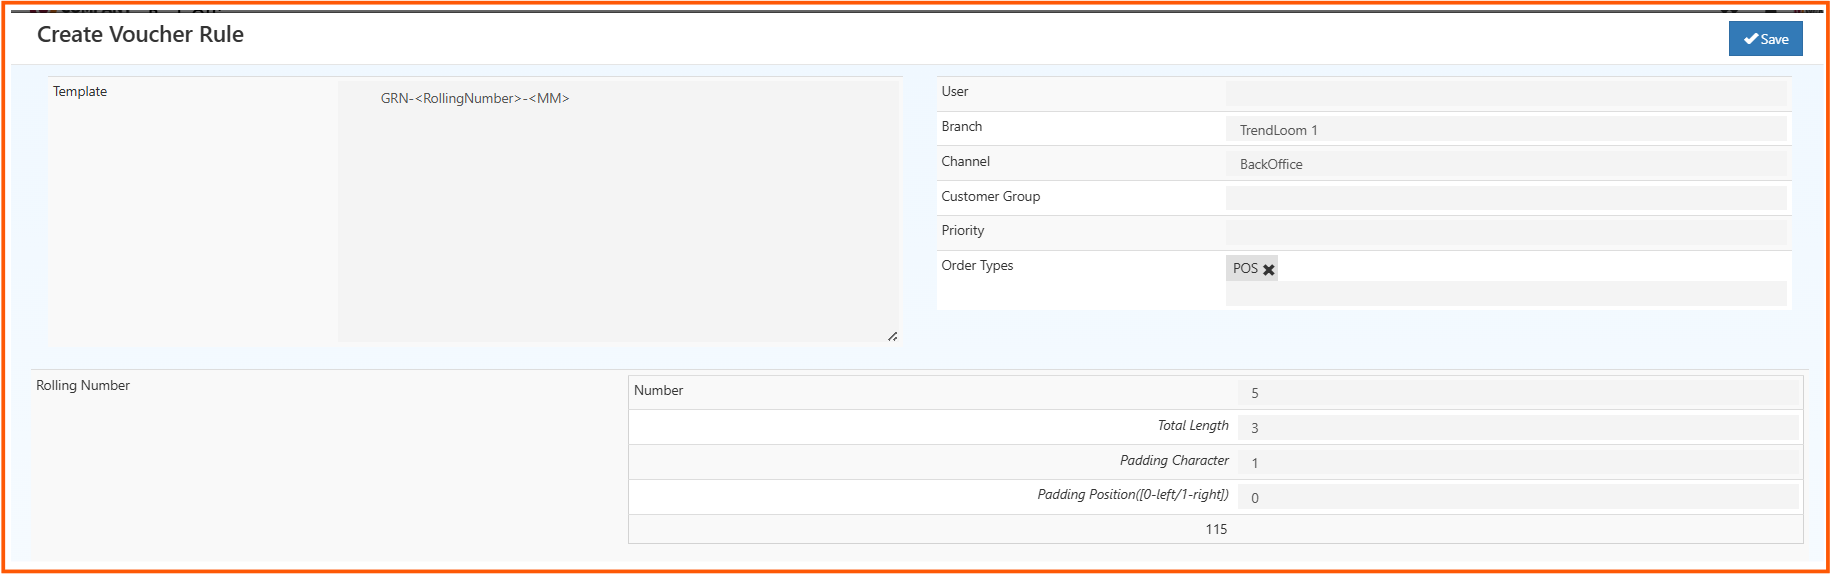
Rule fields
| Field | Description |
|---|---|
| Template | Define the voucher format template. Example: Shopify-SO-<RollingNumber>-SY |
| User | Assign a specific user to the rule (optional). |
| Branch | Select the branch where this rule applies. |
| Channel | Select the sales channel such as POS, Agent App, Shopify. |
| Customer Group | Optionally limit the rule to a customer group. |
| Priority | Lower values mean higher priority when multiple rules match. |
| Order Types | Choose the order types to apply this rule, such as ECommerce or POS. |
Voucher Template Tokens
Use standard date and placeholder tokens inside your template to build dynamic voucher numbers.
| Token | Output example | Meaning |
|---|---|---|
DD |
15 |
Day of month with leading zero |
MM |
04 |
Month number with leading zero |
MMM |
Apr |
Three-letter month name |
YYYY |
2025 |
Four-digit year |
YY |
25 |
Two-digit year |
<RollingNumber> |
00001 |
Sequential number that increments automatically |
<NormalizedName> |
SHOPIFY |
Cleaned or normalized version of the selected name |
<A:1> |
A |
Alphabetical sequence placeholder for voucher numbering |
<O:1> |
O |
Ordered or fixed placeholder used in voucher numbering |
Use
<A:1>and<O:1>directly in voucher numbering templates when you need alphabetic or ordered placeholder segments.
Configure Rolling Number
This section controls how sequential numbers are generated within the voucher format.
| Setting | Description | Example |
|---|---|---|
| Number | The starting number for the sequence. | 1 |
| Total Length | Total characters reserved for the number portion. | 5 |
| Padding Character | Character to pad the rolling number. | 0 |
| Padding Position | 0 = left pad, 1 = right pad. |
0 |
| Preview | Shows the generated voucher format. | 00001 |
Save the Rule
- Verify the template and rule settings.
- Click Save.
- The rule is now active for the selected branch, channel, and order types.
Example Voucher Format
Template: SHOP-<RollingNumber>-<DD><MM><YYYY>
Output: SHOP-00001-15042025
Template: SALE-<A:1>-<O:1>-<YY>
Output: SALE-A-O-25
Best Practices
- Keep voucher templates short and meaningful.
- Use date tokens to group vouchers by day or month.
- Use
<RollingNumber>to maintain sequential numbering. - Use
<A:1>and<O:1>when you need alphabetic or ordered placeholders. - Confirm voucher length when e-Invoice generation is required.