Receipt Challan in O2VEND ERP | Create, Review, and Process Stock Inward
The Receipt Challan screen in O2VEND ERP is basically where you log incoming goods before everything gets finalized in the system. Think of it as a checkpoint—nothing fancy, just making sure what arrived actually matches what was expected.
It’s mostly used by warehouse or purchase teams to enter supplier details, check quantities, and then move things forward (like marking items as received or creating invoices later on).
Navigation Path
Back Office -> Inventory -> Receipt Challans
Receipt Challan List Screen
The list page gives you a complete view of all receipt challans created in the system.
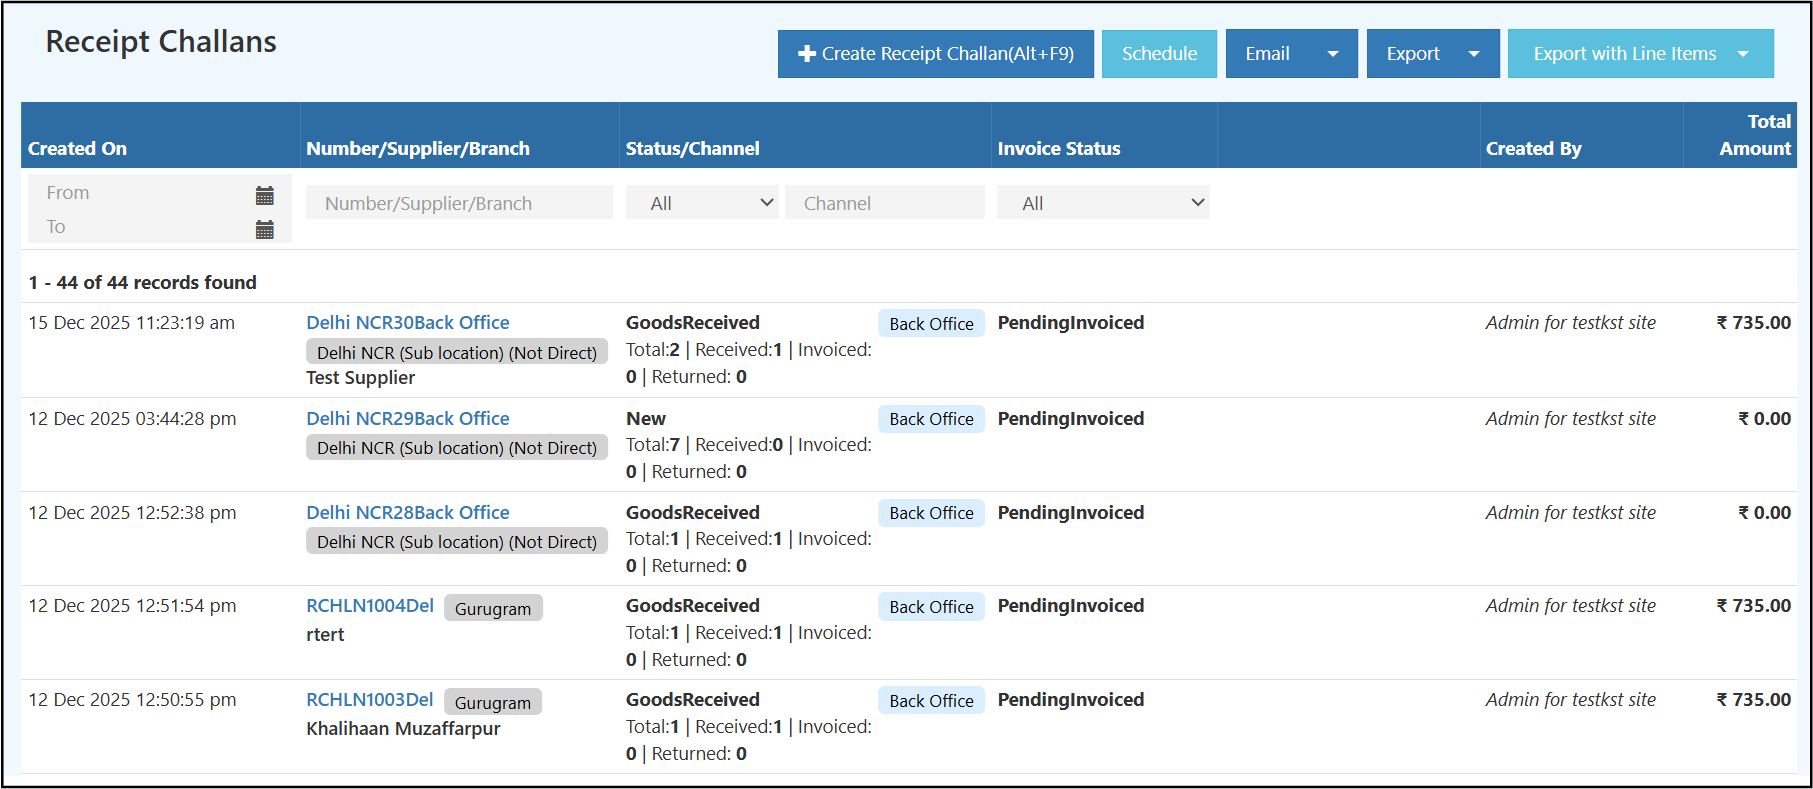
From this screen you can:
- Click Create Receipt Challan (Alt+F9) to add a new inward document
- Use Schedule, Email, Export, and Export with Line Items for reporting and follow-up
- Filter the list by Created On, Number/Supplier/Branch, Status, Channel, and Invoice Status
- Review the challan summary before opening the full document
What the list shows
- Created On: Date and time when the receipt challan was created
- Number/Supplier/Branch: The challan reference, supplier name, and receiving branch or sub-location
- Status/Channel: Current receipt status with counters for total, received, invoiced, and returned items, along with the channel tag
- Invoice Status: The invoice progress for that challan
- Created By: User who created the document
- Total Amount: Total value of the receipt challan
This screen is useful for quickly identifying new challans, challans already marked as GoodsReceived, and challans still waiting for invoicing.
Create a Receipt Challan
Click Create Receipt Challan from the list page to open the data entry screen.
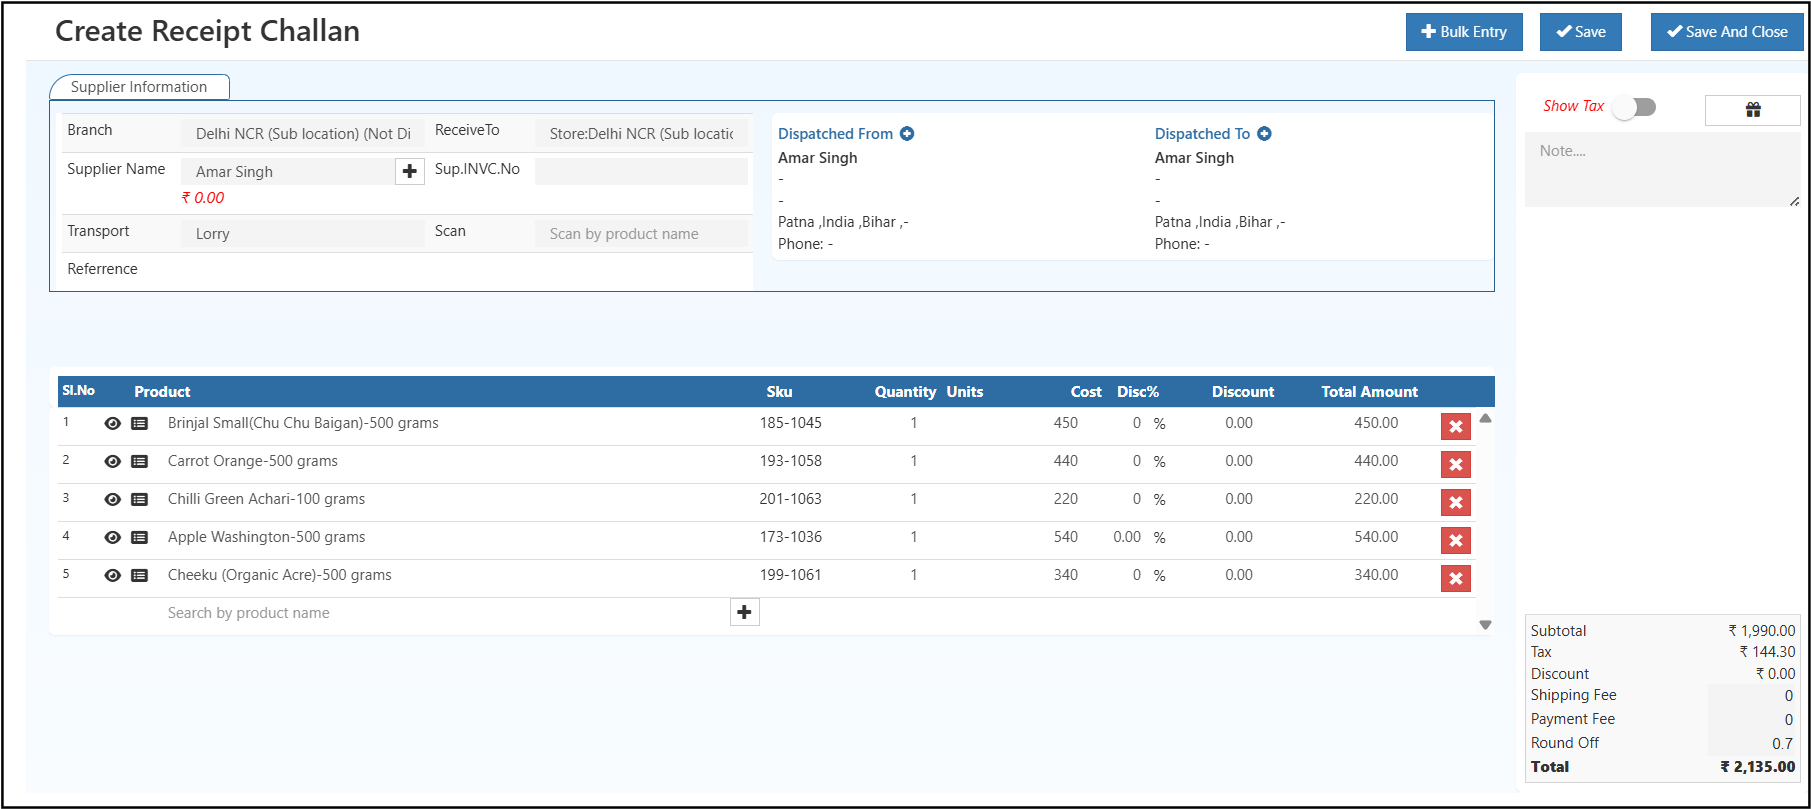
The create screen is divided into four working areas: supplier information, dispatch details, product lines, and the totals panel.
Supplier Information
The top-left section captures the basic inward details:
- Branch: Receiving branch or sub-location
- ReceiveTo: Store or warehouse location that will receive the stock
- Supplier Name: Supplier linked to the receipt challan
- Sup.INVC.No: Supplier invoice number or external reference
- Transport: Transport mode or carrier name
- Scan: Quick search field to scan or search a product
- Reference: Additional inward reference number
Dispatch Details
The top-right section shows the movement information:
- Dispatched From: Supplier or sending address details
- Dispatched To: Receiving address details
This makes the document easier to trace during inward verification and stock audits.
Product Grid
The main grid is where you enter and review each product line in the receipt challan.
| Column | What it shows |
|---|---|
| Product | Product name or item selected for inward entry. |
| Sku | SKU or stock code linked to the selected product. |
| Quantity | Number of units being received in this line. |
| Units | Unit of measure for the product, such as pieces, boxes, or kilograms. |
| Cost | Purchase or inward cost entered for that item. |
| Disc% | Discount percentage applied to the product line, if any. |
| Discount | Discount amount calculated for that row. |
| Total Amount | Final line value after applying quantity, cost, and discount. |
You can add products one by one using the search row or click Bulk Entry to add multiple items faster.
Side Panel and Totals
The right side of the screen includes:
- Show Tax toggle
- Notes area for internal remarks
- Order summary values for Subtotal, Tax, Discount, Shipping Fee, Payment Fee, Round Off, and Total
Save Actions
The create screen provides these main actions:
- Bulk Entry: Add multiple products in one step
- Save: Save the challan and continue working on it
- Save And Close: Save the challan and return to the list
Edit and Process a Receipt Challan
Open any saved receipt challan from the list to review or process it further.
The edit screen keeps the same supplier and product details, but adds workflow tabs and processing actions.
Header Information
At the top of the saved challan, O2VEND displays:
- Receipt challan number
- Branch or challan label
- Document date and time
- Receipt status such as GoodsReceived
- Invoice status such as PendingInvoiced
- Channel tag such as Back Office
Tabs Available on the Challan
The saved receipt challan includes several tabs to help you review the document and continue the inward process.
| Tab | What it shows |
|---|---|
| Supplier Information | Shows the branch, supplier, transport, reference, dispatch details, item lines, notes, and totals entered for the receipt challan. |
| Goods Received | Opens the receipt-related view where you can review or continue the physical goods receiving process linked to this challan. |
| History | Shows the timeline of actions already completed on the challan. |
| Change Status | Lets you manually update the challan status when the workflow moves to the next stage. |
| Documents | Stores attachments and supporting files related to the receipt challan. |
| Update History | Shows the edit trail, so you can track what was changed and when. |
These tabs make it easier to verify inward details, monitor progress, manage status updates, and keep a proper audit record for the challan.
Right-Side Actions
The right-side panel contains the main follow-up actions for a saved receipt challan. The top part shows the action buttons, and below them you can use the Show Tax toggle and the Notes area.
| Action | What it is used for |
|---|---|
| Open a printable version of the receipt challan. | |
| Goods Received | Confirm the items that have physically arrived and continue the inward process. |
| Return Items | Record rejected, damaged, or returnable items from the receipt. |
| Create Invoice | Convert the saved receipt challan into an invoice after verification. |
| Download | Download the receipt challan for record keeping or offline use. |
| Share | Share the challan with the supplier or internal team. |
| Clone | Create another receipt challan using the same supplier and item details. |
| Print Barcode | Generate barcode labels for the items in the challan. |
| Notification | Open notification options related to this receipt challan. |
| Show Tax | Show or hide tax values in the totals section. |
| Notes | Add internal remarks or receiving comments for this document. |
The totals summary remains visible at the bottom of the same panel, so users can review Subtotal, Tax, Discount, Shipping Fee, Payment Fee, Round Off, and Total while taking action.
Typical Receipt Challan Workflow
- Open Receipt Challans from the Inventory menu.
- Click Create Receipt Challan.
- Enter supplier, branch, dispatch, and product details.
- Review the totals and save the document.
- Open the saved challan from the list.
- Use Goods Received after physical inward verification.
- Use Return Items for rejected quantities if needed.
- Use Create Invoice once the receipt is confirmed.
This workflow helps teams keep stock inward records accurate before final posting and invoicing.
Why Receipt Challan Matters
- Creates a structured record of incoming stock before final processing
- Connects supplier information, branch details, and received items in one document
- Helps teams compare expected and received quantities
- Supports controlled follow-up actions from the saved challan
- Improves traceability for warehouse, purchase, and audit teams