O2VEND Retail ERP
  • Product
  • Solutions
  • Resources
    • Blog
    • Community
    • Partnership
    • Find Partner
    • Developer
  • Pricing
  • Docs
    • Getting Started
      • Channels
        • Sales Channel
        • O2VEND to O2VEND Channel
        • Shopify Integration Guide
    • Commerce
      • Ecommerce
      • POS
      • Agent App
      • CMS
      • Themes & Apps
      • Apps
        • Sales Navigator
    • Operations
      • OMS
      • WMS
      • O2C
      • Vendor Portal
      • Supplier Portal
    • Back Office
      • Accounting
      • Reports
      • PIM
      • Communication
      • Back Office
Search Results for

    Show / Hide Table of Contents
    • Retail ERP Back Office Overview
    • Back Office Dashboard
    • Analytics & Reports
      • Visitor Analytics
      • E-commerce Analytics
      • Product Analytics
      • Campaigns Analytics
    • API & Webhook Integration
      • Webhook
      • Product Webhook Payload Guide
      • Testing webhook
    • Back Office Settings
      • Settings Overview
      • Store Settings
        • Business Details
        • Tax Classes
        • Tax Rates
        • Operating Countries
        • Operating State or Province
        • Branches
        • Sales Channels
        • Return Rule
        • Back Office Print Detail
        • Download Template
        • Order Numbering
        • Push Notification
      • POS Settings
        • Quick Add Buttons
        • Print Settings
        • Payment Methods
        • Delivery Settings
        • Language
        • POS Offline Mode
      • Agent App Settings
        • Agent App Print Details
      • Stock Settings
        • Unit Of Measure
        • Location
        • Unit Of Measure Conversions
        • Stock Levels
        • Sub Location
        • Print Barcode Label Settings
        • Package Material
      • User Settings
        • Vendors
        • User Date Setup
        • Employees
        • Vendors Commission
        • Credit Rules
        • Automatic User Code
        • User Authorization
      • User Role Mapping
        • Set Up Employee Roles
        • Ecommerce
        • Point Of Sale
        • Back Office
        • Sales App
        • Roles
      • Loyalty and Promotions
        • Reward Points
        • Coupons
        • Gift Vouchers
        • Offers and Discounts
        • Benefits
        • Affiliate
        • Coupon Print Setting
      • Account Settings
        • Financial Year
        • Voucher Numbering
        • Sales Account Map
        • Voucher Numbering Rules
    • Profile

    Agent App Print Details | Configure Receipt and Invoice Print Settings

    Learn how to configure Agent App Print Details in O2VEND Back Office. Set branch-wise or consolidated print options and control what appears on receipts.

    The Agent App Print Details page in O2VEND Back Office controls what appears on printed receipts and invoices. You can apply these settings for one branch or all branches.

    Use this page to:

    • choose the print format
    • show or hide order details
    • customize receipt headings
    • manage header and footer text

    Open the Agent App Print Settings

    1. Sign in to Back Office.
    2. Go to Settings -> Agent App.
    3. Open Agent App Print Details.
    4. Select the required Branch or choose Consolidated.

    Agent App Print Details page

    This first screen is where you decide whether the print settings should apply to a single branch or to all branches together.

    Configure the Print Options

    After selecting the branch, set the print options shown on the page.

    Agent App print settings form

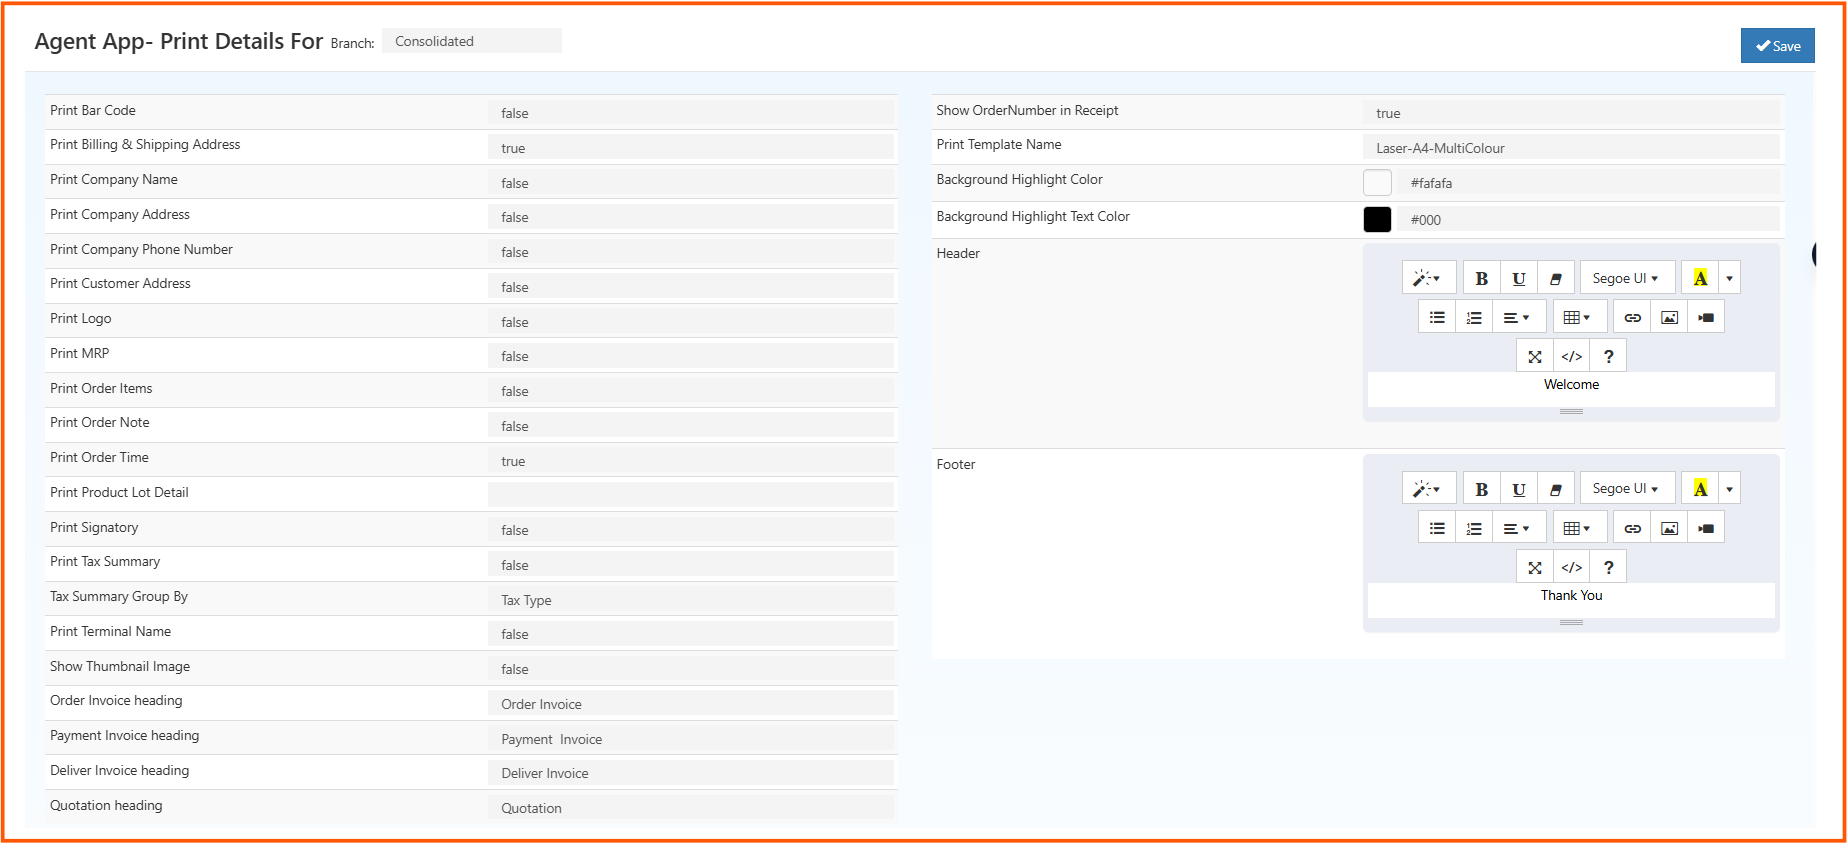
    Enter the details below:

    • Print Bar Code: Enable this if the barcode should print on the receipt
    • Print Billing & Shipping Address: Enable this to include customer address details
    • Print Company Name: Enable this to show the company name on the print
    • Print Company Address: Enable this to show the company address
    • Print Company Phone Number: Enable this to print the company phone number
    • Print Customer Address: Enable this to include the customer address
    • Print Logo: Enable this to print the company logo
    • Print MRP: Enable this to show the product MRP
    • Print Order Items: Enable this to show ordered items
    • Print Order Note: Enable this to include order notes
    • Print Order Time: Enable this to print the order time
    • Print Product Lot Detail: Enable this to show lot or batch details
    • Print Signatory: Enable this to include an authorized signatory area
    • Print Tax Summary: Enable this to print tax summary details
    • Tax Summary Group By: Choose how the tax summary should be grouped
    • Print Terminal Name: Enable this to show the terminal name
    • Show Thumbnail Image: Enable this to show product thumbnail images
    • Order Invoice Heading: Enter the heading for order invoices
    • Payment Invoice Heading: Enter the heading for payment invoices
    • Deliver Invoice Heading: Enter the heading for delivery invoices
    • Quotation Heading: Enter the heading for quotation prints
    • Show Order Number in Receipt: Enable this to display the order number
    • Print Template Name: Select the print template to use
    • Background Highlight Color: Choose the highlight background color
    • Background Highlight Text Color: Choose the text color for highlighted sections
    • Header: Enter the header content shown on the printed document
    • Footer: Enter the footer content shown on the printed document

    Save the Settings

    1. Review the selected print options.
    2. Check the header, footer, and template values.
    3. Click Save.

    After saving, the Agent App will use these settings when printing receipts or invoices for the selected branch.

    Related Articles

    • Coupon Print Settings
    • Store Back Office Print Detail
    • POS Print Settings
    In this article
    O2VEND

    O2VEND Help Center for Ecommerce, Back Office, POS, Agent App, PIM, OMS, WMS, Accounting, O2C, CMS, and ERP Reports workflows.

    Get Demo Contact Sales

    Product Docs

    Ecommerce Back Office Point of Sale Agent App Warehouse (WMS)

    Module Docs

    PIM OMS Accounting Order to Cash (O2C) CMS

    Resources

    Ecommerce POS Back Office Agent App Restaurant POS Integrations

    Community and Company

    Blog Community Partnership Find Partner Developer Pricing

    © 2019-2026 Jeyan Technologies Private Limited. All rights reserved.

    Privacy Policy • Terms of Service • Cancellation & Refund