Affiliate Program Setup | Referral Marketing & Commission Tracking
Set up and manage affiliate programs in O2VEND. Create affiliates, track referrals with unique links, and automate commission payouts.
What Is an Affiliate Program?
An affiliate program lets you reward people (partners, influencers, customers) who bring you new sales.
Example:
- Your partner gets a unique referral link:
https://yourstore.com/?affiliate=john-smith - They share it with their friends
- Friend buys → Partner earns commission automatically
Affiliates = People who promote your business and earn rewards (commission or cashback) for sales they bring
Why Use Affiliates?
- Increase Sales - Get more customers through word-of-mouth
- Automate Commissions - Pay partners without manual work
- Track Referrals - See exactly who brought each customer
- Unique Links - Each affiliate has their own tracking link
- Monitor Performance - See which affiliates perform best
Workflow in O2VEND: Create Affiliate → Generate Referral Link → Customers Buy → Commissions Paid Automatically
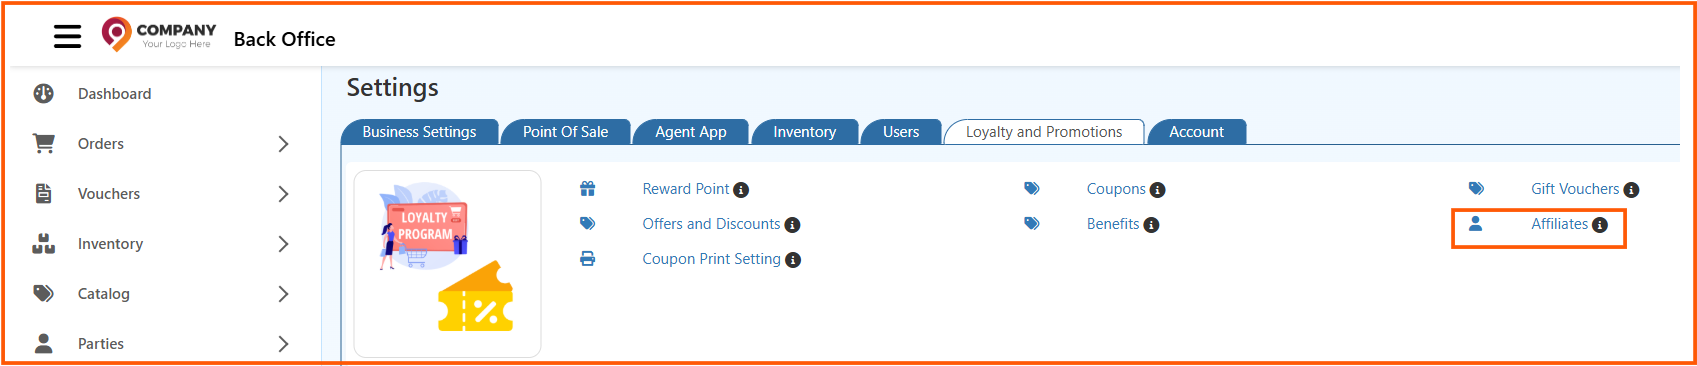
How to Access Affiliates
Path: Back Office → Settings → Loyalty and Promotions → Affiliates
- Sign in to Back Office
- Go to Settings → Loyalty and Promotions
- Click Affiliates
Setup Workflow
Follow these 4 steps to set up your affiliate program:
| Step | Task | Purpose |
|---|---|---|
| 1️⃣ | Create Customer | Set up the person/partner |
| 2️⃣ | Create Benefit | Define their reward (commission/cashback) |
| 3️⃣ | Create Affiliate | Link customer + benefit together |
| 4️⃣ | Create Coupon | Enable affiliate tracking & rewards |
Result: Affiliate gets a unique tracking link → Sales are tracked → Commissions paid automatically
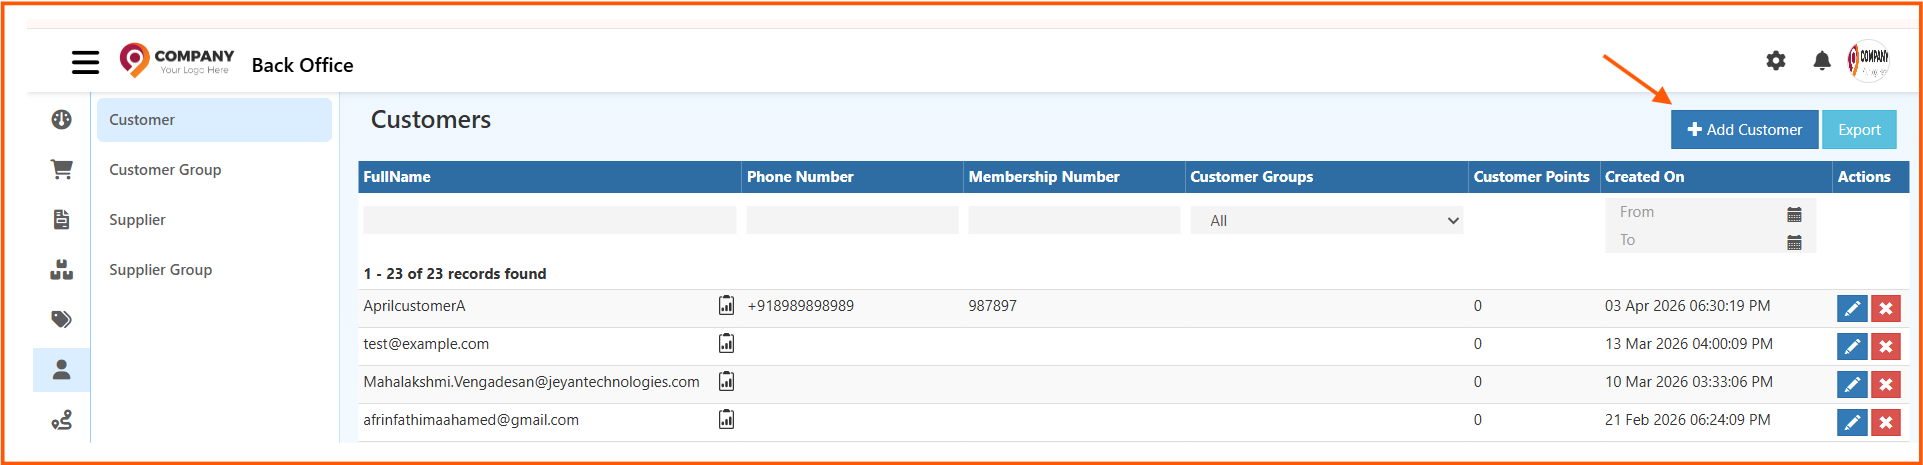
1️⃣ Step 1: Create a Customer
First, create a customer profile for your affiliate (partner, influencer, etc.).
Path: Back Office → Parties → Customers
- Click Create Customer
- Enter details:
- Name - Affiliate/Partner name
- Contact - Phone number
- Email - Email address
- Save

💡 This customer record will be linked to your affiliate profile later
2️⃣ Step 2: Create a Benefit
Define what reward your affiliate will receive.
Path: Settings → Loyalty and Promotions → Benefits
- Go to Benefits section
- Click Create Benefit
- Configure the reward:
- Type: Affiliate Fixed Commission OR Affiliate Percentage Commission
- Amount: How much they earn (e.g.,
$10or5%) - Trigger: When they get paid (usually "Once Order Complete")
- Save
3️⃣ Step 3: Create Affiliate Profile
Now link your customer + benefit together as an affiliate.
Path: Settings → Loyalty and Promotions → Affiliates
- Click Create Affiliate
- Fill in the details below
- Save
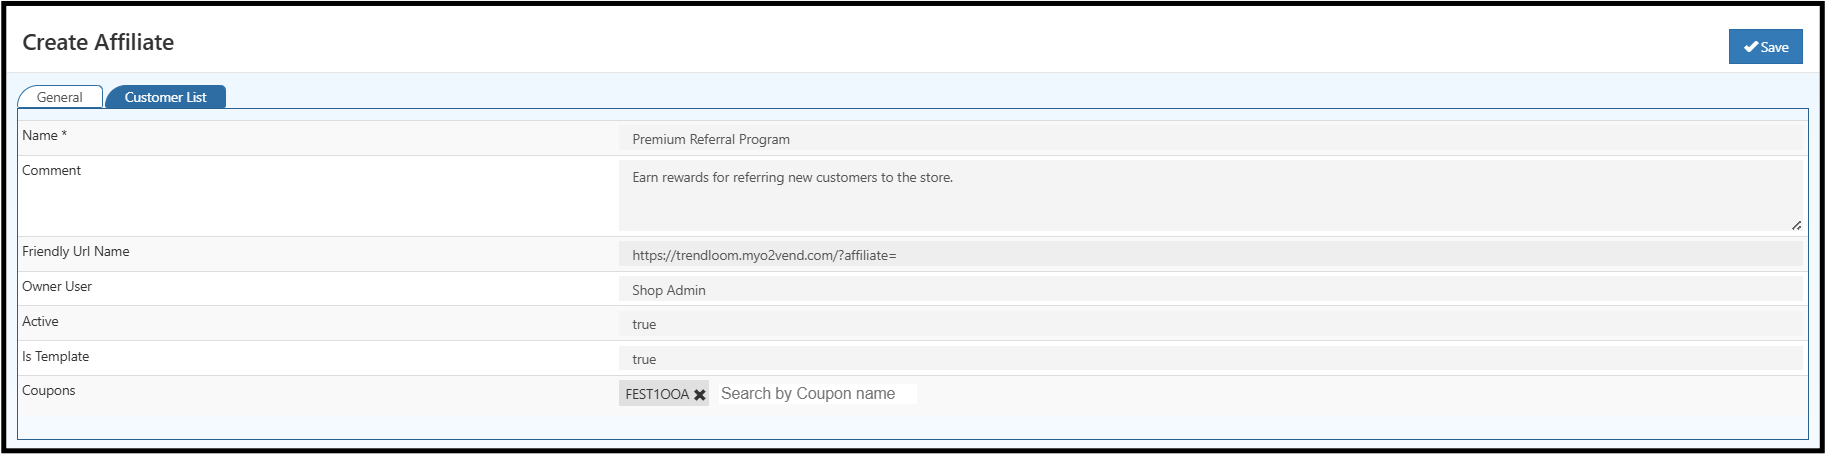
📝 Affiliate Fields:
Name (required)
- Affiliate/partner name
- Example:
John's StoreorTech Influencer Kim
Comment (optional)
- Internal notes about the affiliate
- Example: Premium partner, pays 15% commission
Friendly URL Name (auto-generated)
- Your affiliate's unique tracking link
- Example:
https://yourstore.com/?affiliate=john-smith - Customers who buy through this link contribute to the affiliate's sales
Owner User
- Manager or team member responsible for this affiliate
- Used for internal assignment only
Active
- Toggle to true to enable this affiliate
- Toggle to false to temporarily disable
Is Template
- Set to true if you want to reuse this setup for similar affiliates
- Useful when you have multiple affiliates with same commission structure
Coupons (optional)
- Link promotional coupons here
- Enables special referral discounts for this affiliate's customers
👥 Customer List Tab (Filter Who Participates)
The Customer List tab lets you control which customers are eligible for this affiliate.
Why use this?
- Limit affiliate rewards to specific customer segments
- Example: Only give commission for "Premium Members"
- Example: Only pay affiliate for sales above $100
How to filter:
- Open the Customer List tab
- Click to add a filter
- Select which customers can participate
- Save
💡 Once filtered, the affiliate program only applies to those specific customers
4️⃣ Step 4: Create Coupon for Affiliate
Link your affiliate to a coupon so customers get discounts and affiliate gets tracked.
Path: Settings → Loyalty and Promotions → Coupons
- Click Create Coupon (or edit an existing one)
- Fill in coupon details:
- Name:
AFFILIATE_JOHNorPARTNER_15OFF - Discount: Percentage or fixed amount
- Valid Until: Expiration date
- Name:
- In the Benefits tab:
- Select the benefit you created in Step 2
- In the Affiliate dropdown:
- Select your affiliate's name
- Save

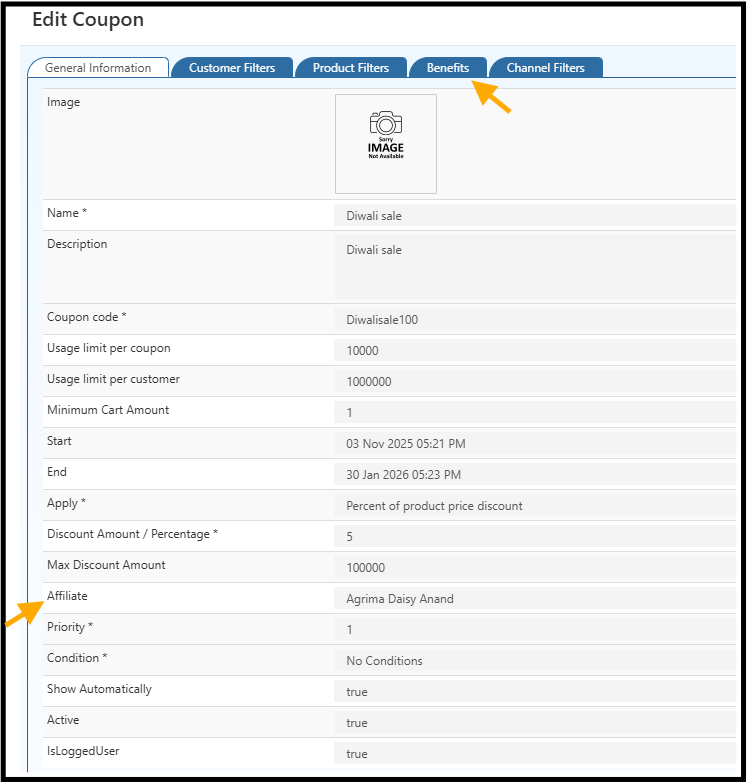
✅ Done! Now customers using this coupon will be tracked as affiliate referrals and the affiliate will earn their commission automatically
Key Benefits of Affiliate Program
- Automate Commission Payments - No manual calculations
- Track Every Referral - Know exactly which affiliate brought each sale
- Unique Affiliate Links - Each partner gets their own tracking URL
- Boost Sales - Affiliates promote your business
- Pay Only for Results - Only pay commission when sales happen
- Detailed Reports - See which affiliates perform best
Example Affiliate Setup
You want to give your partner "TechStore" $10 commission for each sale
| Step | What to Do |
|---|---|
| Step 1 | Create customer: Name = "TechStore" |
| Step 2 | Create benefit: $10 Affiliate Fixed Commission |
| Step 3 | Create affiliate: Name = "TechStore Partner", link the benefit |
| Step 4 | Create coupon: "TECHSTORE_SALE", link to affiliate |
Result: TechStore shares TECHSTORE_SALE coupon → Customers buy → TechStore gets $10 per sale automatically ✅
Quick Links
🎁 Need to Create Components First?
- Create Customer → Create customer profiles
- Create Benefit → Set up commission/cashback rewards
- Create Coupon → Configure promotional codes
Related Articles
🎁 Loyalty Features:
👥 Customer Management:
📊 More Promotions: