How to Create a Purchase Invoice
This guide walks you through every step to create a purchase invoice in O2VEND.
Getting Started
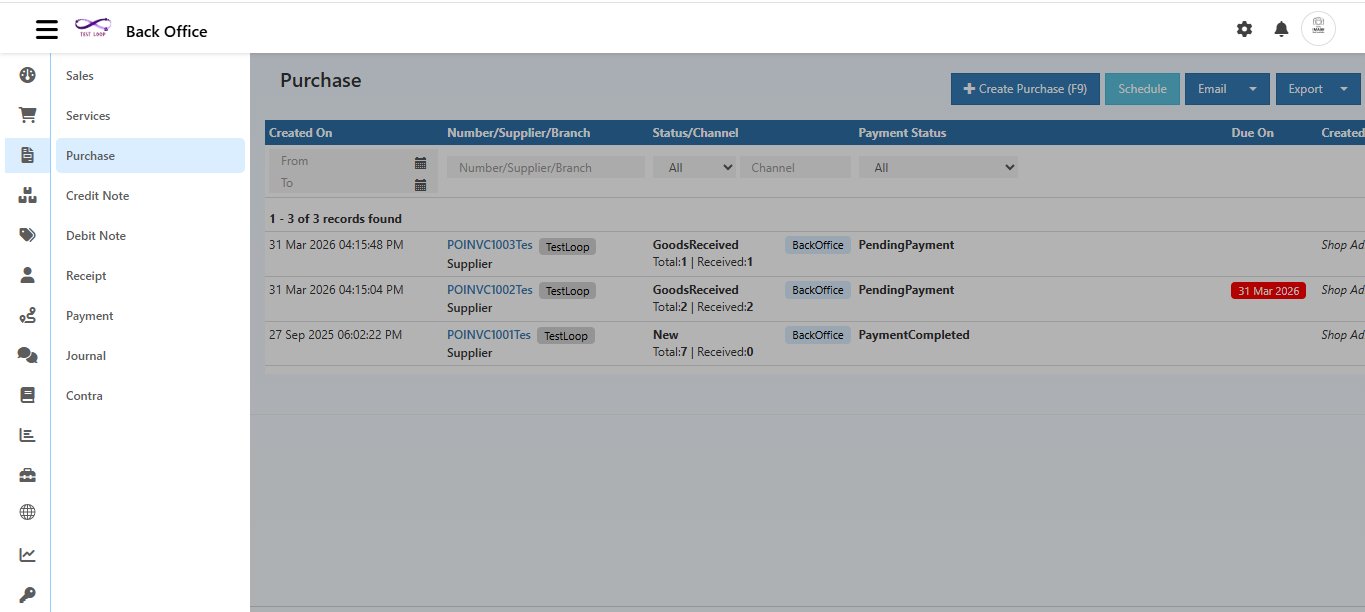
Navigate to:
Back Office → Voucher → Purchase
Click the + Create Purchase (F9) button at the top right corner of the Purchase list.
Shortcut: Press
F9anywhere on the page to instantly open the Create Purchase screen.
Create Purchase Form
When the form opens, you will see three tabs — Supplier Information, Payments, and General Ledger.
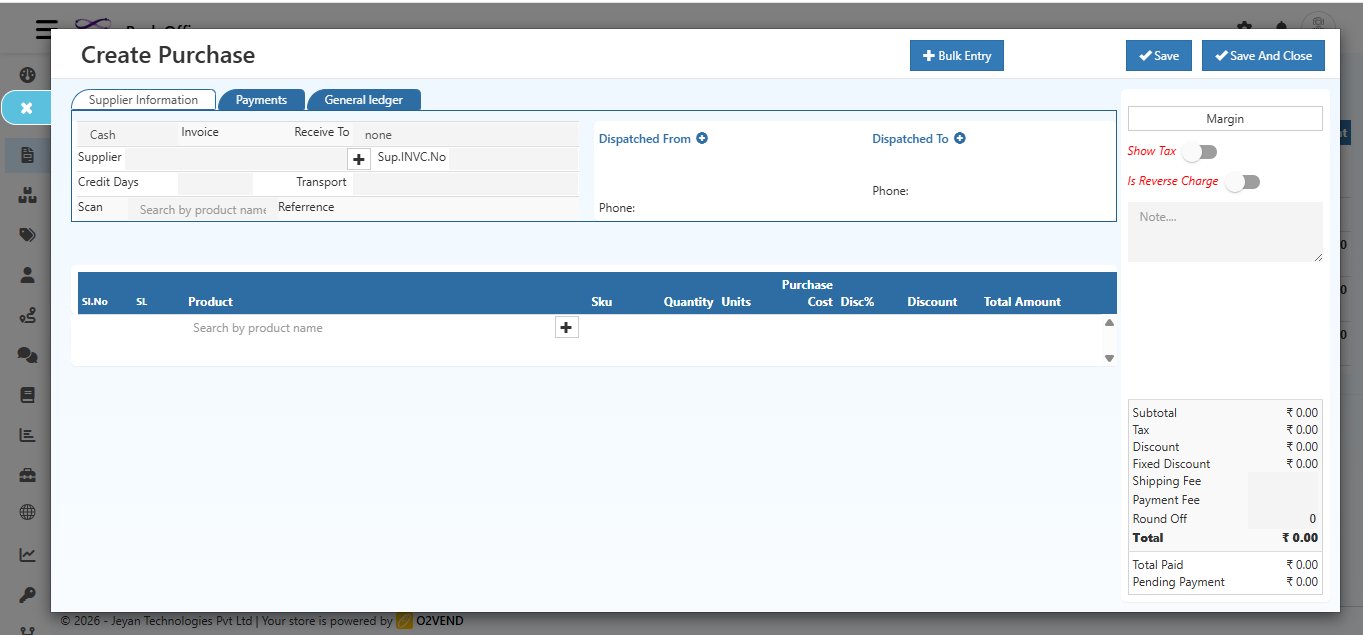
Step 1 — Fill in Supplier Information
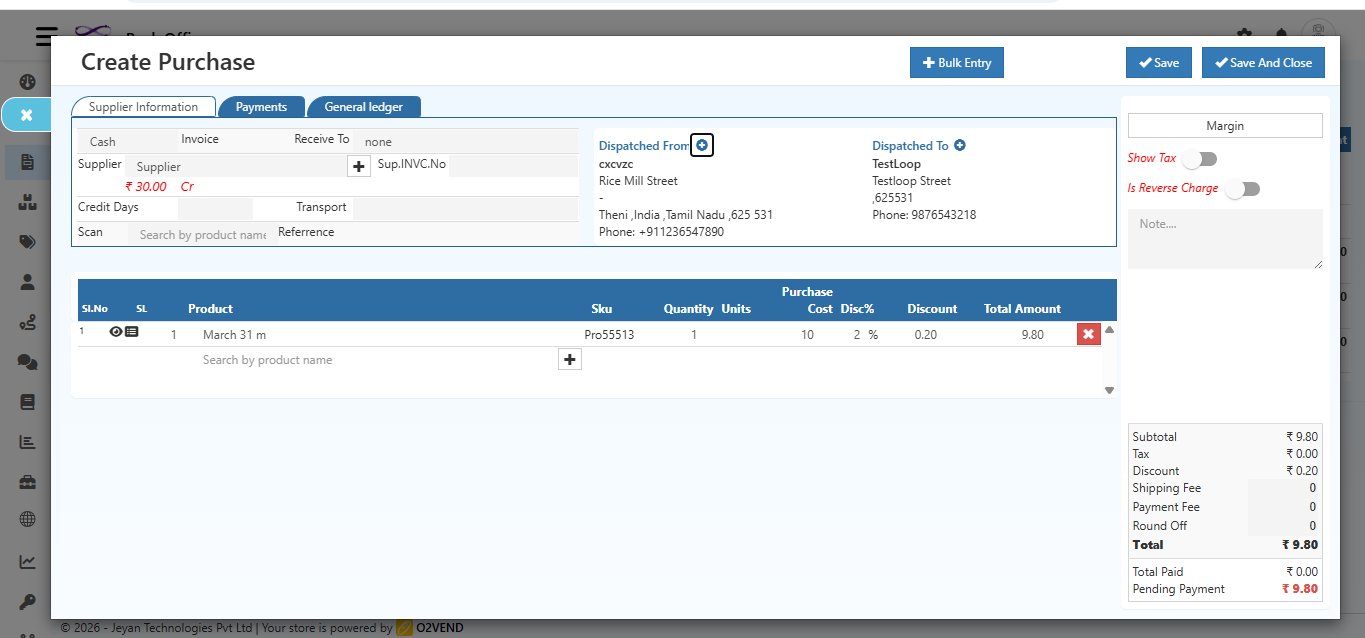
Supplier
Search and select the supplier name in the Supplier field.
Once selected, the supplier's details fill in automatically.
Tip: Click inside the Supplier field to place your cursor first, then press
Alt + Cto create a new supplier instantly. This shortcut only works when your cursor is active inside the field.
Address
Click the + symbol next to the supplier name to open the address section.
Enter the supplier's billing and shipping address here.
This information will appear on printed invoices.
Step 2 — Select Invoice Type
In the Invoice field, select the payment method:
Cash
Select Cash when the full amount is paid immediately.
Credit
Select Credit when payment is partial, pending, or made via an online payment gateway such as Google Pay, Paytm, etc.
When Credit is selected, the Credit Days field appears — enter the number of days allowed before payment is due.
Step 3 — Select Receive To (Warehouse)
Select the warehouse where the purchased goods will be delivered.
- A Goods Receipt is automatically created when you click Save
- This field appears only when creating a purchase invoice
- If not applicable, select None
Step 4 — Fill in Other Details
| Field | What to Enter |
|---|---|
| Credit Days | Number of days the buyer can wait before paying (Credit only) |
| Transport | Transport mode — lorry, van, bus, auto, etc. |
| Reference | Reference number to link this invoice to a supplier order |
| Sup.INVC.No | Supplier's own invoice number for tracking |
Step 5 — Add Dispatched From / To Addresses
- Click Dispatched From
+— enter the supplier's dispatch location with address and phone number - Click Dispatched To
+— enter your receiving warehouse address and phone number
Step 6 — Add Products
Search and add the products you are purchasing in the product table at the bottom.
Tip: Click inside the Product field to place your cursor first, then press
Alt + Cto create a new product instantly. This shortcut only works when your cursor is active inside the field.
| Field | Description |
|---|---|
| Product | Search by product name — purchase price fills in automatically |
| SKU | Product SKU code |
| Quantity | Number of units being purchased |
| Units | Unit of Measure (e.g., pcs, kg, M) |
| Purchase Cost | Auto-filled from product records — editable if needed |
| Disc% | Discount percentage |
| Discount | Discount amount calculated from Disc% |
| Total Amount | (Price × Qty) − Discount — calculated automatically |
Use + Bulk Entry to add multiple products at once quickly.
Step 7 — Adjust Advance Payment (If Any)
If an advance payment was already made before creating this invoice:
- Click the Adjust Advance button
- Enter the advance amount
- Click OK — the advance is deducted from the pending balance automatically
Step 8 — Review Invoice Summary
Before saving, check the Invoice Summary at the bottom right of the form:
| Field | Description |
|---|---|
| Subtotal | Total before tax and discounts |
| Tax | Tax applied |
| Discount | Total percentage discount |
| Fixed Discount | Fixed amount discount |
| Shipping Fee | Shipping charges if applicable |
| Payment Fee | Payment gateway fee if applicable |
| Round Off | Rounding adjustment |
| Total | Final invoice amount |
| Total Paid | Amount paid so far |
| Pending Payment | Remaining balance to be paid |
Step 9 — Save the Invoice
Click Save or Save And Close to create the purchase invoice.
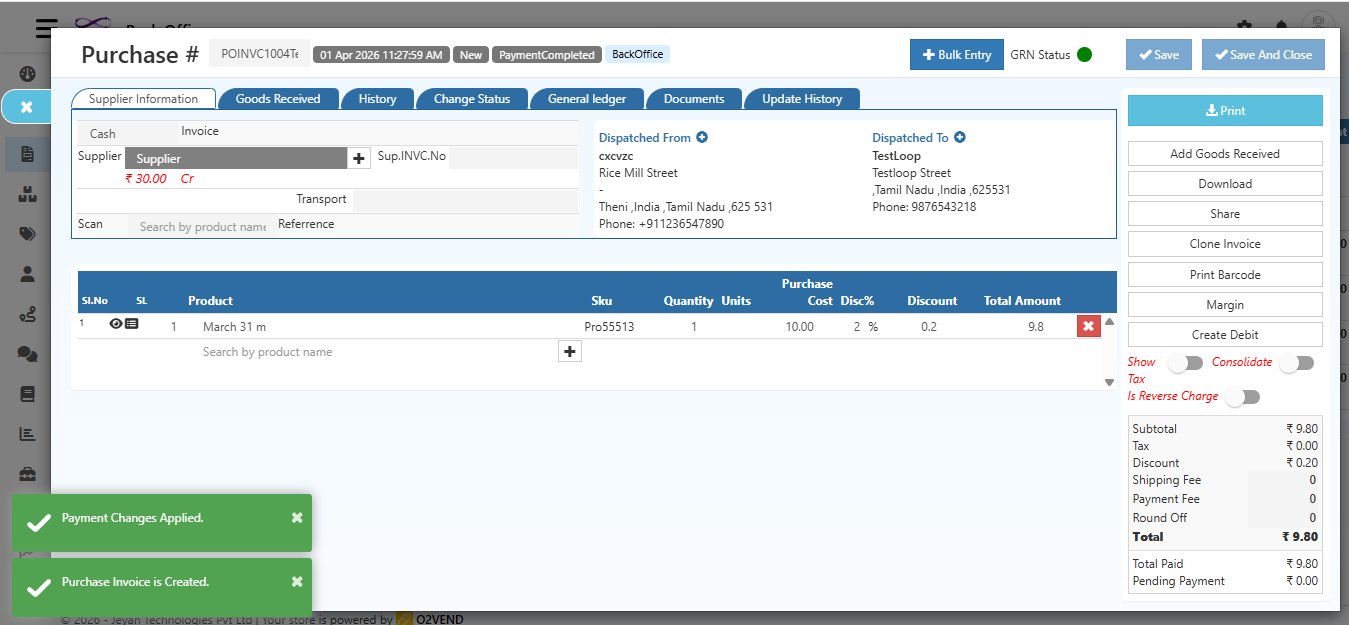
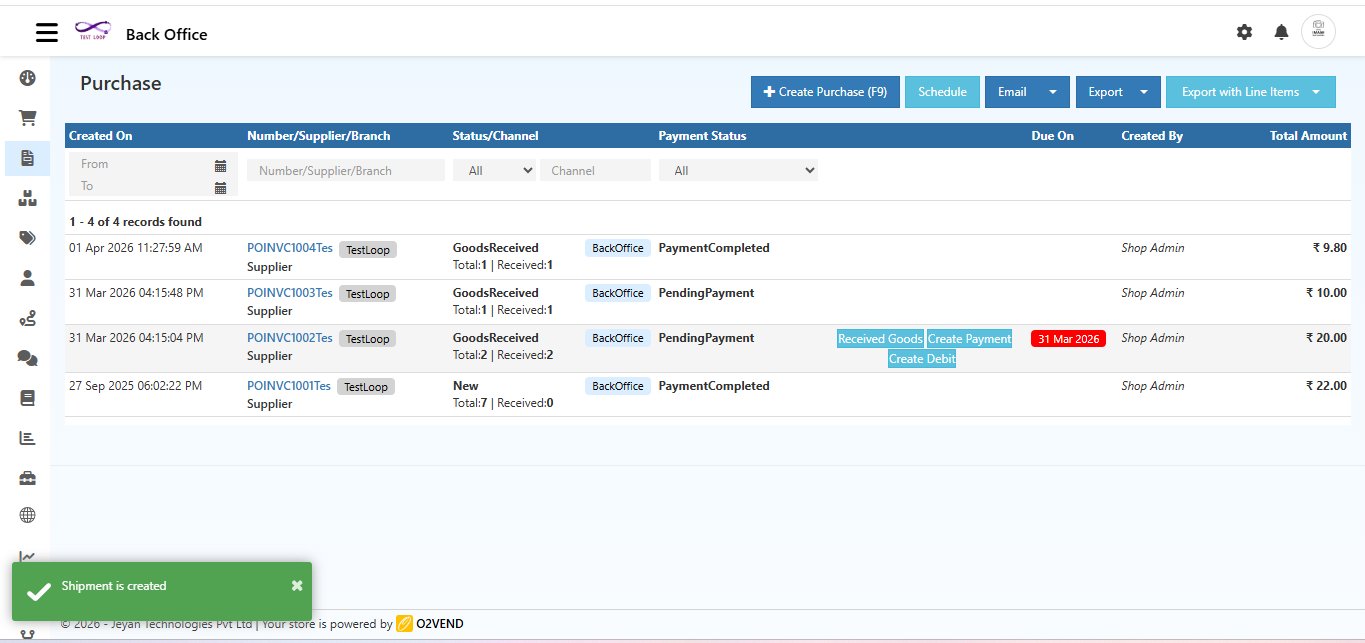
A success message — "Purchase Invoice is Created" — will appear at the bottom left to confirm.
The invoice is now created with:
- A unique Invoice Number (e.g., POINVC1004Tes)
- Status set to New or PaymentCompleted based on payment method
- Goods Receipt automatically generated if a warehouse was selected
After Saving — Quick Actions
Once the invoice is saved, use these buttons on the right panel:
| Button | Action |
|---|---|
| Print the invoice | |
| Add Goods Received | Record items physically received from the supplier |
| Download | Download invoice as PDF (includes company name, logo, address, order details) |
| Share | Share the invoice via email or link |
| Clone Invoice | Duplicate this invoice for a similar purchase |
| Print Barcode | Print barcode labels for products in this invoice |
| Create Debit | Raise a debit note against this invoice |
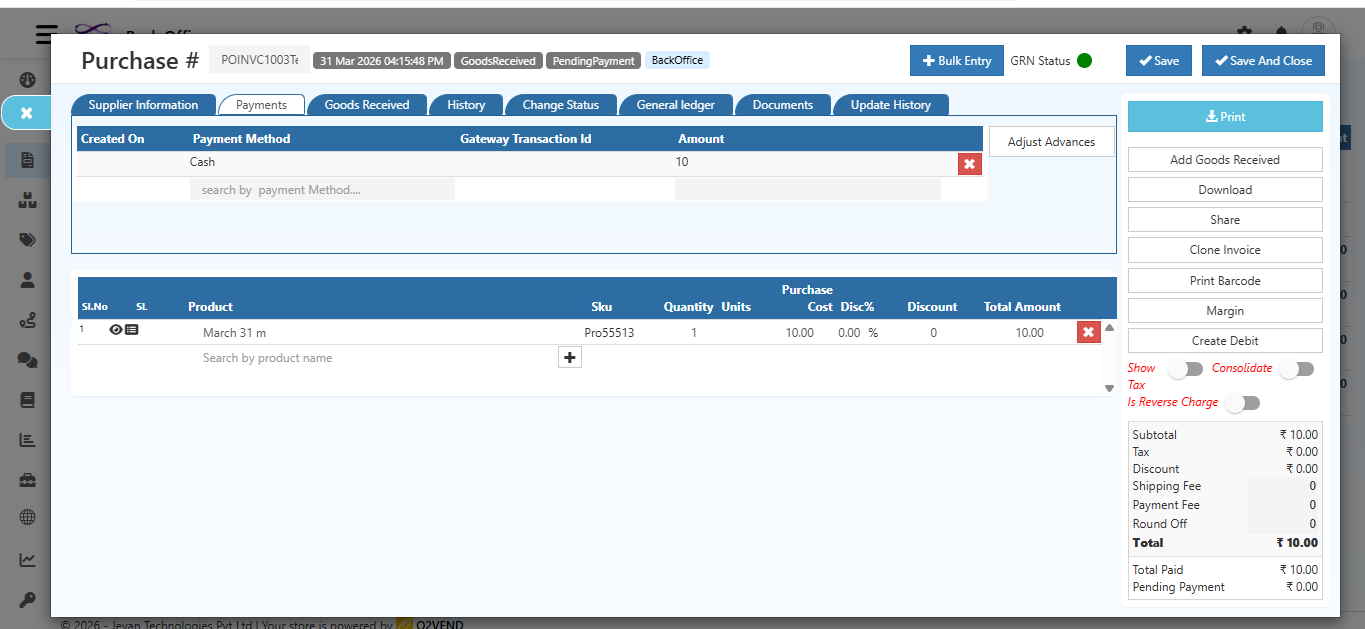
Add Payment
To record a payment against this invoice after saving:
- Click the Payments tab inside the invoice
- Click Add Payment
- Enter the payment amount and method
- Save — payment status updates to PaymentCompleted
Complete Step-by-Step Summary
- Go to Back Office → Voucher → Purchase
- Click + Create Purchase or press
F9 - Search and select the Supplier — address fills automatically
- Choose Invoice type — Cash or Credit
- Select Receive To warehouse (or None)
- Fill in Credit Days, Transport, Reference as needed
- Add Dispatched From and Dispatched To addresses
- Search and add Products — enter quantity, cost, and discount
- Adjust Advance Payment if applicable
- Review the Invoice Summary on the right
- Click Save — invoice is created with a success confirmation