O2VEND Retail ERP
  • Product
  • Solutions
  • Resources
    • Blog
    • Community
    • Partnership
    • Find Partner
    • Developer
  • Pricing
  • Docs
    • Getting Started
      • Channels
        • Sales Channel
        • O2VEND to O2VEND Channel
        • Shopify Integration Guide
    • Commerce
      • Ecommerce
      • POS
      • Agent App
      • CMS
      • Themes & Apps
      • Apps
        • Sales Navigator
    • Operations
      • OMS
      • WMS
      • O2C
      • Vendor Portal
      • Supplier Portal
    • Back Office
      • Accounting
      • Reports
      • PIM
      • Communication
      • Back Office
Search Results for

    Show / Hide Table of Contents
    • Retail ERP Back Office Overview
    • Back Office Dashboard
    • Analytics & Reports
      • Visitor Analytics
      • E-commerce Analytics
      • Product Analytics
      • Campaigns Analytics
    • API & Webhook Integration
      • Webhook
      • Product Webhook Payload Guide
      • Testing webhook
    • Back Office Settings
      • Settings Overview
      • Store Settings
        • Business Details
        • Tax Classes
        • Tax Rates
        • Operating Countries
        • Operating State or Province
        • Branches
        • Sales Channels
        • Return Rule
        • Back Office Print Detail
        • Download Template
        • Order Numbering
        • Push Notification
      • POS Settings
        • Quick Add Buttons
        • Print Settings
        • Payment Methods
        • Delivery Settings
        • Language
        • POS Offline Mode
      • Agent App Settings
        • Agent App Print Details
      • Stock Settings
        • Unit Of Measure
        • Location
        • Unit Of Measure Conversions
        • Stock Levels
        • Sub Location
        • Print Barcode Label Settings
        • Package Material
      • User Settings
        • Vendors
        • User Date Setup
        • Employees
        • Vendors Commission
        • Credit Rules
        • Automatic User Code
        • User Authorization
      • User Role Mapping
        • Set Up Employee Roles
        • Ecommerce
        • Point Of Sale
        • Back Office
        • Sales App
        • Roles
      • Loyalty and Promotions
        • Reward Points
        • Coupons
        • Gift Vouchers
        • Offers and Discounts
        • Benefits
        • Affiliate
        • Coupon Print Setting
      • Account Settings
        • Financial Year
        • Voucher Numbering
        • Sales Account Map
        • Voucher Numbering Rules
    • Profile

    Location Setup - Stores, Warehouses & Shipping

    Set up locations in O2VEND to manage stores, warehouses, inventory flow, POS billing, and courier pickups.

    A Location in O2VEND is a physical point where products are stored, sold, received, or shipped. Proper location setup ensures correct inventory flow, accurate POS billing, and successful order fulfillment.

    Key Benefits: Prevent stock mismatch, avoid billing errors, integrate with couriers, and manage multi-warehouse inventory.

    Create Location (Store Address or Warehouse)

    Locations can be created and managed by Site Admins and Vendor Managers, based on role permissions.

    Steps to Create a Location

    1. Open Back Office > Settings Icon (ALT + S)

    Location Configuration

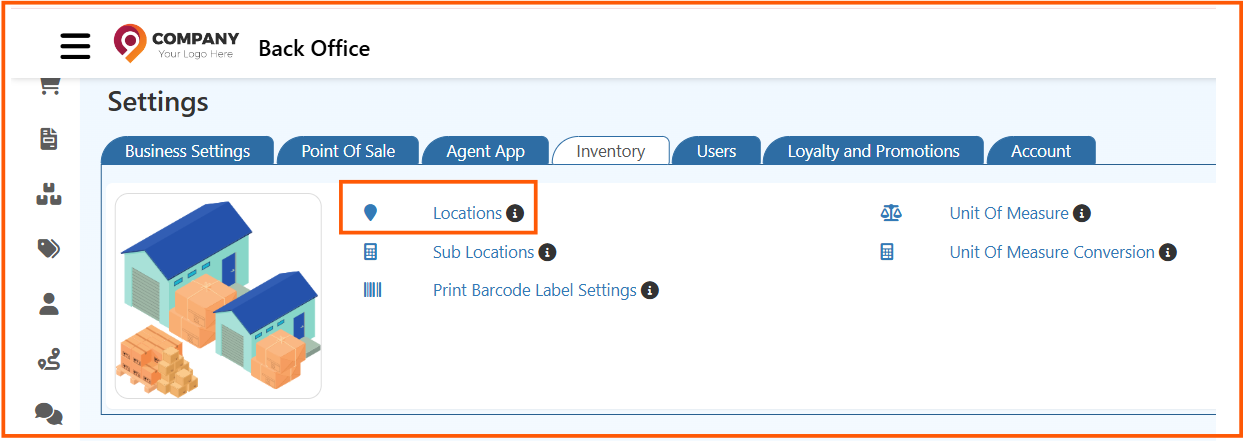
    1. Navigate to Inventory > Locations
    2. Click Create Location
    3. Fill in location details (see steps below)
    4. Click Save

    Step 1: Create Location

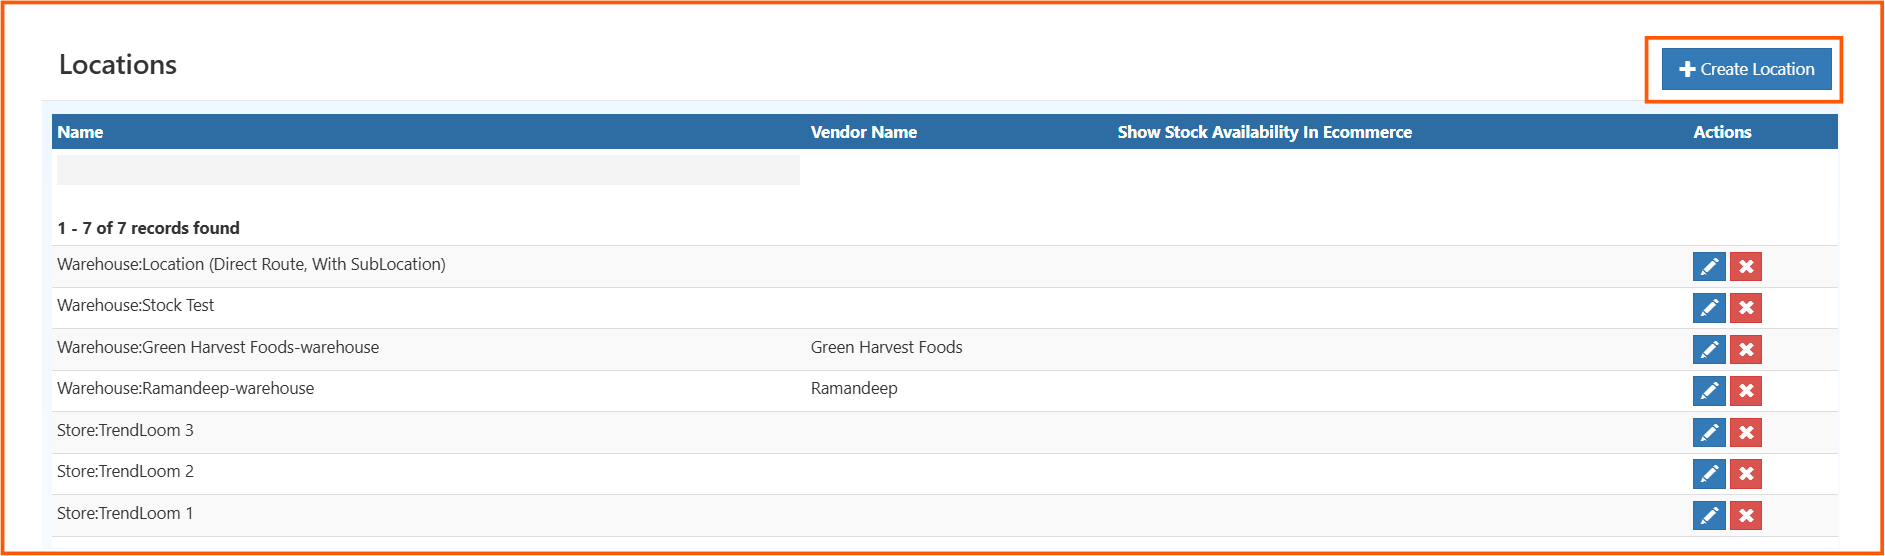
    After saving, the location is available for:

    • Inventory receiving (Incoming Packages / GRN)
    • POS billing
    • Order fulfillment

    Tip: For Drop Shipment operations, the vendor name is automatically assigned to the location.

    Location Configuration - General Tab

    The General tab defines the location's identity, address, inventory behavior, and order flow.
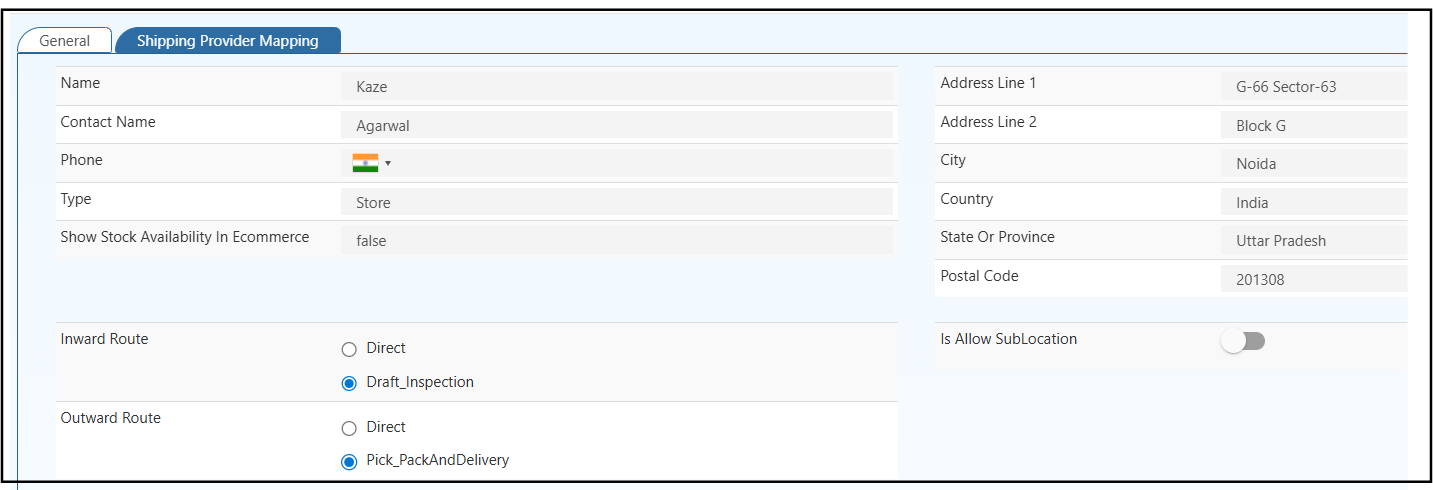
    Create Location Form

    Basic Information

    • Name - Enter your Store or Warehouse name for internal identification.
    • Contact Name - Specify the primary contact person for this location.
    • Phone - Add the contact number with country code, such as +1 for USA.
    • Type - Choose Store for POS locations or Warehouse for inventory hubs.
    • Show Stock in Ecommerce - Enable this to display this location's stock levels on your online store.

    Address Details

    • Address Lines - Enter the complete physical address for this location.
    • City - Specify the city name.
    • State / Province - Enter the state or province name.
    • Country - Select the country where this location is based.
    • Postal Code - Add the ZIP or PIN code.

    Tip: POS invoices will automatically use this location's address for billing and receipts.

    Inventory Routes

    Use the inventory route settings to control how stock moves in and out of this location.

    Inward Route - Choose how incoming stock is received into inventory.

    • Direct - Stock is added to inventory immediately after receipt.
    • Draft_Inspection - Stock is received in draft mode and becomes sellable only after inspection approval.

    Outward Route - Choose how orders are processed for dispatch.

    • Direct - Orders are dispatched immediately without extra steps.
    • Pick_PackAndDelivery - Orders follow a Pick > Pack > Delivery flow for controlled fulfillment.

    Sub-Location Configuration

    Allow SubLocation - Enable this to create child locations under this location and organize inventory by sections, racks, and bins.

    Shipping Provider Mapping Tab

    Connect this location with external courier and marketplace systems for accurate pickups and shipping.

    Supported Provider Fields

    • Shiprocket - Enter the location name and ID registered in your Shiprocket account.
    • Shipway - Add the Location ID from your Shipway account.
    • GetDelivered - Specify the Location ID from your GetDelivered account.
    • Myntra - Enter the Warehouse/Store ID from your Myntra Seller Panel.
    • Unicommerce - Add the Location ID from your Unicommerce OMS system.

    Tip: Make sure all provider IDs exactly match the IDs configured in your courier and marketplace accounts for seamless integration.

    In this article
    O2VEND

    O2VEND Help Center for Ecommerce, Back Office, POS, Agent App, PIM, OMS, WMS, Accounting, O2C, CMS, and ERP Reports workflows.

    Get Demo Contact Sales

    Product Docs

    Ecommerce Back Office Point of Sale Agent App Warehouse (WMS)

    Module Docs

    PIM OMS Accounting Order to Cash (O2C) CMS

    Resources

    Ecommerce POS Back Office Agent App Restaurant POS Integrations

    Community and Company

    Blog Community Partnership Find Partner Developer Pricing

    © 2019-2026 Jeyan Technologies Private Limited. All rights reserved.

    Privacy Policy • Terms of Service • Cancellation & Refund