O2VEND Retail ERP
  • Product
  • Solutions
  • Resources
    • Blog
    • Community
    • Partnership
    • Find Partner
    • Developer
  • Pricing
  • Docs
    • Getting Started
      • Channels
        • Sales Channel
        • O2VEND to O2VEND Channel
        • Shopify Integration Guide
    • Commerce
      • Ecommerce
      • POS
      • Agent App
      • CMS
      • Themes & Apps
      • Apps
        • Sales Navigator
    • Operations
      • OMS
      • WMS
      • O2C
      • Vendor Portal
      • Supplier Portal
    • Back Office
      • Accounting
      • Reports
      • PIM
      • Communication
      • Back Office
Search Results for

    Show / Hide Table of Contents
    • Retail ERP Back Office Overview
    • Back Office Dashboard
    • Analytics & Reports
      • Visitor Analytics
      • E-commerce Analytics
      • Product Analytics
      • Campaigns Analytics
    • API & Webhook Integration
      • Webhook
      • Examples of JSON format data via webhook
      • Testing webhook
    • Back Office Settings
      • Settings Overview
      • Store Settings
        • Business Details
        • Tax Classes
        • Tax Rates
        • Operating Countries
        • Operating State or Province
        • Branches
        • Sales Channels
        • Return Rule
        • Back Office Print Detail
        • Download Template
        • Order Numbering
        • Push Notification
      • POS Settings
        • Quick Add Buttons
        • Print Settings
        • Payment Methods
        • Delivery Settings
        • Language
        • POS Offline Mode
      • Agent App Settings
        • Agent App Print Details
      • Stock Settings
        • Unit Of Measure
        • Location
        • Unit Of Measure Conversions
        • Stock Levels
        • Sub Location
        • Print Barcode Label Settings
        • Package Material
        • Delivery Zone
      • User Settings
        • Vendors
        • User Date Setup
        • Employees
        • Vendors Commission
        • Credit Rules
        • Automatic User Code
        • User Authorization
      • User Role Mapping
        • Set Up Employee Roles
        • Ecommerce
        • Point Of Sale
        • Back Office
        • Sales App
        • Roles
      • Loyalty and Promotions
        • Reward Points
        • Coupons
        • Gift Vouchers
        • Offers and Discounts
        • Benefits
        • Affiliate
        • Coupon Print Setting
      • Account Settings
        • Financial Year
        • Voucher Numbering
        • Sales Account Map
        • Voucher Numbering Rules
      • Integrations
        • Shiprocket Configuration
        • Shipway Configuration
    • Profile

    Manage Order Numbering

    When a customer places an order on store, that order is assigned a unique order number. It is specific to that order and is never assigned again. To change your starting order number, go to Menu < Settings < Store Setup - OrderNumbering. Order Number for O2VEND allows customizing e-commerce and pos order numbers with any letters, date/time variables, random numbers or counters according to the business requirements. There is an option to set the prefix or suffix text for the order number.

    Manage Order Numbering

    Example: An order number can be configured to contain both characters and numbers as SO-1000.
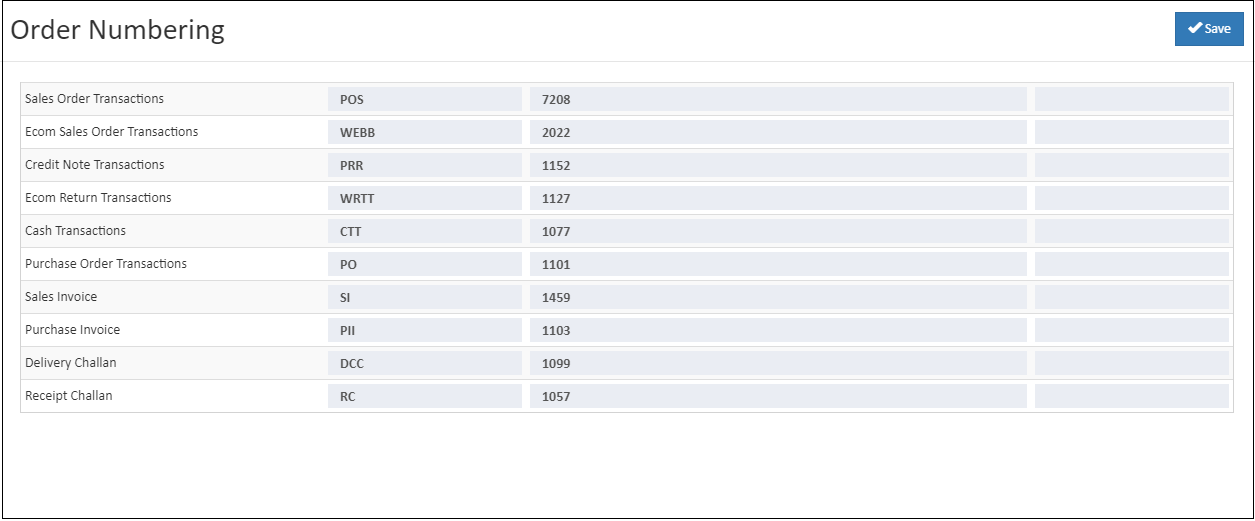
    Order Numbering

    Enter the order number for store.

    Sale Order Transactions

    The Sales order and POS transaction takes place when a receipt is made by a customer at an online store. Allocate the Sales Order numbers.

    Ecom Sale Order Transactions

    Enter e-commerce store transactions number.

    Purchase Order Transactions

    The purchase order takes place when a payment is made by a supplier at an backoffice. Allocate purchase order transaction.

    Sales Invoice

    The Sales invoice transaction takes place when a receipt is made by a customer at backoffice and pos. Allocate Sales invoice numbers.

    Purchase Invoice

    The purchase invoice takes place when a payment is made by a supplier at backoffice. Allocate purchase invoice transaction.

    Debit Note Transactions

    Allocate debit note transactions.

    Credit Note Transactions

    Enter the return transaction number for store.

    Ecom Return Transactions

    Allocate e-commerce return order transaction number.

    Receipt Transactions

    Enter cash transaction order number. Create cash transaction in the receipt section and pos cash register.

    Payment Transactions

    Enter payment transaction order number. Payment transaction order number will be created from payment section and pos receipts.

    Delivery Challan

    Enter delivery challan number.

    Receipt Challan

    Enter receipt challan number.

    How to setup order numbering

    1. Open Back Office.
    2. Go to Settings Menu.
    3. Go to Store Setup section.
    4. Set up order number in this field.
    5. Click Save button.
    In this article
    © 2019-2026 Jeyan Technologies Private Limited • www.o2vend.com • Create your own store