O2VEND Retail ERP
  • Product
  • Solutions
  • Resources
    • Blog
    • Community
    • Partnership
    • Find Partner
    • Developer
  • Pricing
  • Docs
    • Getting Started
      • Channels
        • Sales Channel
        • O2VEND to O2VEND Channel
        • Shopify Integration Guide
    • Commerce
      • Ecommerce
      • POS
      • Agent App
      • CMS
      • Themes & Apps
      • Apps
        • Sales Navigator
    • Operations
      • OMS
      • WMS
      • O2C
      • Vendor Portal
      • Supplier Portal
    • Back Office
      • Accounting
      • Reports
      • PIM
      • Communication
      • Back Office
Search Results for

    Show / Hide Table of Contents
    • Retail ERP Back Office Overview
    • Back Office Dashboard
    • Analytics & Reports
      • Visitor Analytics
      • E-commerce Analytics
      • Product Analytics
      • Campaigns Analytics
    • API & Webhook Integration
      • Webhook
      • Product Webhook Payload Guide
      • Testing webhook
    • Back Office Settings
      • Settings Overview
      • Store Settings
        • Business Details
        • Tax Classes
        • Tax Rates
        • Operating Countries
        • Operating State or Province
        • Branches
        • Sales Channels
        • Return Rule
        • Back Office Print Detail
        • Download Template
        • Order Numbering
        • Push Notification
      • POS Settings
        • Quick Add Buttons
        • Print Settings
        • Payment Methods
        • Delivery Settings
        • Language
        • POS Offline Mode
      • Agent App Settings
        • Agent App Print Details
      • Stock Settings
        • Unit Of Measure
        • Location
        • Unit Of Measure Conversions
        • Stock Levels
        • Sub Location
        • Print Barcode Label Settings
        • Package Material
      • User Settings
        • Vendors
        • User Date Setup
        • Employees
        • Vendors Commission
        • Credit Rules
        • Automatic User Code
        • User Authorization
      • User Role Mapping
        • Set Up Employee Roles
        • Ecommerce
        • Point Of Sale
        • Back Office
        • Sales App
        • Roles
      • Loyalty and Promotions
        • Reward Points
        • Coupons
        • Gift Vouchers
        • Offers and Discounts
        • Benefits
        • Affiliate
        • Coupon Print Setting
      • Account Settings
        • Financial Year
        • Voucher Numbering
        • Sales Account Map
        • Voucher Numbering Rules
    • Profile

    Coupon Print Settings — Create Coupon Templates

    Design custom coupon templates for printing vouchers and promotional coupons in O2VEND. Works with A4 sheets, thermal printers, and POS systems.

    Key Benefits:

    • Professional, properly aligned coupons
    • Reliable barcode scanning at checkout
    • Multi-media support (paged or thermal)
    • Unlimited template creation

    Access Coupon Print Settings

    Getting to the coupon print settings is straightforward:

    1. Open O2VEND Back Office
    2. Navigate to Settings → Business Settings → Coupon Print Settings
    O2VEND Back Office Settings navigation to Coupon Print Settings

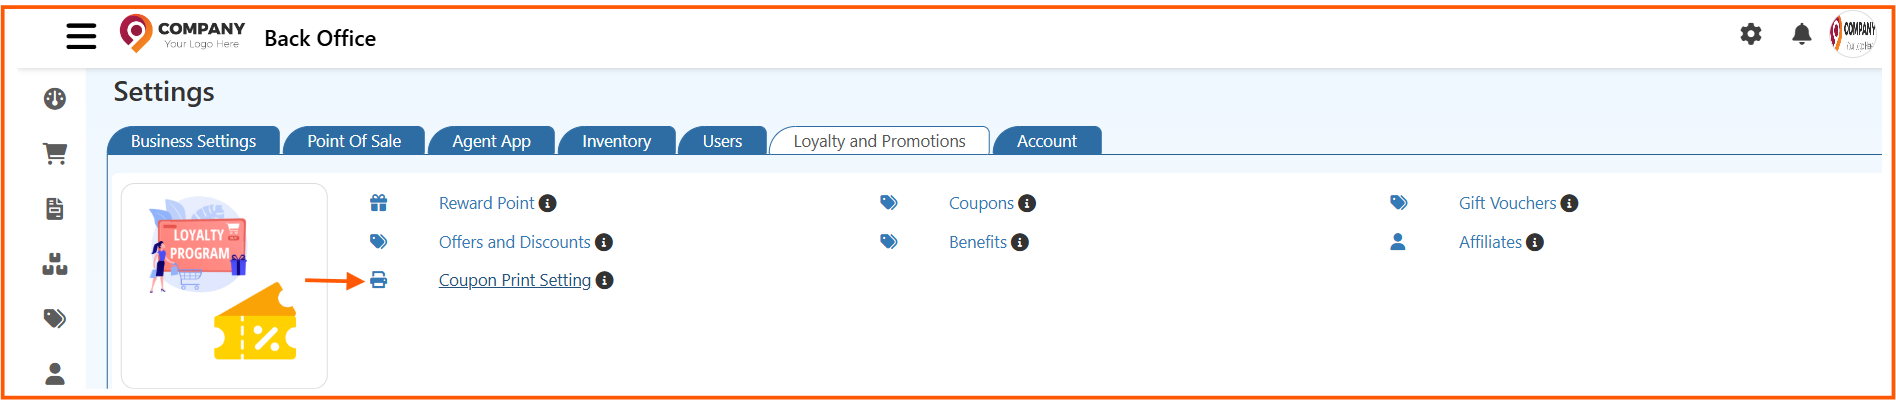
    The page displays all your existing templates. You can see the template name, size, media type (paged or roll), and the number of labels per row and rows per page.

    printsettingcoupon

    To add a new template, click Create Coupon Template. You can also Edit, Delete, or Clone any existing template.


    Understanding the Template List

    Each template in the list shows:

    Column What It Means
    Name Your template's identifier — something descriptive like "Standard A4 2x3 Grid"
    Size Physical dimensions in millimetres (e.g., 100mm × 50mm per coupon)
    Media Type Either Paged (A4/Letter sheets) or Continuous (roll/thermal printer)
    Labels Per Row How many coupons print horizontally across the page
    Rows Per Page How many rows of coupons fit vertically on a page

    This view shows all templates with their name, size, media type, and layout details.

    O2VEND Coupon Print Settings template list with columns and existing templates for thermal and paged media O2VEND Loyalty Settings Coupon Print reference view

    How to Create a Coupon Print Template

    Creating a new template is the first step toward professional-looking printed coupons. Here's how to do it:

    Step 1: Create New Template

    From the Coupon Print Settings page, click Create Coupon Template. The editor opens with a blank canvas.

    O2VEND Coupon Print Settings template creation form with fields and design canvas

    Step 2: Basic Settings

    • Name: "A4 3x2", "Thermal 80mm", etc.
    • Media Type: Paged (A4/Letter) or Continuous (thermal roll)
    • Dimensions: Width and Height in mm
    O2VEND Coupon Print Settings basic template configuration with name, media type, and dimensions

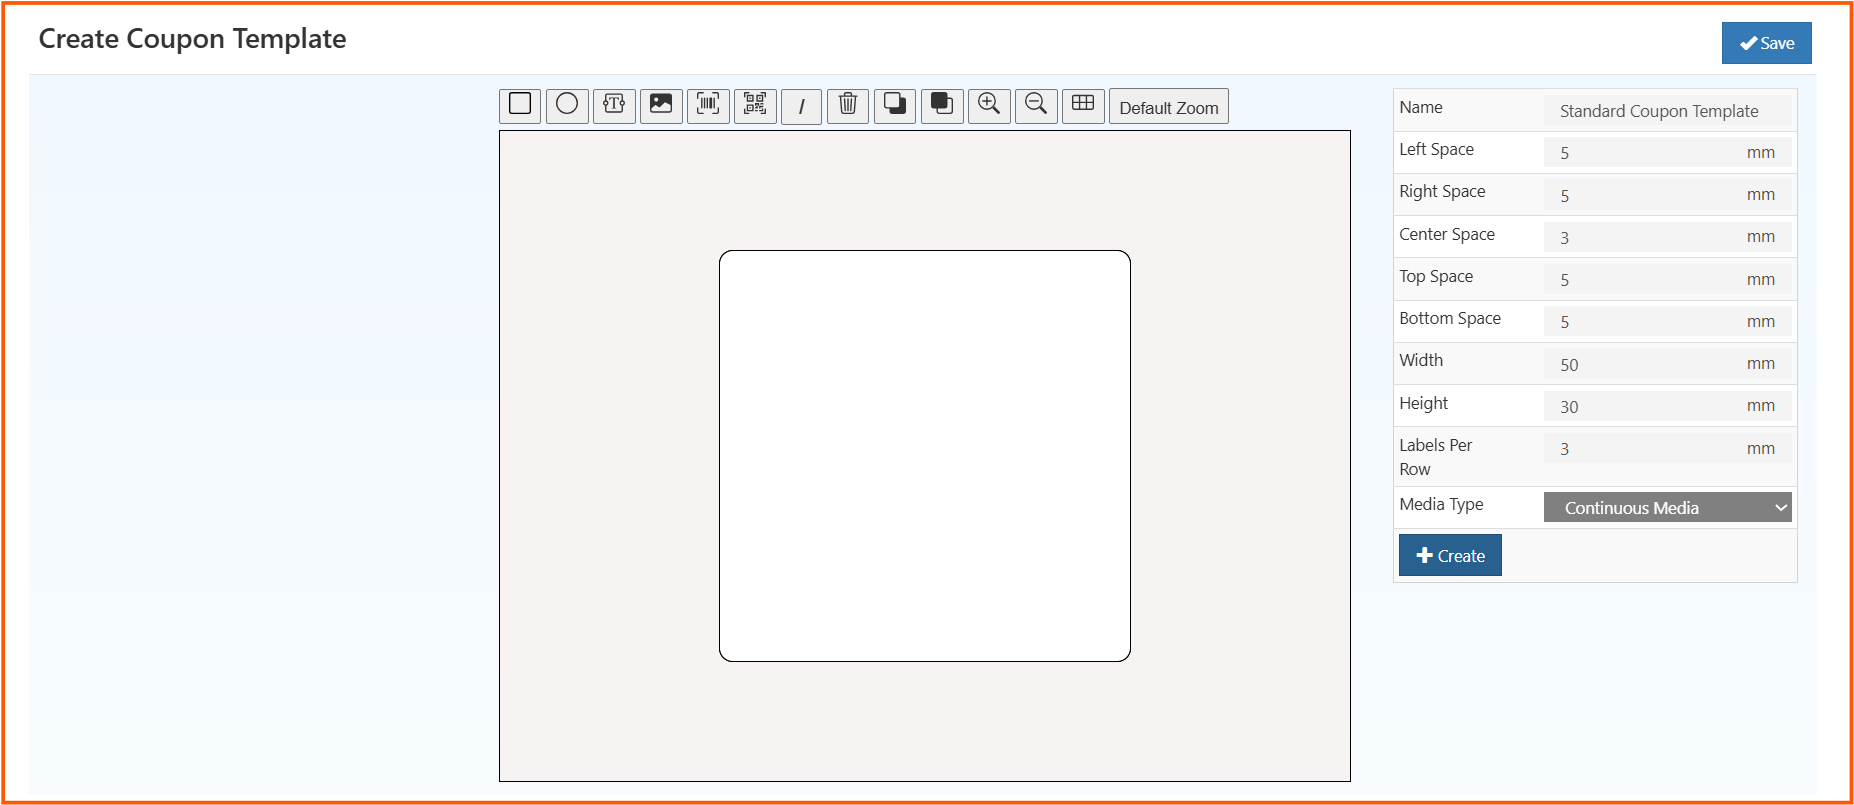
    Step 3: Set Margins and Layout

    • Adjust margins for your printer (Left, Right, Top, Bottom)
    • Set Labels Per Row and Rows Per Page
    O2VEND Coupon Print Settings margins and layout configuration for paged and roll media

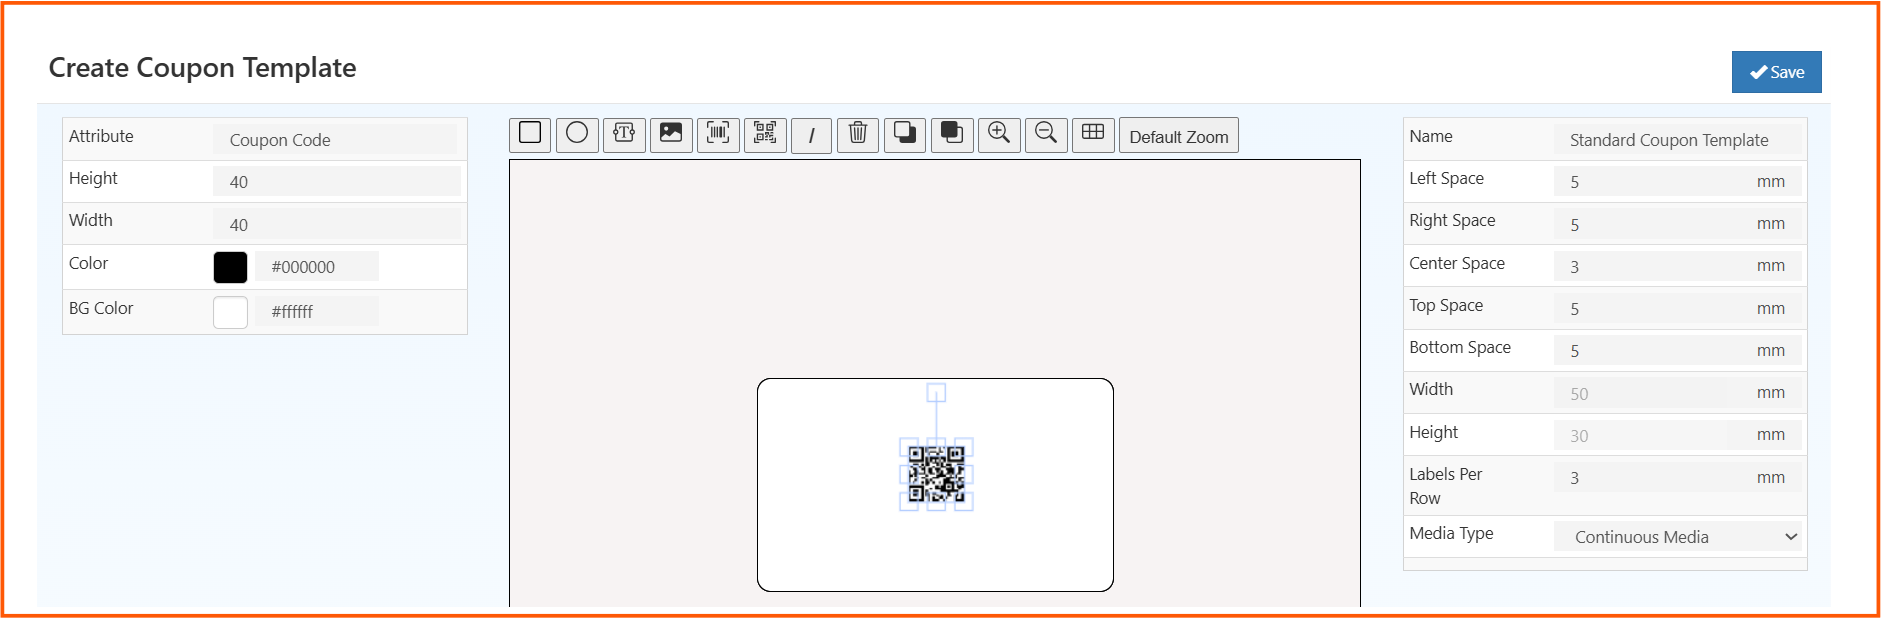
    Step 4: Design Layout

    Add elements using the toolbar:

    • Text: Title, discount, expiry
    • Barcode: EAN-13, Code128, QR Code
    • Image: Logo or product images
    • Shapes: Borders or decorative elements
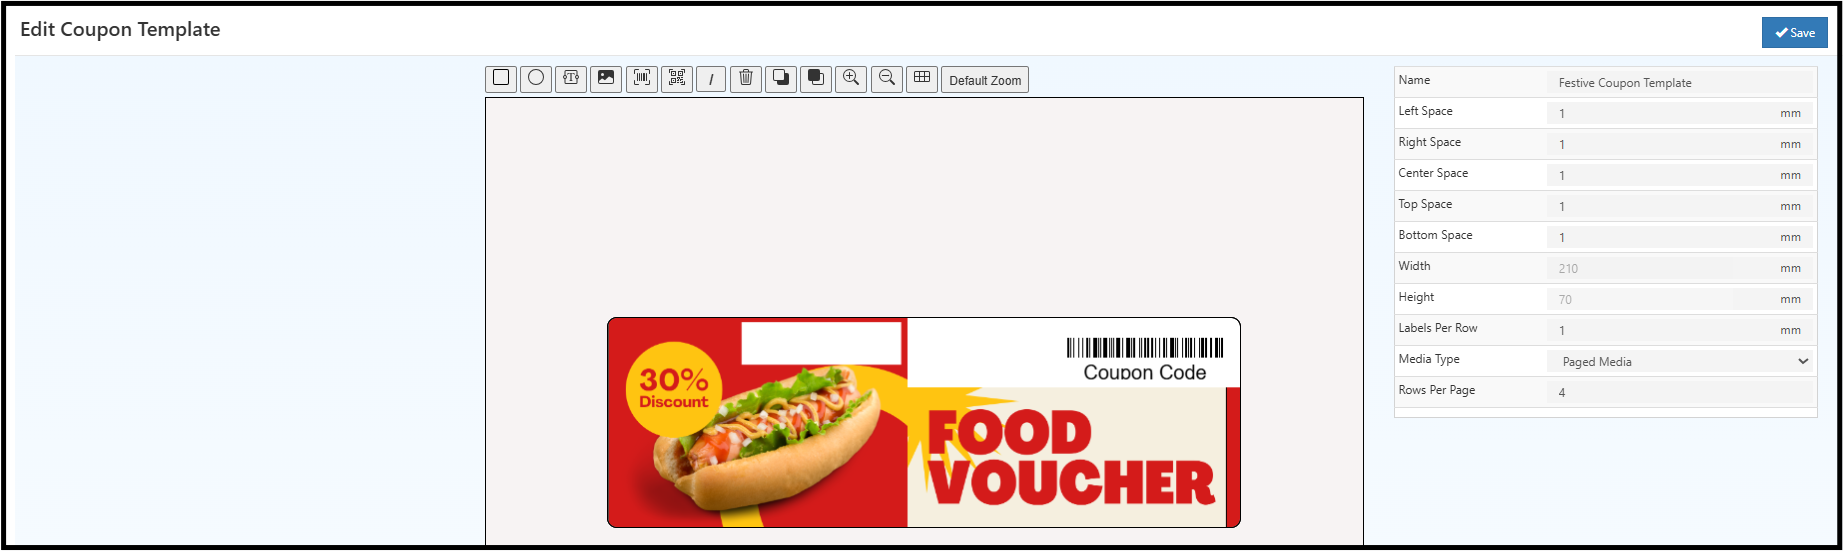
    Step 5: Save

    Preview, review alignment, then click Save.


    The Design Canvas and Toolbar

    The design editor is your creative workspace. Here's what each tool does:

    Tool What It Does
    Rectangle Draw boxes or sections
    Circle Add badges or decorative elements
    Text Text or dynamic fields ({COUPON_CODE}, {EXPIRY_DATE})
    Image PNG or JPG files (logos, QR codes)
    Barcode EAN-13, Code128, or QR Code
    Grid & Snap Pixel-perfect alignment
    Zoom Zoom in/out for detail work
    Preview See final printed output
    Undo/Redo Fix mistakes easily

    Media Types

    Paged Media

    For A4/Letter printing: Inkjet or laser printers, flexible sizes, full-color support.

    Continuous Media

    For thermal printers: Roll-fed, fast bulk printing, standard formats (58mm, 80mm widths).

    Manage Templates

    1. Open Coupon Print Settings
    2. Edit: Modify design or settings
    3. Delete: Remove templates
    4. Clone: Copy template as starting point

    Related Topics

    • Voucher Management in O2VEND
    • Loyalty Points and Rewards System
    • Gift Vouchers Configuration
    In this article
    O2VEND

    O2VEND Help Center for Ecommerce, Back Office, POS, Agent App, PIM, OMS, WMS, Accounting, O2C, CMS, and ERP Reports workflows.

    Get Demo Contact Sales

    Product Docs

    Ecommerce Back Office Point of Sale Agent App Warehouse (WMS)

    Module Docs

    PIM OMS Accounting Order to Cash (O2C) CMS

    Resources

    Ecommerce POS Back Office Agent App Restaurant POS Integrations

    Community and Company

    Blog Community Partnership Find Partner Developer Pricing

    © 2019-2026 Jeyan Technologies Private Limited. All rights reserved.

    Privacy Policy • Terms of Service • Cancellation & Refund