O2VEND Retail ERP
  • Product
  • Solutions
  • Resources
    • Blog
    • Community
    • Partnership
    • Find Partner
    • Developer
  • Pricing
  • Docs
    • Getting Started
      • Channels
        • Sales Channel
        • O2VEND to O2VEND Channel
        • Shopify Integration Guide
    • Commerce
      • Ecommerce
      • POS
      • Agent App
      • CMS
      • Themes & Apps
      • Apps
        • Sales Navigator
    • Operations
      • OMS
      • WMS
      • O2C
      • Vendor Portal
      • Supplier Portal
    • Back Office
      • Accounting
      • Reports
      • PIM
      • Communication
      • Back Office
Search Results for

    Show / Hide Table of Contents
    • Retail ERP Back Office Overview
    • Back Office Dashboard
    • Analytics & Reports
      • Visitor Analytics
      • E-commerce Analytics
      • Product Analytics
      • Campaigns Analytics
    • API & Webhook Integration
      • Webhook
      • Examples of JSON format data via webhook
      • Testing webhook
    • Back Office Settings
      • Settings Overview
      • Store Settings
        • Business Details
        • Tax Classes
        • Tax Rates
        • Operating Countries
        • Operating State or Province
        • Branches
        • Sales Channels
        • Return Rule
        • Back Office Print Detail
        • Download Template
        • Order Numbering
        • Push Notification
      • POS Settings
        • Quick Add Buttons
        • Print Settings
        • Payment Methods
        • Delivery Settings
        • Language
        • POS Offline Mode
      • Agent App Settings
        • Agent App Print Details
      • Stock Settings
        • Unit Of Measure
        • Location
        • Unit Of Measure Conversions
        • Stock Levels
        • Sub Location
        • Print Barcode Label Settings
        • Package Material
        • Delivery Zone
      • User Settings
        • Vendors
        • User Date Setup
        • Employees
        • Vendors Commission
        • Credit Rules
        • Automatic User Code
        • User Authorization
      • User Role Mapping
        • Set Up Employee Roles
        • Ecommerce
        • Point Of Sale
        • Back Office
        • Sales App
        • Roles
      • Loyalty and Promotions
        • Reward Points
        • Coupons
        • Gift Vouchers
        • Offers and Discounts
        • Benefits
        • Affiliate
        • Coupon Print Setting
      • Account Settings
        • Financial Year
        • Voucher Numbering
        • Sales Account Map
        • Voucher Numbering Rules
      • Integrations
        • Shiprocket Configuration
        • Shipway Configuration
    • Profile

    Credit Rules – O2Vend Guide

    The Credit Rules feature in O2Vend allows businesses to define how long customers can take before completing their payments.
    This helps automate credit day limits, return timelines, and customer payment tracking, improving financial control and customer management.


    Credit Rules

    A credit rule determines the number of days a customer is allowed to delay payment after a purchase — often referred to as credit days.
    It can also represent the allowed time frame for returns or exchanges (e.g., 7-day or 10-day return policy).

    By setting credit rules, businesses can:

    • Define flexible payment terms for customers.
    • Manage return periods efficiently.
    • Automate reminders and due-date tracking.
    • Reduce manual follow-ups and credit-related errors.

    How to Create a Credit Rule in O2Vend

    Follow the steps below to configure a new credit rule:

    1. Open the Back Office.
    2. Navigate to Settings → Users → Credit Rules.
    3. Click the Create Credit Rule button.
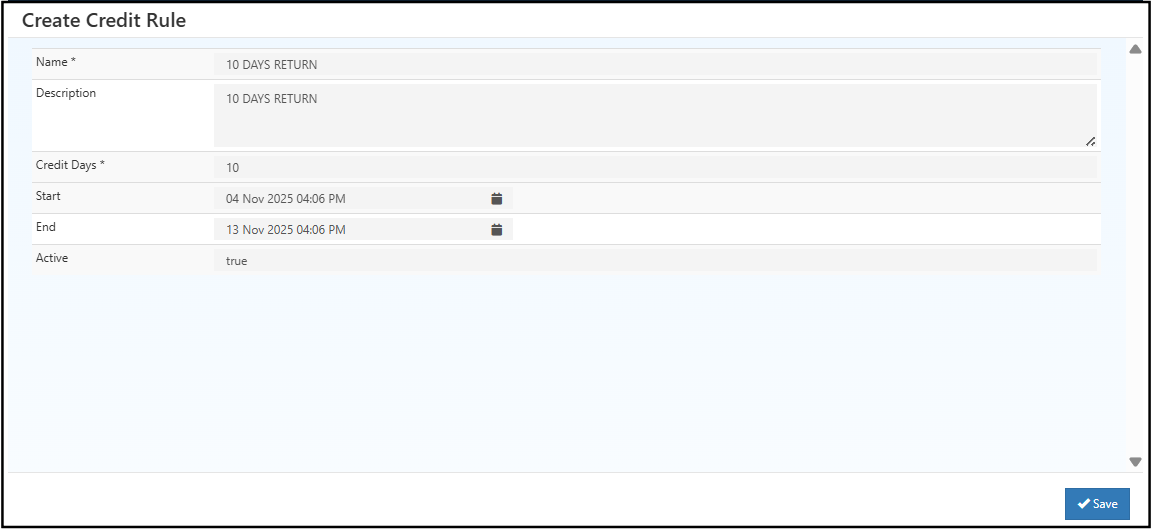
    4. Enter the following details:
      • Rule Name – A descriptive name (e.g., 7-Day Credit or 10-Day Return Policy).
      • Credit Days – Specify how many days the customer has before payment or return.
      • Description – Add additional notes or conditions, if needed.
    5. Click Save to store the rule.
    Credit Rules – O2Vend Guide

    Assigning Credit Rules to Customers

    Once a credit rule is created, it can be assigned directly when creating or editing a customer:

    • Go to Customers → Create / Edit Customer.
    • In the Credit Rule field, select the rule from the dropdown list.
    • Save the changes to apply the credit rule to that customer.

    This ensures each customer follows the correct payment term or return policy based on their assigned rule.


    Example Use Case

    • 7-Day Credit Rule: Customers must complete payment or return items within 7 days.
    • 10-Day Credit Rule: Extended credit for 10 days before payment is due.

    These rules help streamline accounts receivable, manage customer relationships, and enforce store policies automatically.


    Related Topics

    • Customer Management
    • Payment Methods Setup

    In this article
    © 2019-2026 Jeyan Technologies Private Limited • www.o2vend.com • Create your own store