How to Manage Debit Notes in O2VEND | Supplier Returns, Payments & Stock Adjustment
Manage Debit Notes in O2VEND easily by following this step-by-step guide for supplier returns, refund processing, and inventory adjustments.
This tutorial explains how to create and approve Debit Notes, process supplier returns, manage payment adjustments, update inventory, and verify financial reconciliation for accurate accounting and audit compliance.
Quick Answer: In O2VEND, Debit Notes are used to manage returns to suppliers, adjust purchase amounts, and update warehouse stock while automatically reflecting changes in financial records.
Overview
Use the Debit Note workflow to record supplier-side returns, reduce payable values, and keep stock and accounting entries aligned.
What is a Debit Note?
A Debit Note is a financial document issued by a buyer (your store) to a supplier, indicating a return of goods, incorrect billing, or damaged items. It requests a refund or adjustment, reduces the billed amount, updates stock, and records financial adjustments.
Who Should Use This Guide?
This guide is useful for:
- Store managers handling supplier returns
- Finance teams processing payment adjustments and debit entries
- Warehouse teams managing returned inventory and stock reductions
- Auditors verifying supplier return workflows and ledger entries
O2VEND Debit Note Management Overview
O2VEND provides a complete workflow for supplier returns, stock adjustment, and payment reconciliation. This guide explains how to manage debit notes, supplier returns, and payments across both POS and E-commerce channels.
Table of Contents – O2VEND Debit Note Guide
Debit Note List Overview
Go to Voucher → Debit Note in the Back Office.
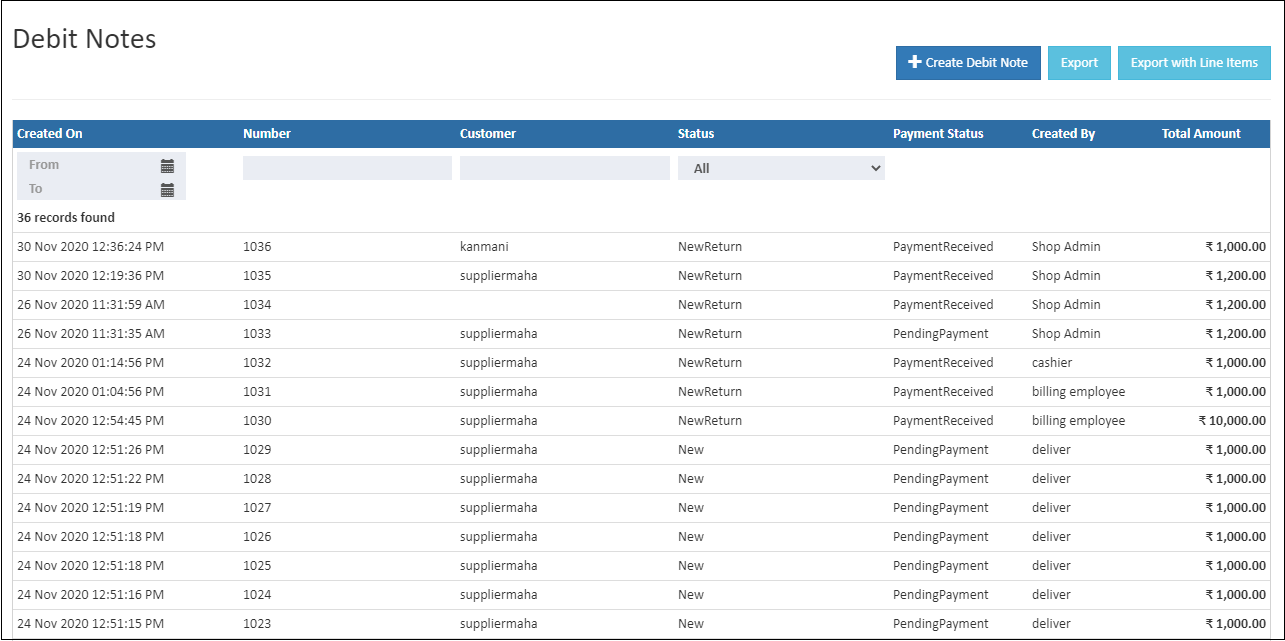
Lists Overview
The Debit Note list page contains all supplier returns.
Number
A unique reference number assigned to each Debit Note.
Status
Shows the current stage of the supplier return workflow.
Status Types
- New Return – Debit Note created, goods not yet returned
- Approved – Admin accepts the supplier return request
- Rejected – Requested items cannot be processed
- Closed Return – Admin closes return without processing
- Return Canceled – Admin cancels the goods return
Supplier Name
Displays the supplier associated with the Debit Note.
Tip
Press Alt+C to create a new supplier directly from this screen.
Created On
Shows the creation date of the Debit Note.
Total
Displays the total purchase amount for the Debit Note.
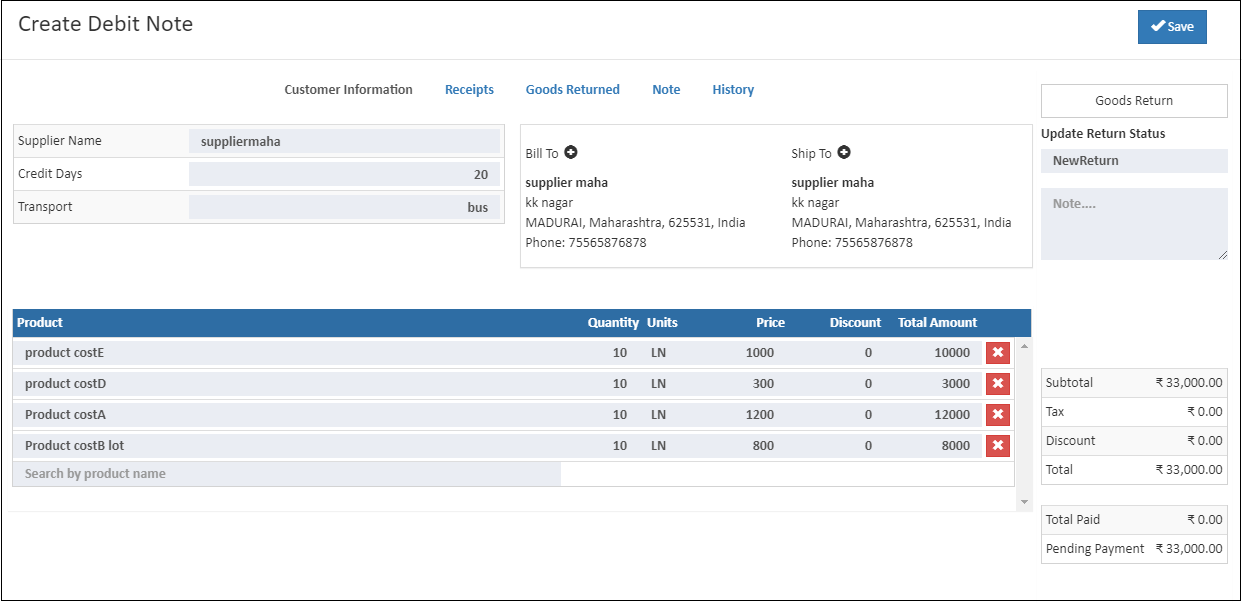
How to Process a Debit Note
Creating a Debit Note involves recording a supplier return, selecting items and quantities, entering pricing, and generating the financial adjustment for refunds or store credit.
Go to Voucher → Debit Note in the Back Office. Select the supplier, add returned items, and enter quantities and cost.
Note
Steps to Create a Debit Note: Select the branch, choose the supplier, add returned items, review totals, and save the Debit Note to finalize the return process.
Steps to Create a Debit Note
- Click Create Debit Note on the top right.
- Select the Branch where the return is processed.
- Choose the Supplier from the dropdown; details populate automatically.
- Add or update Billing and Shipping addresses if required.
- Search and add Products being returned, then enter quantity and cost.
- Review the Summary section at the bottom for totals, taxes, and adjustments.
- Click Save (or press Ctrl + S) to complete the Debit Note.
Master Voucher Numbering in ERP
Configure and manage voucher numbers efficiently, ensuring accurate transactions, smooth audits, and streamlined accounting processes.
Goods Return Process
Returned items can be reduced from inventory by clicking Goods Return.
How to Add Goods Return

- Click Goods Return.
- Product name, UOM, SKU, and quantity appear.
- Enter Tracking Number (optional).
- Select Location.
- Enter Quantity to Return (cannot exceed ordered quantity).
- Click Save to complete the process.

How to Add Lot in Goods Return
- Click Goods Return → Allot Lot.
- Enter lot number, manufacturer batch, MFG date, expiration date, and adjust quantity, or pick an existing lot.
- Click Save to allocate stock.
- Optionally, click Print Challan to generate goods return documents.
Stock History
Check the Stock History to view lot updates and returned product adjustments. Adjust quantities in Stock Inventory as required.
Online Payment Management Software | Multi-Method Payment Tracking in O2VEND
Configure, manage, and monitor multiple payment methods while tracking transactions and settlements from a single, centralized platform.
Debit Note Details
Shows supplier info, billing/shipping addresses, payment and shipment method, product details, and total amount.
How to View Debit Note Details
- Open Back Office → Voucher → Debit Note
- Click the Number to open details
- Click Close or press ESC to return to the list
Edit Debit Note
Edit supplier information or add products to a Debit Note.
Steps to Edit Debit Note
- Open Back Office → Voucher → Debit Note
- Double click the Number to open details
- Edit supplier info and billing/shipping addresses
- Add products via the search box
- Click Save to apply changes
Tip
Click Print to download a PDF copy of the Debit Note, including company branding, supplier, and product details.
Tip
Update the History tab after adding goods return to maintain accurate tracking.
Tip
Use Export Orders or Export Orders with Order Lines to download CSV reports.
Exporting Debit Notes
Use the list page export actions to download Debit Note data for reconciliation and audit reporting.
Related Debit Note & Adjustment Management Tutorials
The following tutorials support the Debit Note workflow in O2VEND, covering supplier returns, purchase adjustments, payments, and inventory corrections.
Below are additional vouchers and inventory guides that help you manage supplier returns, purchase corrections, payment adjustments, and stock movement with accurate accounting and compliance.
Credit Note Guide Learn how Credit Notes are created for customer returns, sales adjustments, and refund processing.
Payment Management Understand how to record vendor payments and adjust outstanding balances after Debit Notes are issued.
Receipt Management Track customer receipts and understand how financial entries flow in related voucher processes.
Purchase Invoice Management Learn how purchase invoices connect with Debit Notes for supplier return adjustments and ledger reconciliation.
Goods Received Note (GRN) Learn how GRN entries impact stock before creating Debit Notes for damaged or excess items.
If you want, I can also rewrite the full �How to Manage Debit Notes in O2VEND� guide in your SEO + human-written style (like we did for other help files).
FAQ: Debit Note Management
Q: How do I create a Debit Note? Select Voucher → Debit Note, choose the supplier, add products, review totals, and save.
Q: How is the supplier return workflow managed? Update statuses like New Return, Approved, Rejected, Closed Return, and Return Canceled. Each change is logged in History.
Q: How is stock updated after a goods return? Click Goods Return, select location, enter return quantities, assign lot/batch numbers, and save. Stock is reduced accordingly.
Q: Can I attach documents to a Debit Note? Yes, attach invoices, photos, tracking proofs, or other relevant files.
Simplify Supplier Returns & Debit Note Management with O2VEND
Manage supplier returns, adjust payments, update inventory, and maintain accurate ledger records using O2VEND�s integrated Debit Note workflow.