How to Create and Manage Service Invoices in O2VEND | Service Management Guide
A Service Invoice in O2VEND allows your business to bill customers for services rendered — such as repairs, installations, maintenance, or consultations. Service invoices are managed separately from sales invoices and have their own dedicated section in the Back Office with full payment tracking, vendor management, and accounting integration.
How to Access Service Management
Go to:
Back Office → Voucher → Services
This page displays a consolidated list of all service invoices created across your branches — including payment status, amount, and operational details.
Service Invoice List
The Services page shows all service records at a glance.
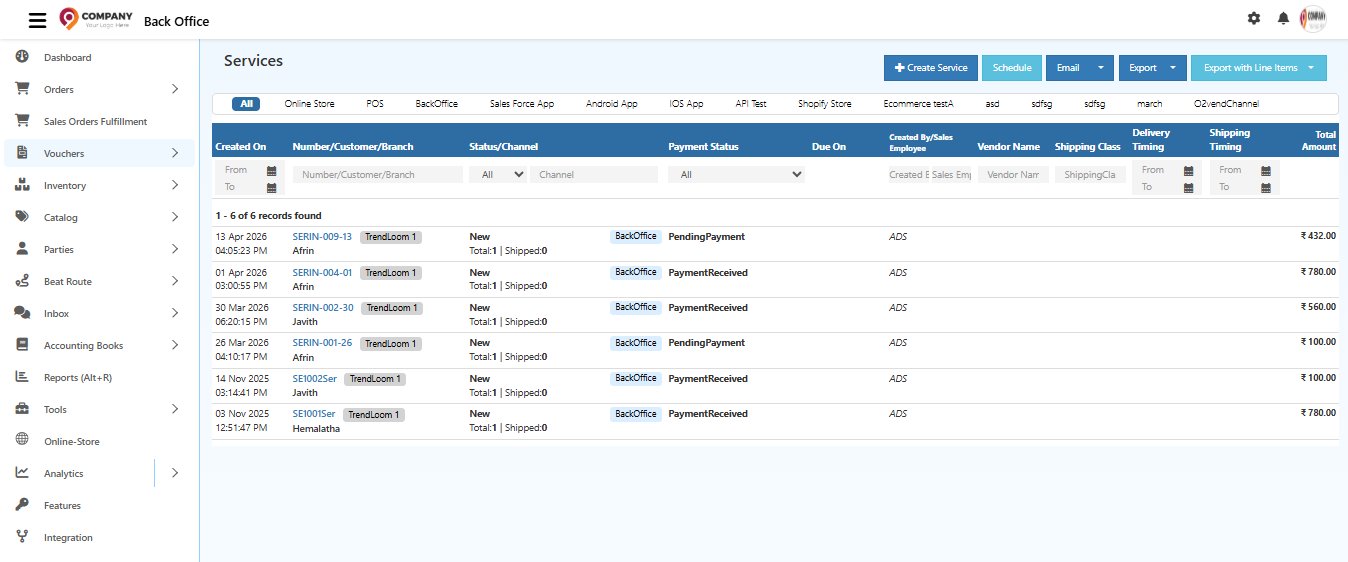
Channel Filter Tabs
Filter invoices by channel — All, Online Store, POS, BackOffice, Sales Force App, Android App, IOS App, Shopify Store, Ecommerce, O2vendChannel, and more.
List Columns Explained
| Column | Description |
|---|---|
| Created On | Date and time the service invoice was created |
| Number / Customer / Branch | Service invoice number (e.g., SERIN-009-13), customer name, and branch tag |
| Status / Channel | Order status and channel — also shows Total and Shipped item count |
| Payment Status | PendingPayment or PaymentReceived |
| Due On | Payment due date — shown in red if overdue |
| Created By / Sales Employee | Admin or sales rep who created the invoice |
| Vendor Name | Vendor linked to this service |
| Shipping Class | Shipping method if applicable |
| Total Amount | Total value of the service invoice |
Top Action Buttons
| Button | What It Does |
|---|---|
| + Create Service | Open the Create Service Invoice form |
| Schedule | Schedule a future-dated service task — useful for recurring services, installations, and follow-up visits |
| Send the service invoice or summary directly to the customer | |
| Export | Download all service records as a .csv file |
| Export with Line Items | Download invoices with full service line item details — ideal for GST reconciliation and auditing |
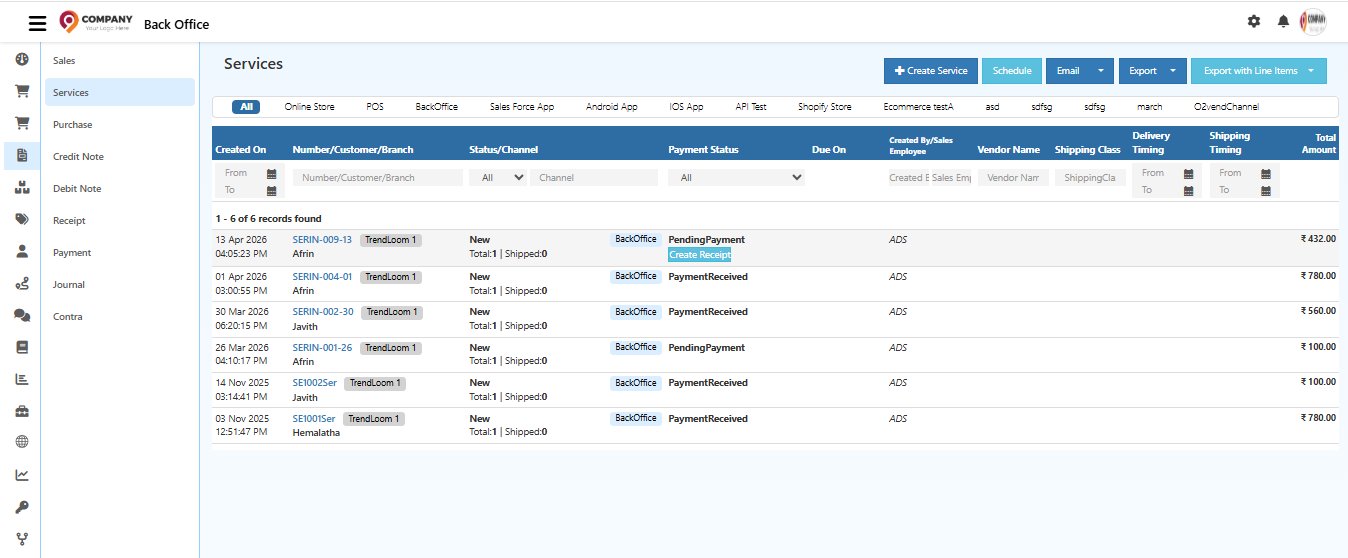
Quick Actions from the List
Hover over any invoice row to see inline action buttons.
| Button | Action |
|---|---|
| Create Receipt | Record a payment directly from the list — available for PendingPayment invoices |
Creating a Service Invoice
Click + Create Service from the top right to open the Create Service Invoice form.
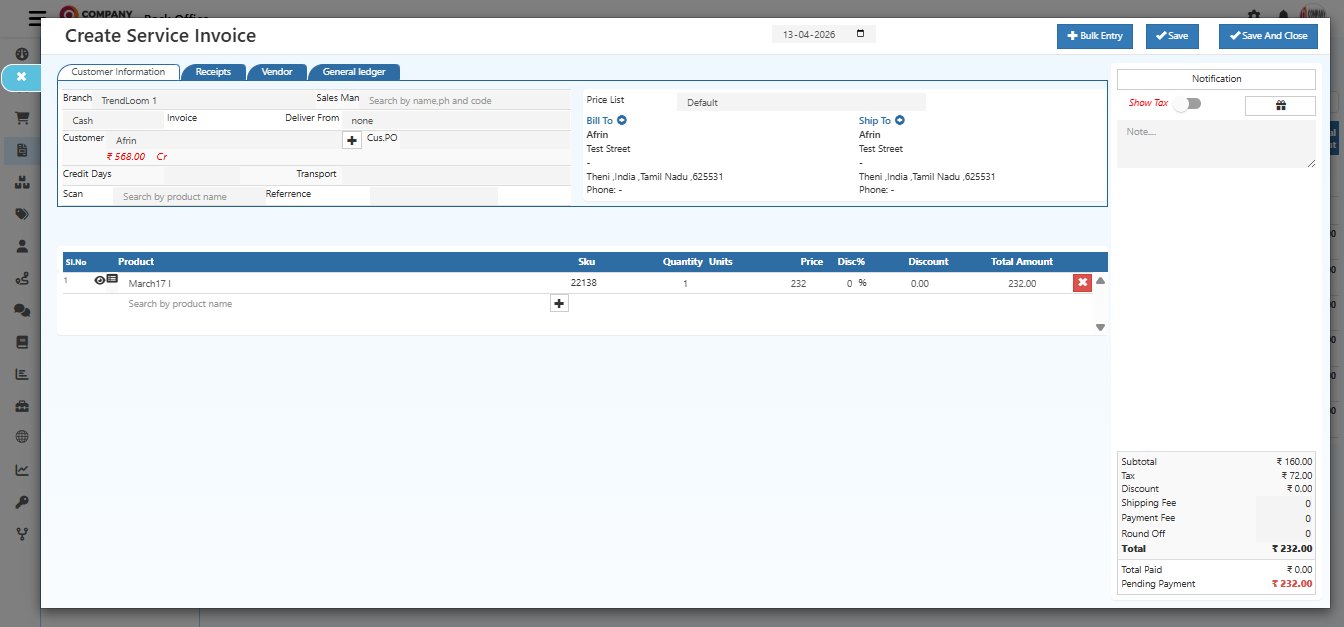
The form has 4 tabs — Customer Information, Receipts, Vendor, and General Ledger.
Tab 1 — Customer Information
This is the main tab where you enter all customer and service details.
Customer & Branch Fields
| Field | What to Enter |
|---|---|
| Branch | Auto-filled with the current branch (e.g., TrendLoom 1) |
| Sales Man | Search and assign the salesperson responsible for this service |
| Invoice Type | Select Cash (full payment now) or Credit (payment later) |
| Deliver From | Select the warehouse — choose None if not applicable |
| Customer | Search and select the customer — outstanding balance shown in red |
| Cus.PO | Customer's purchase order number for reference |
| Price List | Select the pricing category (e.g., Default) |
| Credit Days | Number of days allowed before payment is due — appears for Credit invoices only |
| Transport | Transport mode for delivery if applicable |
| Scan | Scan a product or service barcode to add it instantly |
| Reference | Internal reference or work order number for this service |
| Bill To | Customer's billing address — click + to update |
| Ship To | Customer's delivery address — click + to update |
Service / Product Line Items
Add the services or products being billed in the table below:
| Column | Description |
|---|---|
| Product | Search by service or product name — details fill automatically |
| SKU | Product or service SKU code |
| Quantity | Number of units or service hours |
| Units | Unit of Measure (e.g., pcs, hrs) |
| Price | Service price — editable if needed |
| Disc% | Discount percentage to apply |
| Discount | Discount amount calculated from Disc% |
| Total Amount | (Price × Qty) − Discount — auto-calculated |
Click + in the table to add more line items. Use + Bulk Entry at the top to add multiple items quickly.
Invoice Summary (Bottom Right)
The summary panel updates automatically as you add items:
| Field | Description |
|---|---|
| Subtotal | Total before tax and discounts |
| Tax | GST or applicable tax |
| Discount | Total discount applied |
| Shipping Fee | Delivery charges if applicable |
| Payment Fee | Payment gateway fee if applicable |
| TCS | Tax Collected at Source (if applicable) |
| Round Off | Rounding adjustment |
| Total | Final invoice amount |
| Total Paid | Amount paid so far |
| Pending Payment | Balance remaining — shown in red if unpaid |
Tab 2 — Receipts
The Receipts tab is used to record payments collected from the customer for this service invoice.
How to Record a Payment
- Click the Receipts tab
- Select the Payment Method from the available options:
- Cash
- UPI
- Card
- Net Banking
- Wallet
- Any other configured payment gateway
- Enter the Amount Received
- Add an optional Payment Note for internal reference
- Save — the payment status updates automatically
Payment Status After Entry
| Status | When It Appears |
|---|---|
| PaymentReceived | Full invoice amount has been collected |
| Partial | Part of the payment is collected — balance still pending |
| PendingPayment | No payment recorded yet |
You can also Adjust Advances from this tab — apply any advance paid by the customer against this invoice. Use Create QR & Link to generate a payment link or QR code to share with the customer.
Tab 3 — Vendor
The Vendor tab is used when the service is executed by an external vendor or third-party service provider.
| Field | Description |
|---|---|
| Vendor Name | Select the vendor responsible for executing this service |
| Vendor Charges | Enter the vendor's service cost or product cost |
| Vendor Note | Add internal notes for vendor communication or settlement reference |
This section ensures accurate vendor reconciliation and keeps vendor costs separated from customer billing for correct profit reporting.
Tab 4 — General Ledger
The General Ledger tab shows how this service invoice is mapped to your accounting books — automatically, without any manual entry.
Ledger Entries Created
When a service invoice is saved, O2VEND automatically creates entries for:
| Ledger | Purpose |
|---|---|
| Sales Ledger | Records the revenue from this service |
| Tax Ledger (CGST / SGST / IGST) | Records the GST components collected |
| Customer Ledger | Records the amount receivable from the customer |
| Discount Ledger | Records any discount given |
| Round Off Ledger | Records rounding adjustments |
This ensures complete accounting traceability and accurate financial reporting without any double-entry work.
Viewing a Saved Service Invoice
Click any invoice number from the list to open the full service invoice detail.

All Tabs in Invoice Detail
| Tab | What It Shows |
|---|---|
| Customer Information | Customer details, service line items, addresses, and invoice totals |
| Receipts | All payment records for this invoice |
| Vendor | Vendor assigned and vendor charges |
| History | Timeline of all status changes |
| Change Status | Manually update the invoice status with a reason |
| E-Way | E-Way Bill details for goods transport compliance |
| General Ledger | Accounting entries for this invoice |
| Documents | Attach purchase orders, contracts, or delivery proofs |
| Update History | Full audit log of all edits made |
Quick Action Buttons (Right Panel)
| Button | Action |
|---|---|
| Print the service invoice | |
| Print PickupList | Print the service pickup list for staff |
| Download Invoice | Download as PDF |
| Share Invoice | Share with the customer via email or link |
| Clone Invoice | Duplicate this invoice |
| Notification | Send a notification to the customer |
Best Practices
- Select the correct product or service for accurate GST calculation
- Always fill in the customer's Bill To and Ship To addresses correctly
- Record payments in the Receipts tab immediately after collection — this keeps your payment status accurate
- Use the Reference field to link the service invoice to a work order or job number for easy tracking
- After any major update, add a note in the History tab to maintain a clear audit trail
- Use Export with Line Items for detailed service reports and GST reconciliation
Quick Summary
| Task | Where to Go |
|---|---|
| View all service invoices | Back Office → Voucher → Services |
| Create a new service invoice | Click + Create Service |
| Record a payment | Hover on row → Create Receipt or open invoice → Receipts tab |
| View or edit service details | Click the invoice number |
| Update invoice status | Change Status tab inside the invoice |
| Download as PDF | Click Download Invoice (right panel) |
| Export all records | Click Export or Export with Line Items |
| Schedule a future service | Click Schedule from the top bar |
| View accounting entries | General Ledger tab inside the invoice |
Powerful Cloud Service Billing Starts Here
A complete, secure, enterprise-level platform for service billing, customer management, accounting, inventory, and business automation — all in one place.
Secure Cloud • Fast Setup • Trusted by Retailers & Service Businesses