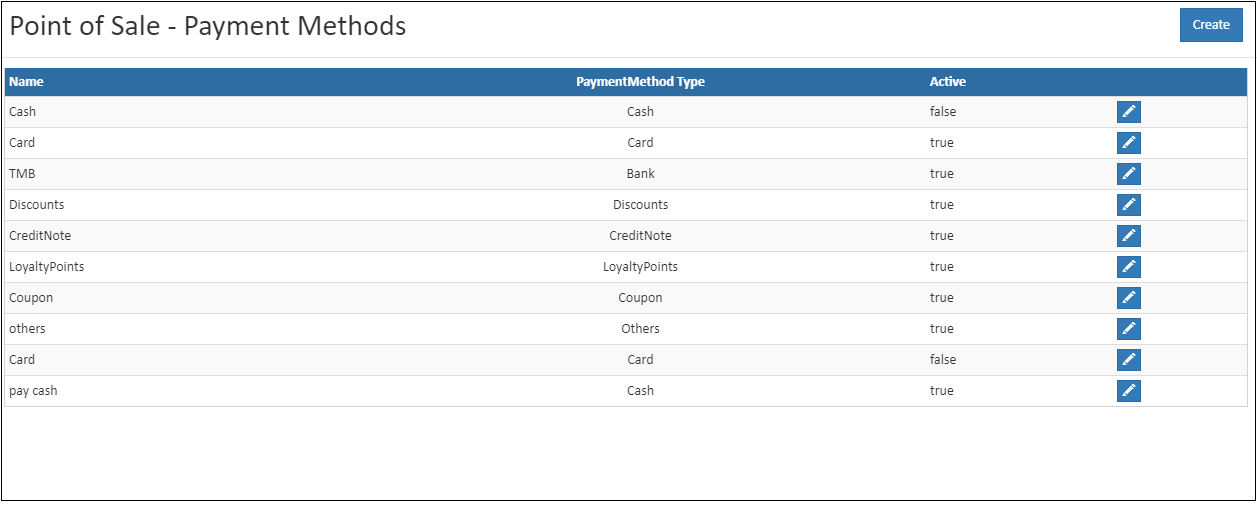
Manage Payments in Back Office | Payment Creation & Ledger
Create, track, and verify payments in the Back Office with clear steps for payment entry, account allocation, and ledger validation. This guide explains how to manage outgoing payments, view payment transactions, and ensure accurate accounting records for daily operations and audits.
Payment: List View
The Payment screen provides a consolidated view of all payments recorded against Purchase Invoices, Purchase Orders, Credit Notes, Returns, and Cash Out transactions.
Navigation path: Back Office – Vouchers – Payment

Filters and Actions
Date Filter (From / To)
The Date filter is used to view payments based on their creation date.
- By default, payments for the current date are displayed
- Select Start Date and End Date to filter payments for a specific period
- The payment list refreshes automatically after date selection
Create Payment
The Create Payment button (shortcut key: F5) is used to record a new payment transaction.
Export
The Export option allows payment data to be downloaded in CSV format for audits, and accounting reports.
Payment List Columns
Date
Displays the date and time when the payment was created.
Payment Number / Branch
Shows the system-generated payment number along with the branch under which the payment was recorded. Each payment number is unique and used for tracking.
Party
Displays the supplier, vendor, or party to whom the payment was made.
Account
Shows the ledger account associated with the payment transaction.
Type
Indicates the payment type. Supported types include:
- Purchase Invoice
- Purchase Order
- Credit Note
- Return Order
- Cash Out
Reference Numbers
Displays linked reference documents such as purchase invoice numbers or order references.
Created By
Displays the name of the user who created the payment entry.
Description
Displays remarks or notes entered during payment creation.
Total Amount
Displays the total payment amount with the applicable currency symbol.
Pagination
Pagination controls allow navigation across multiple pages when large volumes of payment records are available.
Track Outgoing Payments with Confidence
Gain complete visibility into supplier payments, cash outflows, and account movements using O2VEND�s centralized payment management.
Payment Details: Create Payment Screen
The Create Payment screen is used to record payments made to suppliers, vendors, or accounts. This screen captures both transaction and ledger-level details required for accurate accounting.
Navigation path: Back Office – Vouchers – Payment – Create Payment
Screen Header
Payment Details
Displays the payment creation screen title.
Branch
Shows the branch under which the payment is recorded.
Save
Validates and saves the payment entry.
Delete Payment
Allows deletion of an existing payment, subject to permissions and accounting rules.
Payment Ledger Section
This section defines how the payment impacts accounting ledgers.
To / Cr (Credit Account)
Displays the account or party receiving the payment.
- Typically a supplier or vendor account
- Credit amount reflects reduction in payable balance
Reference
Displays the linked reference document such as a purchase invoice or order number.
By / Dr (Debit Account)
Shows the account used to make the payment.
- Examples: Cash, Bank, Razorpay, Wallet
- Debit amount reflects cash or bank outflow
Narration
Optional remarks to describe the payment purpose. Useful for internal tracking and audits.
Total Amount
Displays the total payment amount recorded for the transaction.
Simplify Vendor Payments with O2VEND
Manage supplier payments, cash outflows, and bank transactions efficiently with integrated accounting controls.
Edit / View Payment � General Ledger Screen
The Edit / View Payment screen is used to review payment details and verify ledger postings generated for the transaction.
Navigation path: Back Office – Vouchers – Payment – Open Payment – General tab
Payment Header Details
Payment Number
Unique identifier for the payment transaction.
Payment Date and Time
Displays when the payment was created.
Branch
Shows the branch under which the payment is recorded.
Generates a printable payment voucher.
Delete Payment
Removes the payment entry, subject to validation and permissions.
Navigation path: Back Office � Vouchers � Payment � Open Payment � General Ledger tab
Ledger Posting Grid
Displays the accounting impact of the payment.
Repost
Regenerates ledger entries if recalculation is required.
Date Time
Ledger posting timestamp.
Name
Ledger account name (Supplier, Cash, Bank).
Note
Additional remarks if provided.
Party
Associated supplier or vendor.
Debit
Amount debited from the payment account.
Credit
Amount credited to the party account.
Control Payments Across All Branches
Maintain accurate ledgers, track vendor payments, and ensure financial transparency with O2VEND�s Back Office tools.