Manage Purchase Invoice
This guide explains how to create, view, and manage purchase invoices in O2VEND.
What is a Purchase Invoice?
A Purchase Invoice is a document received from your supplier that lists all goods or services provided. It shows the product name, quantity, unit, and price for every item purchased.
In O2VEND, purchase invoices help you:
- Track goods ordered and received from suppliers
- Monitor payment status and due dates
- Maintain accurate stock and accounting records
Navigate here:
Back Office → Voucher → Purchase
Purchase Invoice List
When you open the Purchase section, all your invoices are shown in a list view.
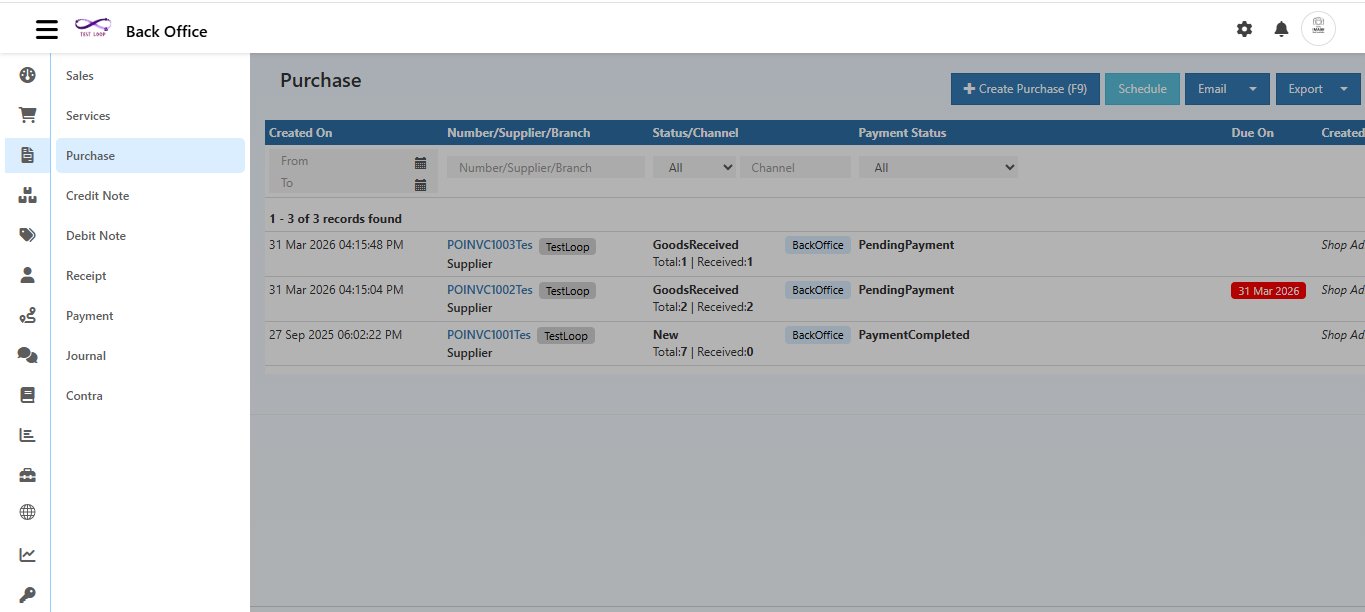
Each row in the list shows:
| Column | Description |
|---|---|
| Created On | Date and time the invoice was created |
| Number / Supplier / Branch | Invoice ID (e.g., POINVC1003Tes), supplier name, and branch tag |
| Status / Channel | Order status (New, GoodsReceived) and channel (BackOffice) |
| Payment Status | PendingPayment or PaymentCompleted |
| Due On | Payment due date — shown in red if overdue |
| Created By | Admin who created the invoice |
| Total Amount | Total value of the purchase |
The list also shows Total items and Received items count directly in the Status column (e.g., Total:1 | Received:1), so you can track delivery progress at a glance.
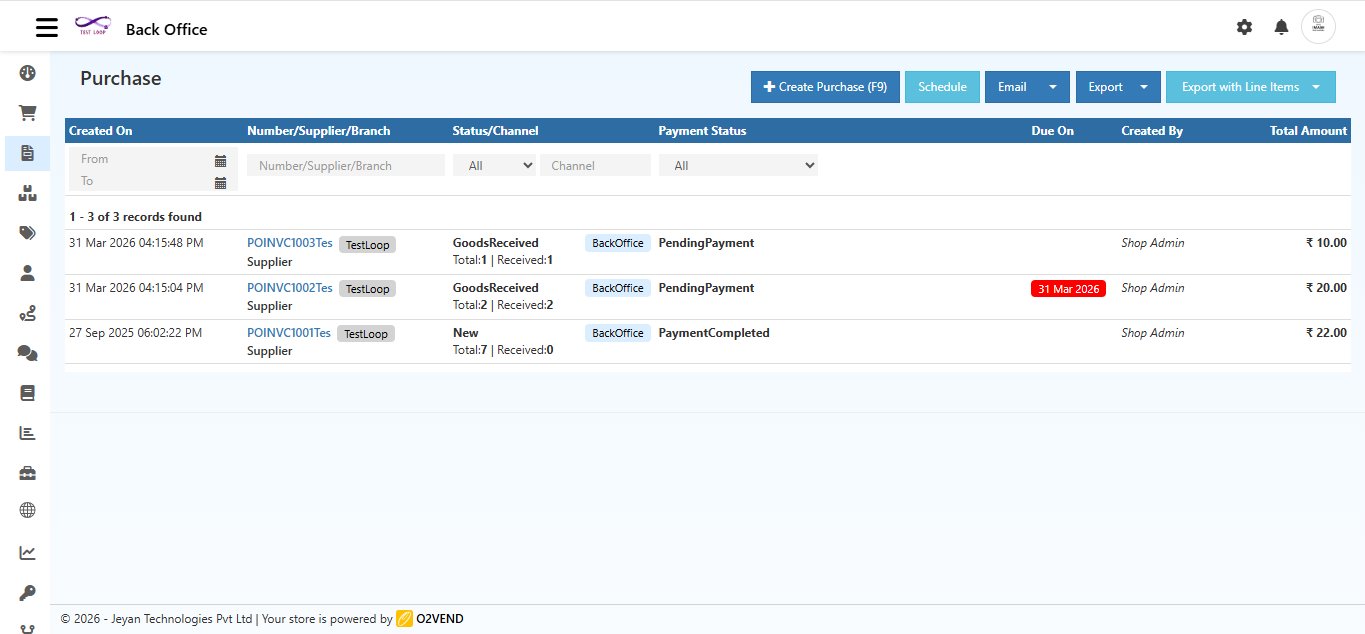
Filtering and Exporting
Use the filter bar at the top to search and narrow down invoices.
Filter Options
| Filter | How to Use |
|---|---|
| From / To | Select a date range using the calendar icons |
| Number / Supplier / Branch | Type to search by invoice number, supplier name, or branch |
| Status | Select from dropdown — All, New, GoodsReceived, PartiallyGoodsReceived |
| Channel | Filter by channel (BackOffice, POS, etc.) |
| Payment Status | Select All, PendingPayment, or PaymentCompleted |
Export Options
| Button | What It Does |
|---|---|
| Export | Downloads invoice records as a .csv file |
| Export with Line Items | Downloads invoices with full product-level detail as a .csv file |
| Schedule | Schedule automated export or email delivery |
| Email the invoice list directly |
Order Status Types
| Status | What It Means |
|---|---|
| New | Invoice created — goods not yet received |
| PartiallyGoodsReceived | Some goods arrived — remaining items still pending |
| GoodsReceived | All goods received from supplier |
Payment Status
| Status | What It Means |
|---|---|
| PendingPayment | Payment not yet completed — bank transfer in progress or invoice unpaid |
| PaymentCompleted | Full payment received — online or cash |
Due On date appears in red when payment is overdue.
Creating a Purchase Invoice
Click + Create Purchase (F9) from the top right, or press F9 anywhere on the page.
Empty Create Purchase Form
When the form opens, it has three tabs: Supplier Information, Payments, and General Ledger.
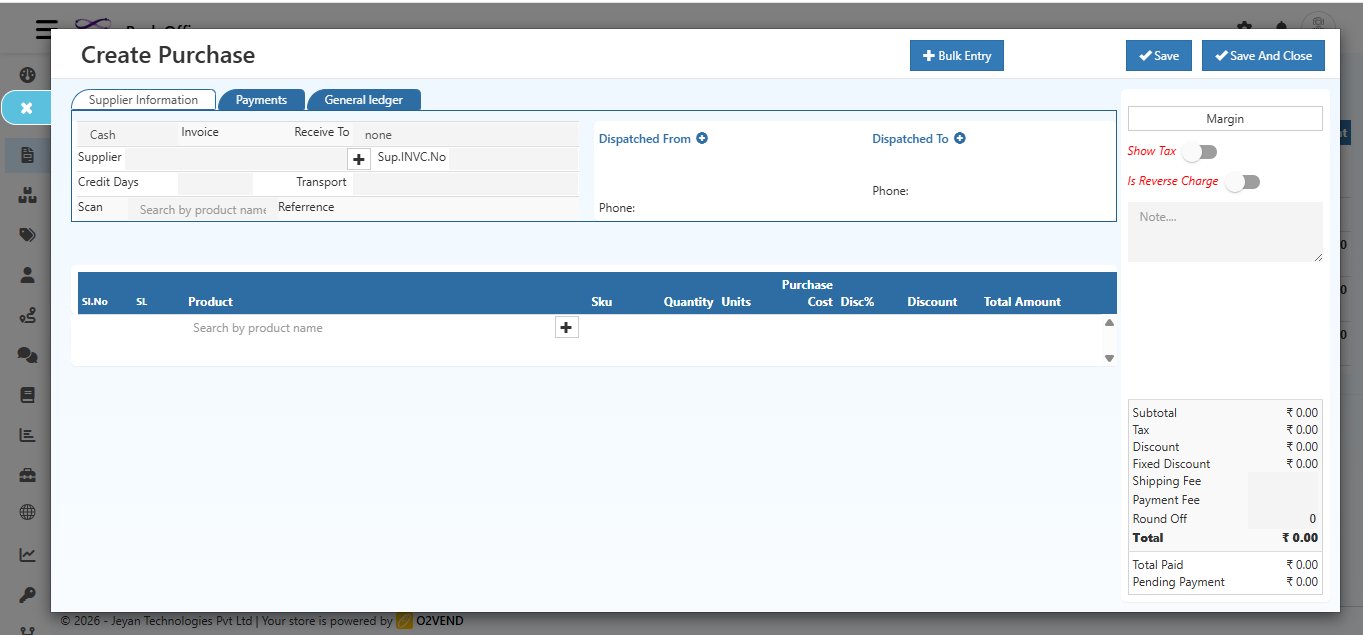
Supplier Information Tab — Fields
| Field | What to Enter |
|---|---|
| Invoice | Select payment method — Cash or Credit |
| Receive To | Select the warehouse for delivery. Choose None if not applicable |
| Supplier | Search and select the supplier name. Click + to add supplier invoice number |
| Sup.INVC.No | Enter the supplier's own invoice number for reference |
| Credit Days | (Credit only) Number of days the buyer has to pay |
| Transport | Transport mode — lorry, van, bus, auto, etc. |
| Scan | Scan a product barcode to add it quickly |
| Reference | Reference number to link this invoice to a supplier order |
Tip: Click inside the Supplier field to place your cursor first, then press
Alt + Cto create a new supplier. This shortcut only works when your cursor is active inside the field — it will not work if you press it from anywhere else on the page.
Right Panel Options
| Option | Description |
|---|---|
| Margin | View the profit margin for this purchase |
| Show Tax | Toggle to show or hide tax on the invoice |
| Is Reverse Charge | Toggle for reverse charge tax applicability |
| Note | Add an internal note for this purchase |
Dispatched From / To
- Click Dispatched From
+to add the supplier's dispatch address and phone - Click Dispatched To
+to add your receiving warehouse address and phone
Filled Create Purchase Form
Here is an example of a filled purchase form with a product added:
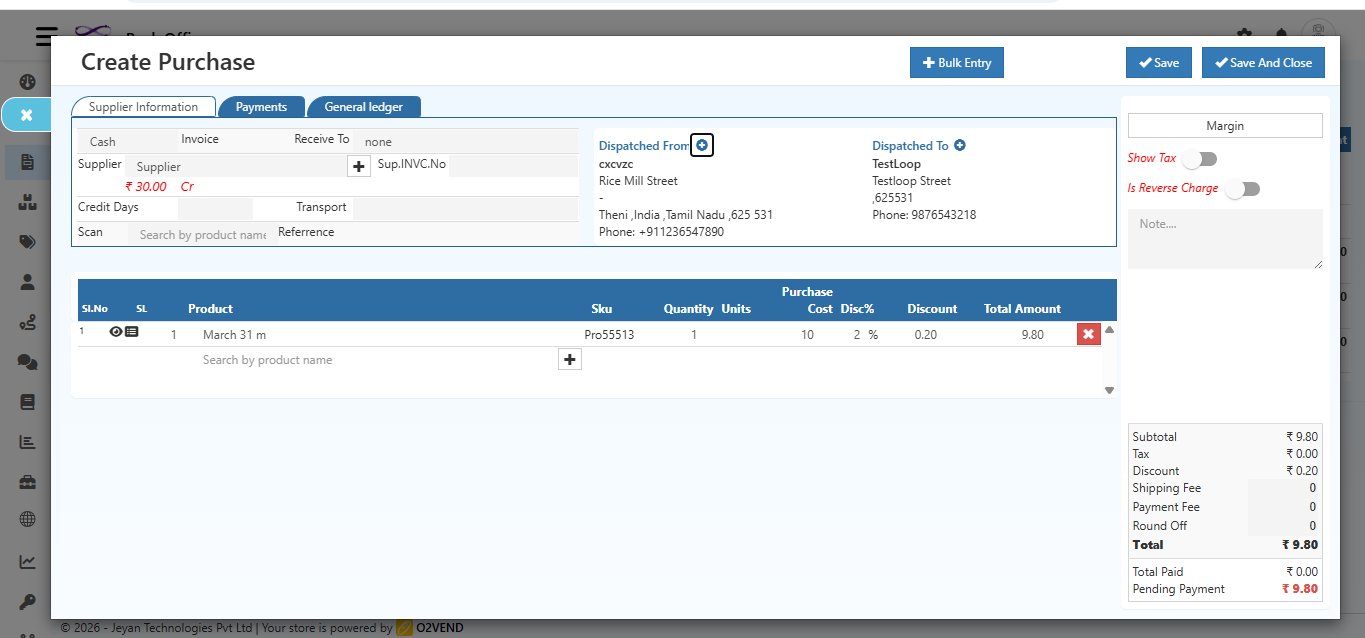
Product Table Fields
| Field | Description |
|---|---|
| SL | Serial / lot number for the product |
| Product | Search by product name — purchase cost fills in automatically |
| SKU | Product SKU code |
| Quantity | Number of units being purchased |
| Units | Unit of Measure (e.g., pcs, kg, M) |
| Purchase Cost | Auto-filled from product records — editable if needed |
| Disc% | Discount percentage to apply |
| Discount | Discount amount calculated from Disc% |
| Total Amount | (Price × Qty) − Discount |
Tip: Click inside the Product field to place your cursor first, then press
Alt + Cto create a new product. This shortcut only works when your cursor is active inside the field — it will not work if you press it from anywhere else on the page. Use + Bulk Entry to add multiple products at once.
Invoice Summary (Bottom Right)
| Field | Description |
|---|---|
| Subtotal | Total before tax and discounts |
| Tax | Tax applied |
| Discount | Total percentage discount |
| Fixed Discount | Fixed amount discount |
| Shipping Fee | Shipping charges if applicable |
| Payment Fee | Payment gateway fee if applicable |
| Round Off | Rounding adjustment |
| Total | Final invoice amount |
| Total Paid | Amount paid so far |
| Pending Payment | Remaining balance to be paid |
Click Save or Save And Close to create the invoice.
Saved Purchase Invoice
After saving, the invoice opens in detail view with a confirmation message.
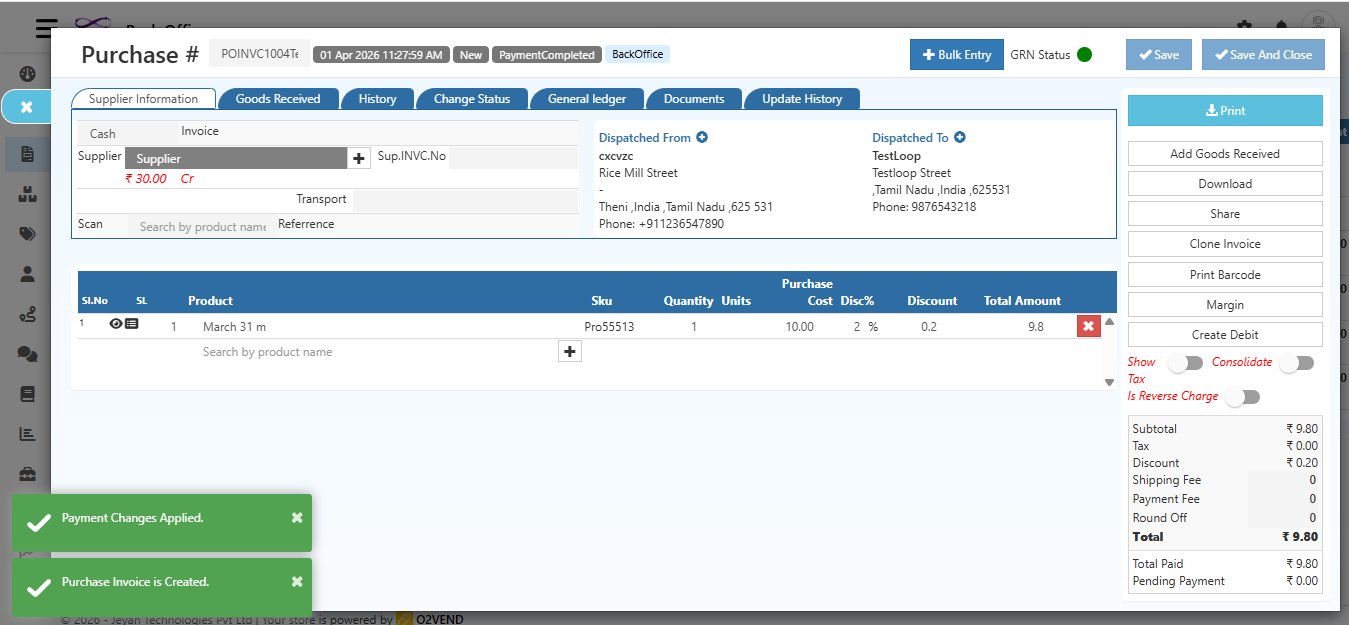
The invoice header shows:
- Invoice Number (e.g., POINVC1004Tes)
- Date and Time of creation
- Status badges — New / GoodsReceived / PendingPayment / PaymentCompleted / BackOffice
Tabs in Invoice Detail
| Tab | What It Shows |
|---|---|
| Supplier Information | Supplier details, products, dispatch addresses, and totals |
| Goods Received | Items received against this invoice |
| History | Timeline of all status changes |
| Change Status | Manually update the invoice status |
| General Ledger | Accounting ledger entries for this invoice |
| Documents | Attached documents for this invoice |
| Update History | Log of all edits and updates made |
Quick Action Buttons (Right Panel)
| Button | Action |
|---|---|
| Print the invoice | |
| Add Goods Received | Record items received from this invoice |
| Download | Download invoice as PDF |
| Share | Share the invoice via email or link |
| Clone Invoice | Duplicate this invoice |
| Print Barcode | Print barcode labels for products |
| Margin | View profit margin for this purchase |
| Create Debit | Create a debit note against this invoice |
Goods Received Tab
When you click Add Goods Received, the Goods Receive screen opens.
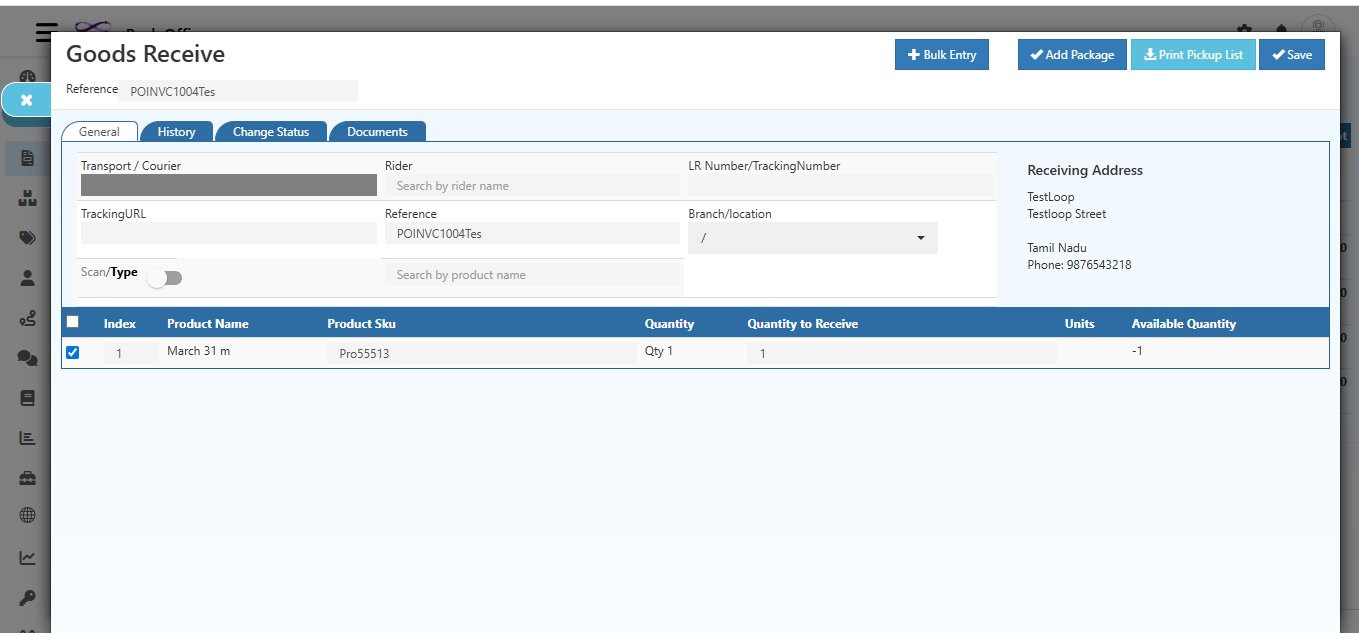
This screen allows you to confirm which items have physically arrived from the supplier.
Goods Receive Fields
| Field | Description |
|---|---|
| Reference | Auto-filled with the invoice number (e.g., POINVC1004Tes) |
| Transport / Courier | Enter the courier or transport company name |
| Rider | Search and assign a delivery rider if applicable |
| LR Number / Tracking Number | Enter the lorry receipt or shipment tracking number |
| Tracking URL | Paste the shipment tracking link |
| Branch / Location | Select the branch where goods are received |
| Scan / Type | Toggle to scan barcodes or type product names |
| Receiving Address | Auto-filled from the invoice dispatch address |
Product Receipt Table
| Column | Description |
|---|---|
| Index | Row number |
| Product Name | Name of the product to be received |
| Product SKU | SKU code of the product |
| Quantity | Original ordered quantity |
| Quantity to Receive | Enter how many units you are receiving now |
| Units | Unit of measure |
| Available Quantity | Current stock available in the warehouse |
You can receive partial quantities — the invoice status will update to PartiallyGoodsReceived automatically.
Use + Add Package, Print Pickup List, or Save buttons at the top to complete the receipt.
Inline Actions from Invoice List
Hover over any invoice row to see quick inline action buttons.
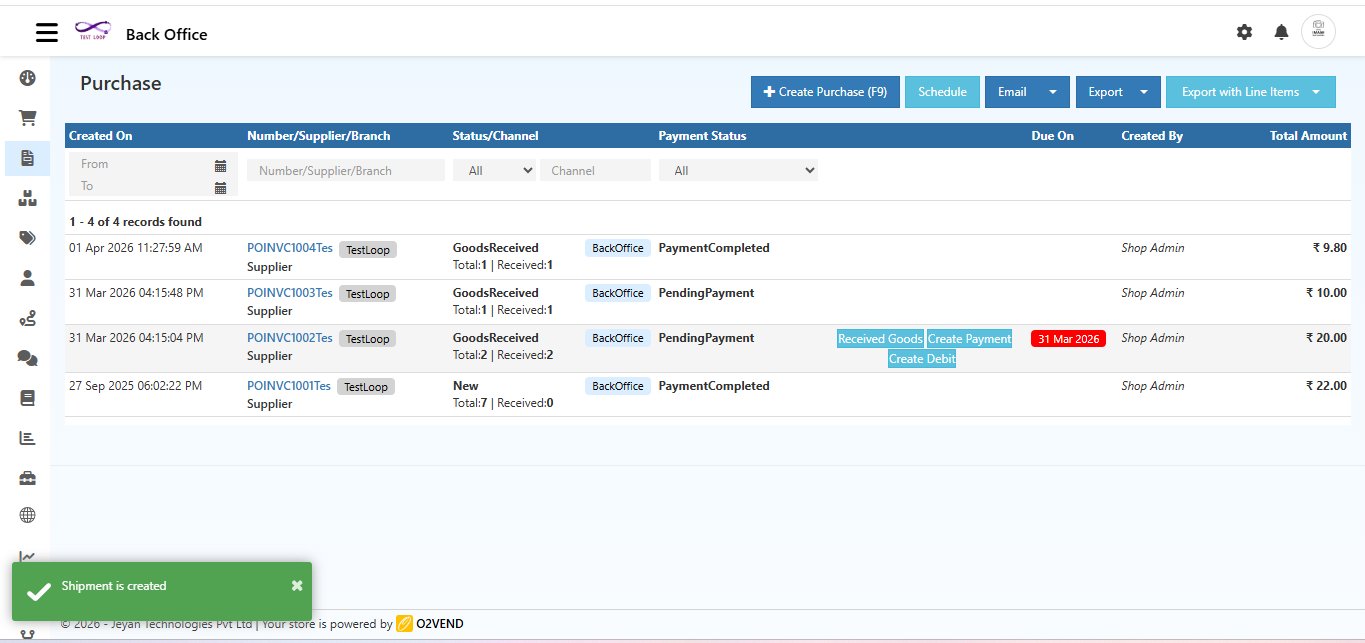
| Button | Action |
|---|---|
| Received Goods | Quickly open the Goods Receive screen from the list |
| Create Payment | Record a payment directly from the list |
| Create Debit | Create a debit note from the list |
Success notifications appear at the bottom left (e.g., "Shipment is created", "Purchase Invoice is Created") to confirm your actions.
Keyboard Shortcuts
| Shortcut | Action |
|---|---|
F9 |
Open the Create Purchase Invoice screen |
Alt + C |
Create a new Supplier — cursor must be active inside the Supplier field |
Alt + C |
Create a new Product — cursor must be active inside the Product field |
Step-by-Step: How to Create a Purchase Invoice
- Go to Back Office → Voucher → Purchase
- Click + Create Purchase or press
F9 - Select Invoice type — Cash or Credit
- Search and select the Supplier, add Sup.INVC.No if needed
- Select Receive To warehouse (or None)
- Fill in Credit Days, Transport, Reference as needed
- Add Dispatched From and Dispatched To addresses
- Search and add Products — enter quantity, cost, and discount
- Review the Invoice Summary on the right
- Click Save or Save And Close — invoice is created with a success confirmation
- Click Add Goods Received to record received items and update stock