Outward Route Configuration for GDN in O2VEND: Complete Setup Guide
What Is Outward Route Configuration & Why It Matters
Outward route configuration is the backbone of controlled warehouse dispatch in O2VEND. It determines whether your team can initiate goods shipment and controls the entire pick-pack-deliver workflow.
Key Benefits:
- Prevent unauthorized inventory deductions
- Streamline dispatch approvals
- Ensure accurate stock movement tracking
- Improve warehouse operational efficiency
How Location Routing Controls the "Initiate Goods Issue" Button
The Initiate Goods Issue button visibility depends entirely on your Location Outward Routes configuration.
Why this matters:
- Your dispatch location must have an active outward route
- Route permissions determine who can initiate shipments
- Branch-level routing logic controls button access
If the button isn't visible, check:
- Location configuration in Back Office
- Outward route mapping status
- User role and dispatch permissions
Pro Tip: Proper routing prevents unauthorized inventory transactions and ensures structured stock movement across your warehouse.
Configure Outward Route: Pick_PackAndDelivery Step-by-Step
The Pick_PackAndDelivery Route Explained
Setting your Outward Route to Pick_PackAndDelivery activates:
- ✅ Initiate Goods Issue button
- ✅ Structured Pick → Pack → Deliver workflow
- ✅ Real-time inventory control
- ✅ Approval-based stock deduction
How to Enable Pick_PackAndDelivery Routing
Follow these steps:
- Navigate to Back Office → Locations → Edit Location
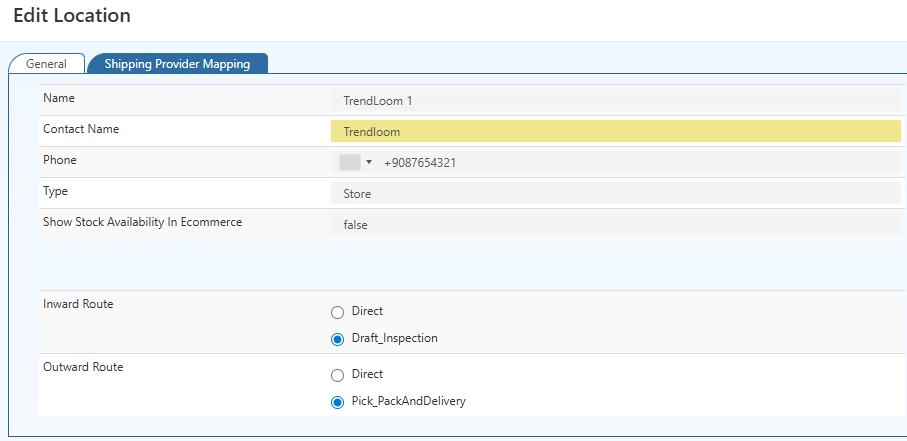
- Find the Outward Route field
- Select Pick_PackAndDelivery
- Click Save Changes
Result: The Initiate Goods Issue button becomes immediately active.
⚠️ Important: Button availability is location-dependent. Ensure your selected branch has proper outward routing configured before initiating dispatch.
Complete Workflow: From Configuration to Dispatch
Step 1: Set Location Routing
Configure the location with Outward Route = Pick_PackAndDelivery
Step 2: Create a New GDN
Generate a Goods Dispatched Note in your system
Step 3: Select Dispatch Location
Choose the correct branch and click Initiate Goods Issue
Step 4: Access the Packages Tab
Review and manage package details, courier selection, and shipping labels
Step 5: Finalize & Approve
Confirm dispatch—stock reduces only after full approval
Outcome: Controlled workflow prevents premature stock deduction and maintains accuracy.
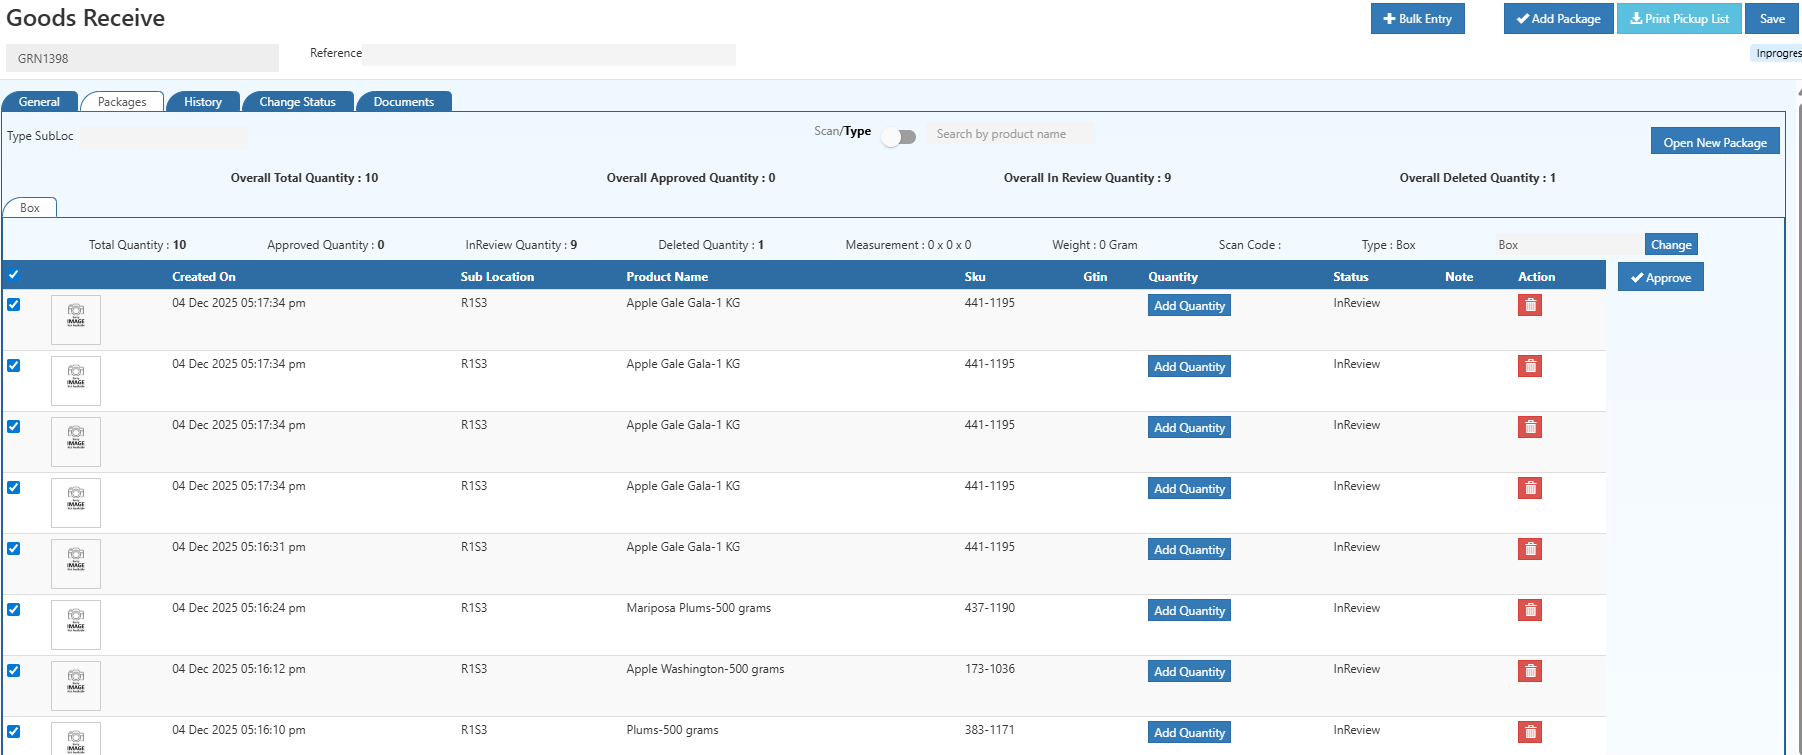
Packages Tab: Package-Level Control for Accurate Dispatch
The Packages Tab is your central hub for managing outbound shipments at the package level.
What You Can Do in the Packages Tab
- Create multiple packages per shipment
- Assign products to specific packages
- Enter weight and dimension details
- Enable COD (Cash on Delivery)
- Generate shipping labels
- Track courier handover status
Why Package-Level Management Improves Operations
✓ Reduces courier billing errors
✓ Prevents incorrect label generation
✓ Enables precise delivery tracking
✓ Strengthens audit compliance
✓ Improves freight cost accuracy
7-Step Package Verification Process
Step 1: Select or Create a Package
- Choose an existing package OR
- Click Initiate Goods Issue to create a new shipment unit
Each package represents one physical shipment (box, carton, pallet).
Step 2: Scan or Search Products
Use the Scan/Type toggle to add items:
- Scan Mode: Barcode scanning for speed and accuracy
- Type Mode: Manual search by product name or SKU
Recommendation: Scan mode reduces errors in high-volume warehouses.
Step 3: Review the Product List
Verify all added items including:
- Date & time added
- Sub-location (rack/shelf)
- Product name & SKU
- Quantity status
Step 4: Add Quantity Per Item
- Click Add Quantity for each product
- Update dispatched amounts
- Prevent over-dispatch errors
Step 5: Verify Item Accuracy
Before approval, confirm:
- ✓ Correct product selected
- ✓ Accurate quantity entered
- ✓ Correct sub-location identified
- ✓ Status shows InReview
Step 6: Remove Incorrect Items
If errors occur:
- Click Delete on incorrect entries
- Re-scan or re-add correct products
- Prevents shipment mismatches
Step 7: Approve & Finalize
- Select verified items
- Click Approve
- Items exit InReview status and become part of final package