How to Add Products in O2VEND POS & Ecommerce (Complete Catalog Guide)
Product Creation & General Section Guide
Proper product setup is the foundation for smooth billing, accurate inventory tracking, and consistent product visibility across sales channels.
This guide explains how to add, configure, and manage products in O2VEND POS and Web Store, with a primary focus on the General section, where pricing, tax behavior, inventory rules, and product visibility are defined.
When products do not appear in POS or Ecommerce, the cause is usually an incomplete or incorrect catalog configuration.
Following this guide helps ensure products are visible, orderable, and billed correctly across both POS and Web Store environments.
Quick Answer: How to Add a Product in O2VEND?
- Back Office → Catalog → Products
- Click Create Product
- Enter Product Name, SKU, Category, Price, and Tax
- Enable Published & Allowed To Order
- Save the product
Once saved, the product becomes available for billing in POS and listing in the Web Store.
This setup process is recommended for all businesses using O2VEND POS and Ecommerce to avoid product visibility and billing issues.
Why Catalog Product Setup Matters
Proper catalog setup helps to:
- Improve product discoverability
- Ensure accurate pricing and tax calculation
- Reduce inventory inconsistencies
- Enable faster product updates
- Maintain consistency across sales channels
Each catalog product acts as a core data entity for sales, inventory tracking, and reporting in O2VEND.
General Section Overview
The General section contains the core configuration required to activate a product across the platform.
It defines:
- Product identifiers (Product Name, SKU, GTIN)
- Brand and category mapping
- Pricing, discounts, cost, and tax behavior
- Product visibility and ordering rules
- Descriptions and images for storefront display
Most configurations affecting visibility, pricing logic, and ordering flow are managed in this section.
Note
Review the General section before publishing to ensure correct behavior across Web Store and POS.
How to Create a Catalog Product
Creating a catalog product in O2VEND allows you to list, manage, and sell products across Web Store, POS, and other sales channels.
Steps to Create a Catalog Product
- Open Back Office
- Navigate to Catalog → Products
- Click the Create Product button (top-right corner)
- Fill in the required details in each tab (starting with General)
- Click Save to create the product
Once saved, the product can be published to the web store or used in POS billing.
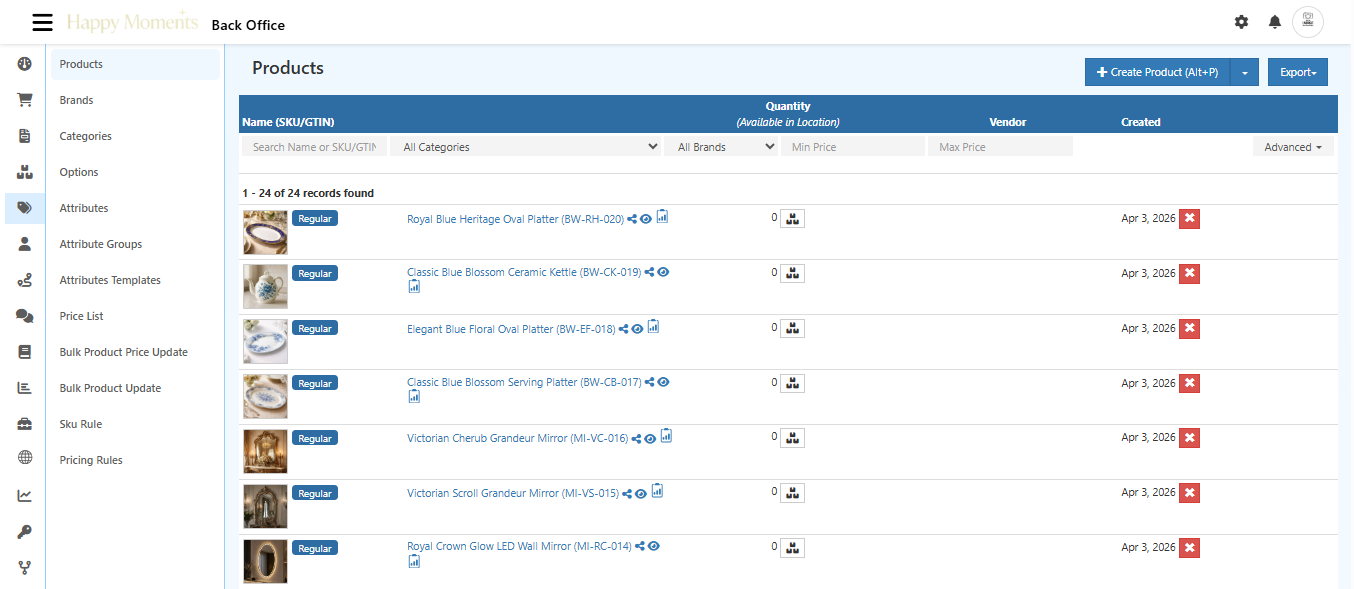
Products List View
You can view all existing products in the Products list, which displays product thumbnails, SKU/GTIN, vendor information, and creation dates.
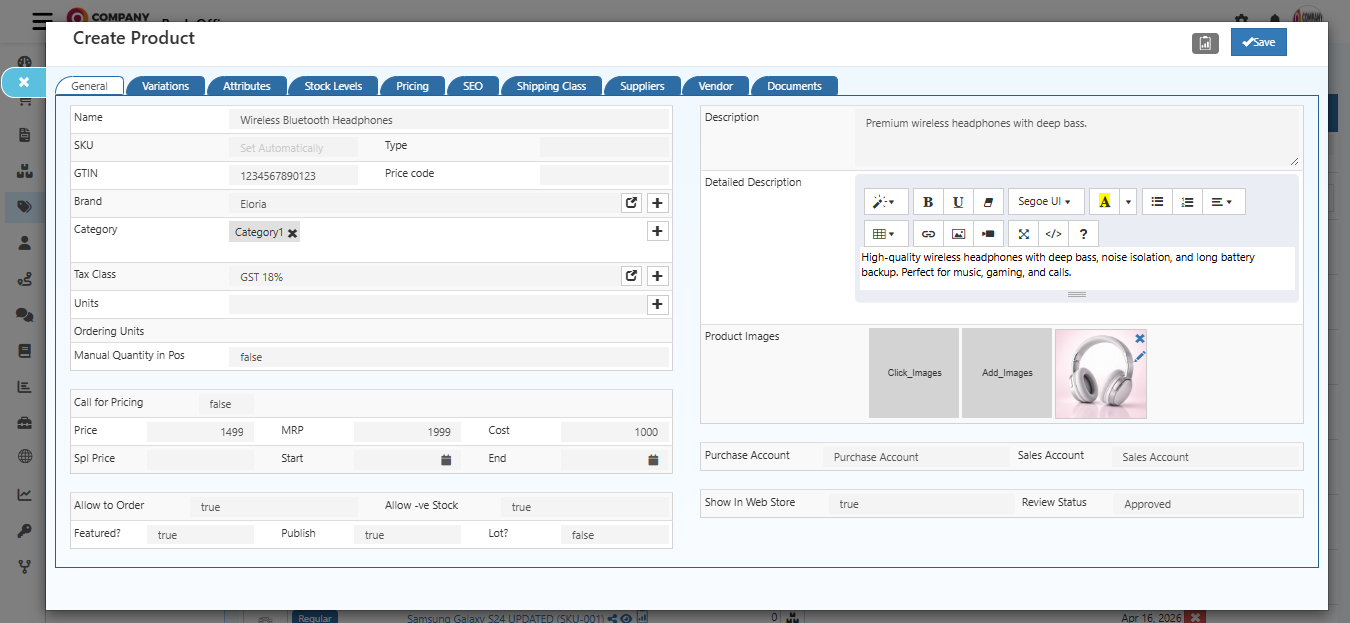
General Section Configuration
The General section contains the core information required to define, display, price, and sell a product in O2VEND.
Product Name
Enter a Product Name. The Product Name is displayed under the Product Image in most O2VEND themes and across the catalog.
The Product Name is also used to generate the slug name, which becomes the product URL in the web store.
Best Practices:
- Use clear, descriptive names (e.g., "Wireless Bluetooth Headphones" instead of "Product")
- Avoid excessive capitalization or special characters
- Include key product attributes when relevant (e.g., color, size, model)
- Keep names concise but informative
A clear and descriptive product name helps customers understand the product quickly and improves discoverability and SEO rankings.
SKU and GTIN
Enter the SKU (Stock Keeping Unit) and/or GTIN (Global Trade Item Number) for the product.
SKU (Stock Keeping Unit):
- Unique identifier for inventory management
- Used for barcode generation and POS scanning
- Can be set automatically or manually
GTIN (Global Trade Item Number):
- Standardized international product code
- Used for retail and ecommerce integration
- Enables product matching across channels
Benefits:
- Generate barcodes and print barcode labels
- Scan products directly in the POS Sales Screen
- When scanned, the product is automatically added to the billing cart
- The same SKU or GTIN can be used across online and physical stores, enabling unified inventory tracking
- Facilitates product lookup and order fulfillment
Brand
The Brand field is used to associate a product with a specific brand. This helps organize products and allows brands to be used for filtering, grouping, and reporting across the catalog.
In the General tab, the Brand field includes action icons:
- Edit icon (pencil) – Used to modify the selected brand details
- Create (+) icon – Used to create a new brand without leaving the product screen
Inline Brand Management:
- Clicking the Create (+) icon opens the Brand creation page
- A new brand name and related details can be added
- Once saved, the newly created brand becomes immediately available for selection
- Clicking the Edit icon opens the selected brand in edit mode for updates
Benefits:
- Organize products by brand for better catalog management
- Use brands for filtering and sorting in the storefront
- Generate brand-specific reports and analytics
- Manage brands without leaving the product setup workflow
Category
The Category field determines where the product appears within the catalog structure.
Key Features:
- A product can be assigned to one or multiple categories
- Allows products to appear in different sections of the store
- Enables hierarchical catalog organization (categories and subcategories)
Inline Category Management:
- A Create (+) icon is available next to the Category field
- Clicking this icon opens the Category creation page
- New categories or subcategories can be created and saved
- Newly created categories are immediately selectable for the product
- This feature allows catalog structure to be adjusted during product creation
Best Practices:
- Assign products to the most relevant primary category
- Use subcategories for better organization
- Keep category names clear and customer-friendly
- Avoid overly broad category assignments
Tax Class
The Tax Class field defines how tax is calculated for the product during checkout and billing.
Inline Tax Class Management:
- Edit icon – Used to modify the selected tax class
- Create (+) icon – Used to create a new tax class directly from the product screen
Features:
- Tax rules are applied automatically during checkout
- Different tax classes can be used for different products or regions
- Tax calculations are based on the selected tax class and store location
- Ensures compliance with local tax regulations
Common Tax Classes:
- Standard VAT/GST
- Reduced tax rate (groceries, books)
- Exempt products
- Zero-rated items
Units
The Units field defines the basic unit of measurement for the product (e.g., each, dozen, meter, kilogram, liter).
Inline Unit Management:
- A Create (+) icon is available next to the Units field
- Clicking opens the Unit creation page
- New units of measure can be defined as required
- The newly created unit becomes available instantly for selection
Purpose:
- Ensures accurate quantity handling and inventory tracking
- Standardizes measurement across inventory and sales
- Enables proper unit conversions in reports
Ordering Units
Select the unit of measure used while ordering the product.
This controls how quantities are displayed during ordering and billing processes.
Note - Inline Management Features
The inline Create (+) and Edit icons in Brand, Tax Class, Category, and Units fields are designed to streamline catalog management.
They allow related master data to be created or updated directly from the product screen, improving efficiency and reducing navigation time.
Pricing & Cost Configuration
Price
Enter the selling price of the product that customers will pay.
Important: The price entered is inclusive of all taxes, based on the selected tax class.
Tips:
- Ensure pricing is accurate, as it is used across all sales channels
- Price appears on product pages, POS, and invoices
- Use consistent pricing across channels for customer trust
MRP (Maximum Retail Price)
Enter the Maximum Retail Price (MRP) if applicable.
This is typically used for:
- Display purposes on invoices and receipts
- Comparison with selling price to show discounts
- Compliance with regional pricing regulations
Cost
Enter the actual cost of the product (wholesale or procurement cost).
Usage:
- Margin calculation (Price - Cost = Profit Margin)
- Profit analysis and business reporting
- Accounting and inventory valuation
- Not visible to customers
Old Price
Enter the old/regular price of the product.
Display Purpose:
- Some O2VEND themes calculate and display discount percentages (e.g., "Save 20%")
- Shows comparison between old and current price
- Helps customers recognize savings
Special Price (Discounted Price)
Enter a Special Price to offer a discounted price for a limited time.
When Applied:
- During the active period, the special price replaces the regular price on the product page
- Creates urgency and encourages purchases
Special Price Start Date and End Date
Set the Start Date and End Date for the special price promotion.
Automated Behavior:
- Discounts apply automatically on the start date
- Prices automatically revert to regular price after the end date
- No manual intervention required
Product Availability & Visibility
Allowed To Order
When Allowed To Order is enabled, customers can add the product to the cart.
Behavior:
- Enabled: Add to Cart button is displayed and functional
- Disabled: Add to Cart button is hidden, preventing orders
- Useful for products that are temporarily unavailable or out of stock
Allow -ve Stock (Negative Stock)
Controls whether inventory is checked during checkout.
Options:
- Disabled: Product shows Out of Stock if quantity is zero; orders are prevented
- Enabled: Orders are allowed even if stock is zero
Use Cases:
- Pre-orders for upcoming products
- Backorders when stock is temporarily unavailable
- Popular items with expected restock
Published
When Published is enabled, the product becomes active and visible to customers.
Status:
- Published: Product is live and visible in the storefront and POS
- Unpublished: Product remains inactive and is treated as a draft
- Allows you to complete all details before going live
Featured
When Featured is enabled, the product becomes a highlighted/featured product.
Benefits:
- Featured products are highlighted in key areas such as the homepage
- Increases visibility and customer attention
- Used in Featured Home Page Components
- Helps promote new, popular, or high-margin items
Lot Enabled
When Lot Enabled is true, the product can be assigned a lot number.
Purpose:
- Track batches of products
- Expiry date tracking
- Traceability and quality control
- Useful for FMCG, pharmaceuticals, and perishable goods
Call For Pricing
Some products do not have a fixed price and require customer interaction.
When Call For Pricing is enabled:
- The product price is hidden
- A Call For Price button is displayed instead
This is useful for custom, bulk, or quote-based products.
Product Descriptions
Description
Enter a detailed description of the product.
Content:
- Features, benefits, and specifications
- Usage instructions or care guidelines
- Materials, dimensions, and other relevant details
- Why customers should choose this product
Visibility:
- Appears on the Product Details page (depending on the selected theme)
- Helps customers understand the product thoroughly
- Improves SEO and search rankings
Formatting Tip:
- Use the editor tools to color and style text for readability
- Format with bullet points, bold, and italics where appropriate
Short Description
Enter a short description of the product.
Content:
- Brief 1-2 sentence summary of the product
- Highlights key selling points
- Quick overview for customers browsing the catalog
Visibility:
- Usually displayed under the Product Name
- Provides a quick summary before clicking to full details
- Important for mobile shopping experiences
Product Images & Media
Product Images
Product images visually showcase the product and significantly impact purchase decisions.
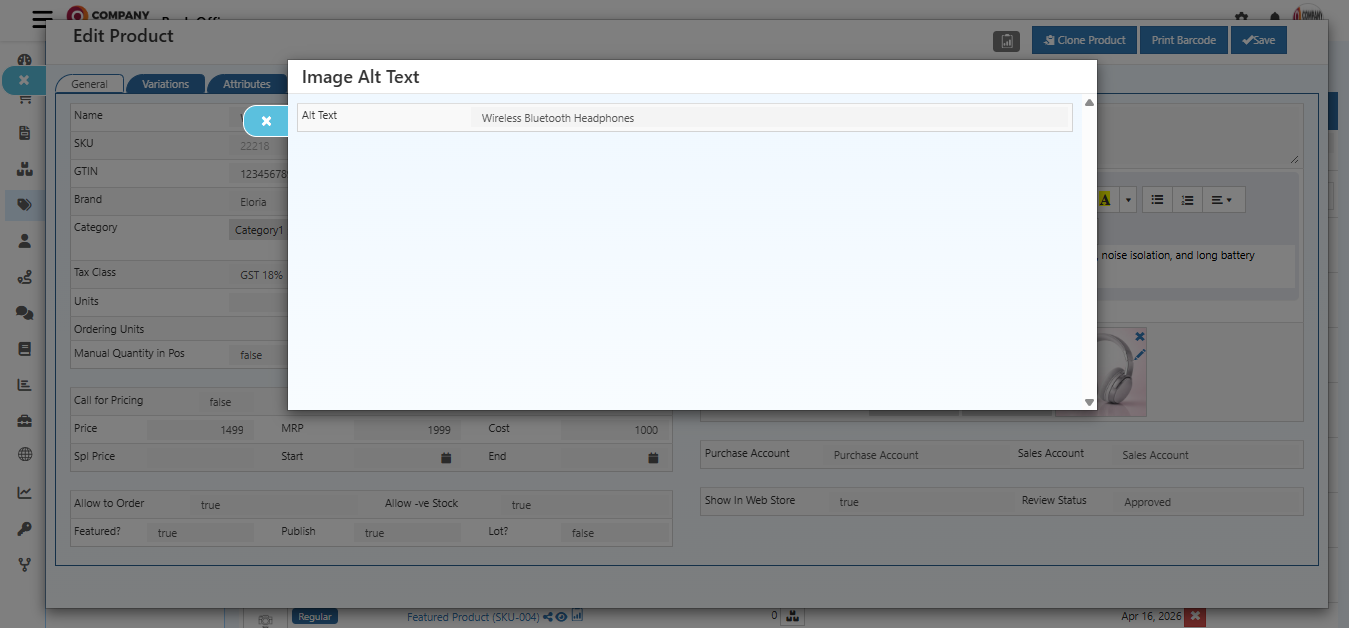
Image Upload & Management
Features:
- Upload one or more images for the product
- The first uploaded image is used as the thumbnail in product lists
- Add variant images for different colors, sizes, or views
Tips for Best Results:
- Use high-quality, high-resolution images (minimum 800x800px recommended)
- Ensure consistent image backgrounds and lighting
- Show product from multiple angles
- Use the edit button to crop and adjust images
Adding Alt Text to Images
What is Alt Text? Alt text (also known as "alt tags" or "alt attributes") is crucial for:
- Accessibility: Helps visually impaired users understand the image
- SEO: Improves search engine rankings and visibility
- User Experience: Displays when images fail to load
How to Add Alt Text for an Image:
- Open the Create or Edit product details page
- Click the edit icon (pencil) on the product image or variant image
- Enter descriptive Alt Text in the provided field
- Example: "Wireless Bluetooth Headphones with noise isolation in black"
- Click the OK button
- Click the Save button to save the product
Best Practices for Alt Text:
- Be descriptive but concise (50-125 characters)
- Include the product name and key features
- Avoid keyword stuffing
- Don't start with "image of" or "picture of"
- Example Good: "Premium wireless Bluetooth headphones with deep bass"
Accounting Details
Purchase Account
Select the Purchase Account for the product.
Purpose:
- Used to track product acquisition costs in accounting
- Records purchases in financial reports
- Enables cost analysis and inventory valuation
Sales Account
Select the Sales Account for the product.
Purpose:
- Records revenue generated from product sales
- Ensures accurate income reporting in financial statements
- Used for sales analysis and profit calculation
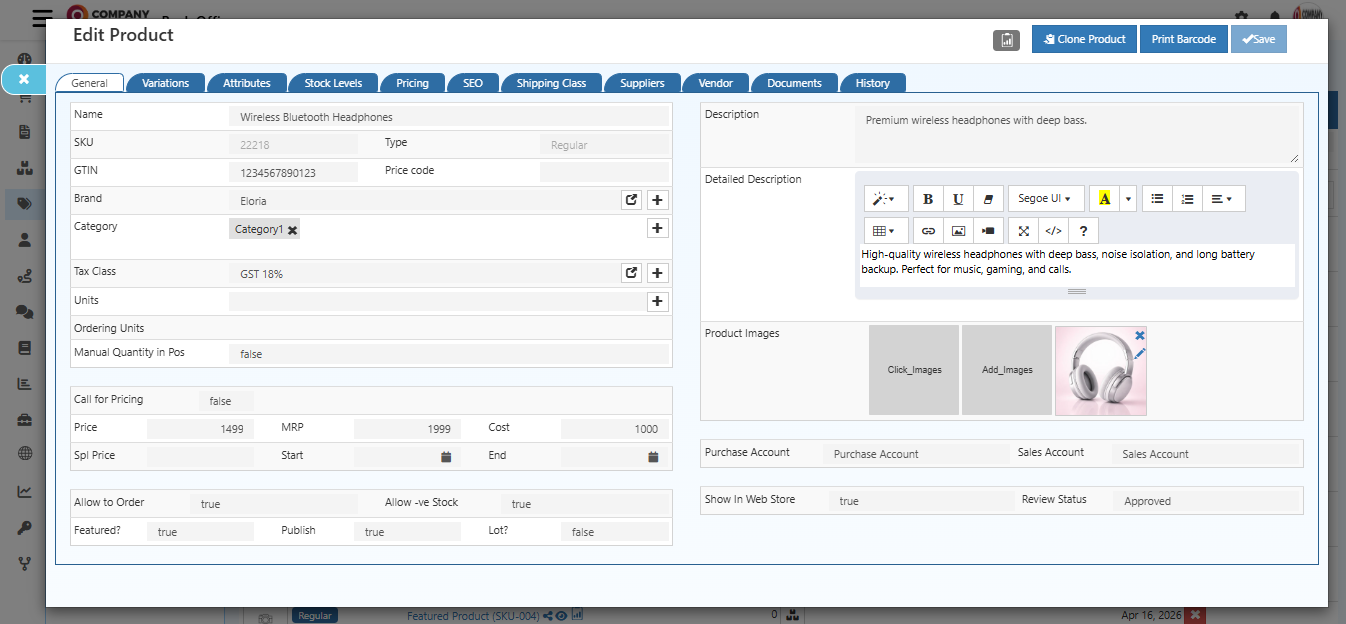
Edit Product
Edit and update a product along with its variations and all associated details.
How to Edit a Product
Follow these steps to update an existing product:
- Open Back Office
- Go to Catalog Menu
- Click and open Products section
- A list of already existing products will be displayed
- Click the Product Name in the product list to open the product for editing
- Update the needed information in the related tabs (General, Variations, Attributes, Stock Levels, Pricing, SEO, etc.)
- Press the Save button at the end of the page to save your changes
Additional Actions Available:
- Clone Product: Create a duplicate of the product with all settings
- Print Barcode: Generate and print product barcodes for inventory management
- View History: Track changes and revisions made to the product
Related Topics
Product Management
- Brand Management
- Product Categories
- Product Options & Variations
- Product Attributes
- Attribute Groups & Templates
Inventory & Pricing
- Stock & Inventory Management
- Bulk Product Updates
- Price List Management
- Pricing Rules & Discounts
- Stock UOM & Conversions
- Stock UOM Conversions
Catalog Configuration
SEO & Marketing
Related Blogs
Explore deeper insights on ecommerce product optimization and store configuration:
- Step-by-Step Guide to Optimizing Product Titles and Descriptions for Online Sales
- The Complete Guide to Product Categorization for Better Sales
- How to Optimize Product Pricing for Maximum Profit Margins
- Best Practices for Product Descriptions and SEO
- The Great Sort Debate: Choosing the Right Default Sorting for an Ecommerce Site