Import Data in O2VEND
Bulk Product, Category, Attribute and Stock Upload Guide
Learn how to use the O2VEND Import tool to create or update products, categories, product attributes, price lists, stock availability, and variation products with templates, mapping, and import logs.
The Import page in O2VEND Back Office is used to add or update large volumes of data with a prepared file.
It is the fastest way to create products in bulk, update existing catalog data, assign products to categories, and manage stock or pricing without editing one record at a time.
Use this page when you need to:
- create many products at once
- update existing product data in bulk
- create categories and attributes
- map products to categories
- update pricing, stock, and other supporting master data
Navigation
Open:
Back Office -> Tools -> Import
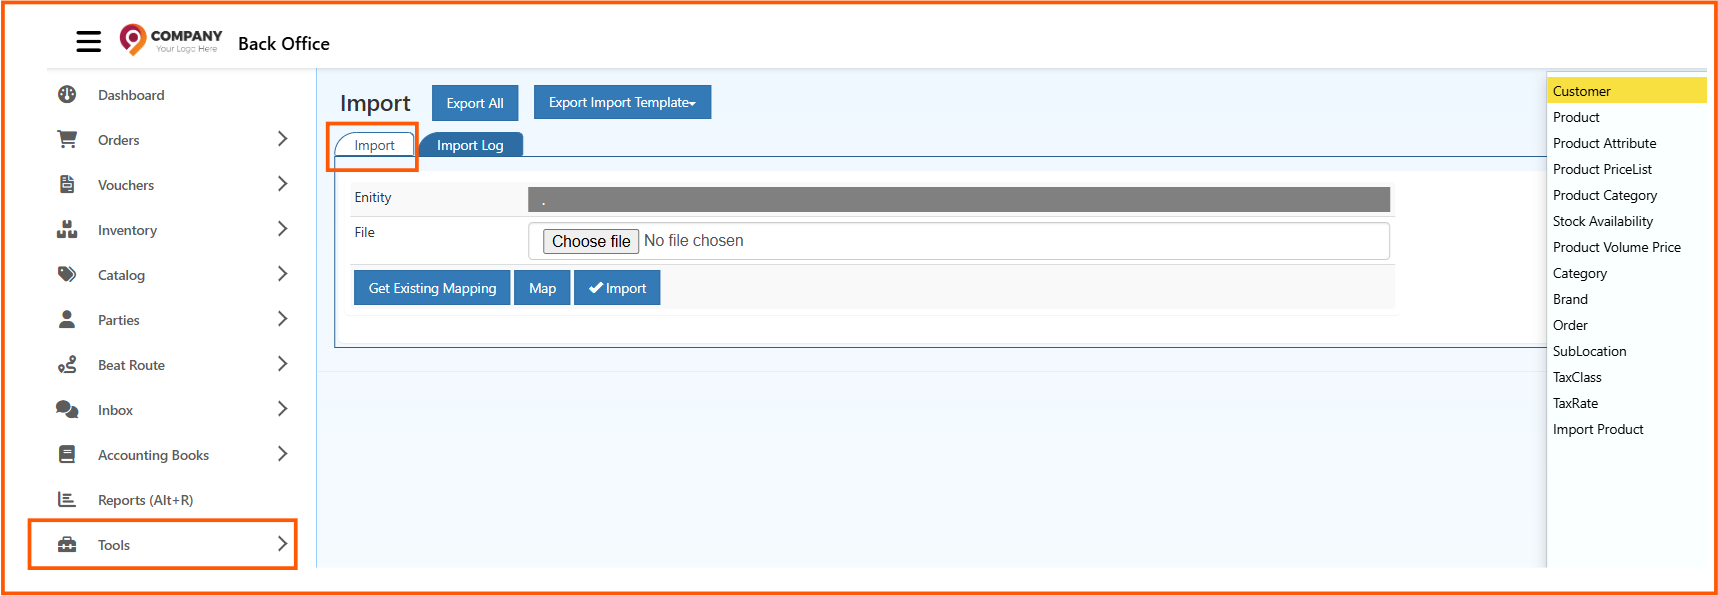
From this page, you can:
- download existing system data with Export All
- download a blank import format with Export Import Template
- upload a new file from the Import tab
- review previous uploads from the Import Log tab
Before You Begin
Before starting any import, check the following:
- Use the correct template for the data you want to import.
- Keep the column headers in the original format.
- Fill all required fields in the file.
- Make sure supporting master data already exists where needed.
Import Workflow
Follow this sequence for a standard import:
Step 1: Decide what you want to import
Choose the correct Entity based on the data you want to create or update.
Common options include:
ProductProduct AttributeProduct CategoryCategoryBrandStock AvailabilityProduct PriceList
Step 2: Download the correct file format
If you are creating a new file, click Export Import Template.

You may see:
- Product for standard product import
- Variation Product for products with options such as size, color, or pack type
If you are updating existing data, you can use Export All first and work on that file.
Step 3: Prepare the import file
Update the file carefully before upload.
Step 4: Open the Import tab and select the entity
In the Import tab, choose the entity that matches your file.
Example:
- select
Productfor product creation or product update - select
Categoryfor category creation - select
Product Categoryfor product-category mapping
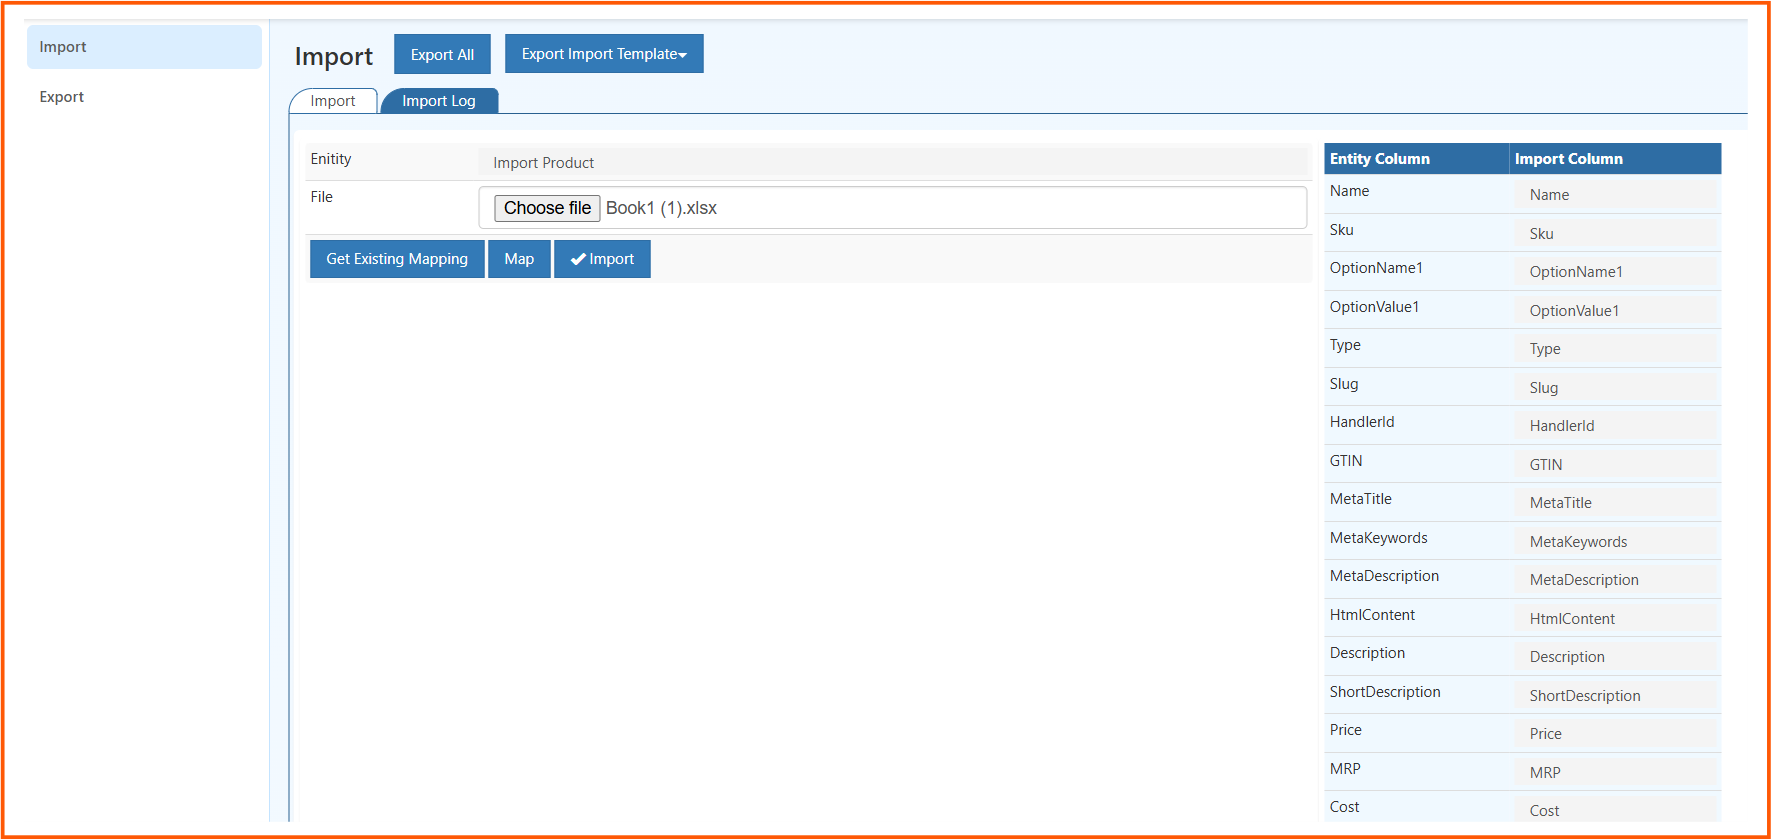
Step 5: Upload the file
Click Choose file and select the prepared file from your computer.
Step 6: Load or create field mapping
Use:
- Get Existing Mapping if you have already imported the same type before
- Map if you need to match the file columns with O2VEND fields manually
Step 7: Run the import
Click Import to start processing the file.
Step 8: Review the result
Open the Import Log tab and confirm whether the upload completed successfully.
Choose the Correct Import Type
Use the import type that matches your goal.
Product
Choose Product when you want to:
- create new products
- update existing products
- upload a complete product catalog
Category
Choose Category when you want to:
- create categories
- update category details
- build the category structure before product mapping
Product Category
Choose Product Category when:
- categories already exist
- products already exist
- you only want to map products to categories
Product Attribute
Choose Product Attribute when you want to import product specifications or attribute data.
Product PriceList
Choose Product PriceList when you want to update pricing in bulk.
Stock Availability
Choose Stock Availability when you want to update available stock values.
Product Volume Price
Choose Product Volume Price when you want to upload quantity-based or slab pricing.
Other entities
The same screen can also be used for:
- Brand import
- Customer import
- TaxClass import
- TaxRate import
- SubLocation import
Product Import
Product is the most frequently used import option.
It supports both new product creation and existing product update.
Create new products
Use Product import when you are onboarding new items into the catalog.
Typical use cases:
- initial store setup
- supplier catalog onboarding
- seasonal product launch
- migration from another platform

Recommended flow:
- Download the Product template.
- Fill the required product fields.
- Review identifiers and mandatory values.
- Import the file using the
Productentity. - Verify the result in Import Log.
Update existing products
Use the same Product entity when records already exist and only specific fields need to be changed.
Typical use cases:
- price revisions
- content corrections
- publish status updates
- tax or brand updates
Recommended flow:
- Download current data using Export All.
- Keep the main product identifier unchanged.
- Edit only the fields you want to update.
- Import the file again using the
Productentity. - Review the result in Import Log.
Important
When updating products, do not change the main identifying field unless your process specifically requires it.
Common identifiers include:
- SKU
- product Name
- GTIN
- Type(Product or Variation)
Common product fields in the import file include:
- product name
- SKU or product code
- GTIN or barcode
- brand
- category
- price
- tax class
- publish status
Category Import and Product Category Import
These two options serve different purposes.
Use Category when you need to create or update the category itself
This is used for:
- top-level categories
- sub-categories
- parent-child category structure
- category visibility and display order
Use Product Category when you need to link products to an existing category
This is used when the category already exists and you only want to assign products to it.
Simple example:
- if you want to create
Mens Shirts, use Category - if you want to assign 500 products under
Mens Shirts, use Product Category
See also: Product Categories
Product Attribute Import
Use Product Attribute import when you need to upload product specification data in bulk.
Examples:
- size
- color
- material
- weight
- technical specifications
This is useful when many products need structured and consistent attribute data.
Recommended flow:
- Prepare the attribute file in the correct format.
- Select
Product Attributeas the entity. - Upload the file.
- Map the fields if required.
- Run the import and review the result in Import Log.
See also: Attribute Master Setup
Variation Product Template
Use the Variation Product template when one product has multiple options.
Examples:
- one shirt with sizes
S,M, andL - one item with
Red,Blue, andBlackcolors - one product with
500g,1kg, and5kgpack sizes
This template typically includes:
- variation SKU
- variation price
- option values
- HnadlerID
See also: Product Variations
Recommended Import Order for New Catalog Setup
If you are setting up a catalog for the first time, follow this sequence:
- Import Brand, TaxClass, TaxRate, Category, and Product Attribute.
- Import Product.
- Import Product Category, Product PriceList, Stock Availability, and Product Volume Price.
- Use the Variation Product template if variation products are required.
This order reduces dependency errors during product import.
Import Log
After every import, open the Import Log tab to verify the result.
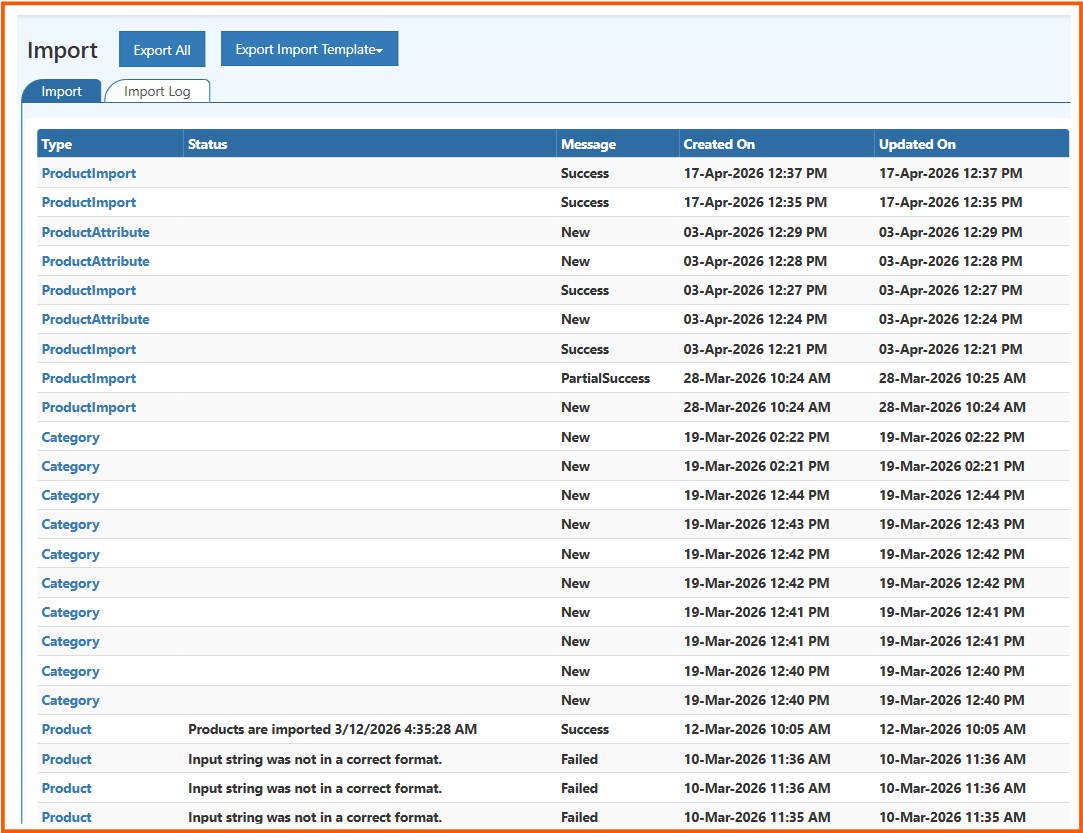
The log helps you check:
- which entity was imported
- whether the import succeeded or failed
- the message returned by the system
- when the import was created
- when the import was last updated
Common status values:
- Success means the import completed successfully
- PartialSuccess means some rows worked and some rows failed
- New means a new import entry was created
- Failed means the import did not complete and needs correction