O2VEND Retail ERP
  • Getting Started
  • Ecommerce
  • Back Office
  • POS
  • Agent App
  • PIM
  • Communication
  • CMS
  • OMS
  • WMS
  • O2C
  • Accounting
  • Reports
  • Themes and Apps
Search Results for

    Show / Hide Table of Contents
    • Retail ERP Back Office Overview
    • Back Office Dashboard
    • Analytics & Reports
      • Visitor Analytics
      • E-commerce Analytics
      • Product Analytics
      • Campaigns Analytics
    • API & Webhook Integration
      • Webhook
      • Examples of JSON format data via webhook
      • Testing webhook
    • System Settings
      • Settings
      • Business Settings
        • Business Details
        • Tax Classes
        • Tax Rates
        • Operating Countries
        • Operating State or Province
        • Branches
        • Sales Channels
        • Return Rule
        • Backoffice Print Detail
        • Download Template
      • Point Of Sale
        • Quick Add Buttons
        • Print Settings
        • Payment Methods
        • Delivery Settings
        • Language
        • POS Offline Mode
      • Agent App
        • Agent App Print Details
      • Inventory
        • Unit Of Measure
        • Location
        • Unit Of Measure Conversions
        • Stock Levels
        • Sub Location
        • Print Barcode Label Settings
        • Package Material
      • userSettings
        • vendors
        • User Date Setup
        • Employees
          • Set Up Employee Roles
          • Ecommerce
          • Point Of Sale
          • Back Office
          • Sales App
        • Vendors Commission
        • Credit Rules
        • Automatic User Code
      • Loyalty and Promotions
        • Reward Points
        • Coupons
        • Gift Vouchers
        • Offers and Discounts
        • Benefits
        • Affiliate
        • Coupon Print Setting
      • Account
        • Financial Year
        • Voucher Numbering
        • Sales Account Map
        • Voucher Numbering Rules
    • Profile

    Vendor Setup – O2Vend

    The Vendor module in O2Vend manages supplier or vendor information used in purchasing and commission-related operations.
    Each vendor record stores business details, contact information, and configuration settings that support transactions and reporting.

    Steps to Create Vendor

    1. Navigate to Vendor

    1. Open the Back Office.
    2. Go to Settings → Vendor → Create Vendor.
    Vendor Setup – O2Vend

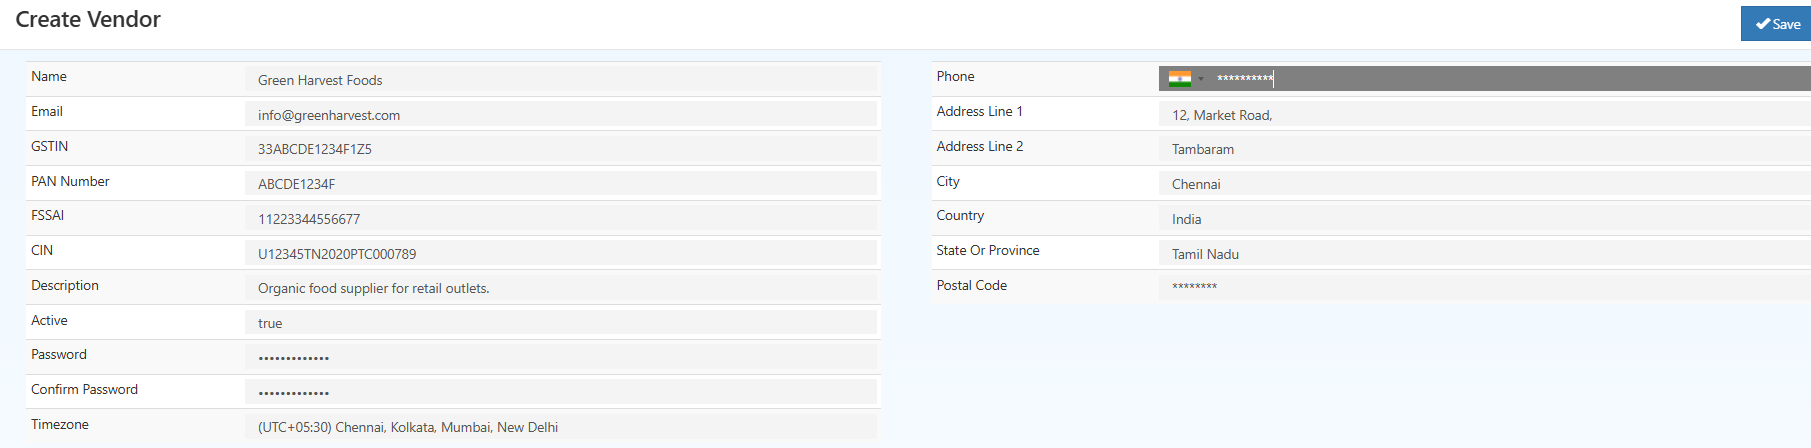
    2. General Information

    Provide essential information to register a vendor in the system.

    Field Description
    Vendor Name* Official name of the vendor or business entity (required).
    Email Business email address for vendor communication and notifications.
    GSTIN Goods and Services Tax Identification Number for taxation purposes.
    PAN Number Permanent Account Number associated with the vendor.
    FSSAI Food Safety and Standards Authority of India license number, if applicable.
    CIN Corporate Identification Number for registered business entities.
    Description Optional remarks or additional notes about the vendor.
    Active Enables or disables the vendor account. Inactive vendors cannot participate in transactions.
    Password Login password assigned to the vendor account for portal access.
    Confirm Password Field used to verify the entered password.
    Timezone Defines the operational timezone for the vendor account.
    Address Business address or operational location of the vendor.
    Country / State / City Geographic details for record keeping and taxation.

    4. Save Vendor

    After entering the required details, select Save.
    The vendor record becomes available for use in purchasing modules, commission setups, and reports.

    5. Editing Vendor Details

    The Edit icon in the vendor list allows modification of existing vendor details.
    Fields such as contact information, status, or address can be updated as needed.
    Changes take effect immediately after saving.

    In this article
    Back to top _includes/footer.html
    © 2019–2026 Jeyan Technologies Private Limited • www.o2vend.com • Create your own store