Locations Setup | Inventory, POS & Shipping Configuration
Learn how to configure stores/warehouses in O2VEND to prevent stock mismatch, POS billing errors, and courier pickup issues.
Facing issues with incorrect stock levels, wrong order routing, or shipping failures?
This guide explains how to set up Locations correctly to control inventory flow, POS billing, and fulfillment operations.
A Location in O2VEND represents a physical or operational point where products are stored, received, sold, fulfilled, or shipped.
Locations form the backbone of inventory accuracy, POS operations, order routing, and shipping integration across the O2VEND ecosystem.
What This Guide Helps Achieve
- Correct setup of stores and warehouses
- Control of inventory flow (GRN and dispatch)
- Prevention of stock mismatch across channels
- Setup of courier pickup locations
- Management of inventory using sub-locations
Create Location (Store Address or Warehouse)
Locations can be created and managed by Site Admins and Vendor Managers, based on role permissions.
Steps to Create a Location
- Open Back Office
- Navigate to Settings Icon (ALT + S) → Inventory
- Click Locations
- Select Create Location
- Enter the required location details
- Click Save to complete the setup
After saving, the location becomes available for:
- Inventory receiving (Incoming Packages / GRN)
- POS billing
- Order fulfillment
💡 Tip
For Drop Shipment operations, the vendor name is automatically associated with the location.
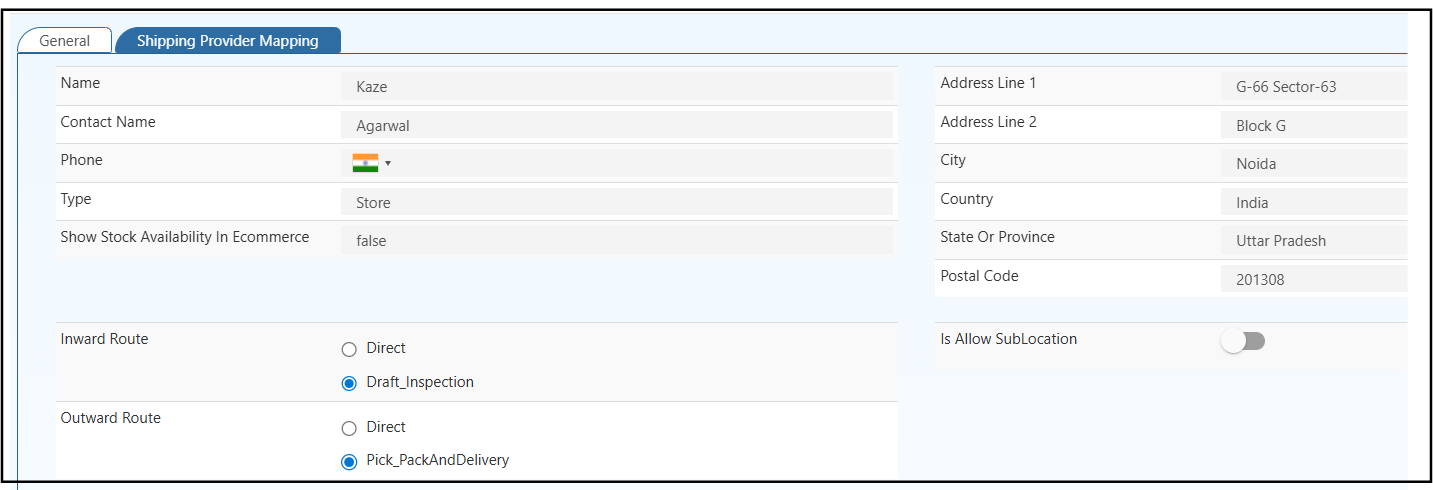
Location Configuration – General Tab
The General tab defines the location’s identity, address, inventory behavior, and order flow.
Basic Information
| Field | Description |
|---|---|
| Name | Internal name of the location (Store / Warehouse name) |
| Contact Name | Primary contact person for this location |
| Phone | Contact number with country code |
| Type | Location type such as Store or Warehouse |
| Show Stock Availability in Ecommerce | Enable to display this location’s stock on the online store |
💡 Note
Disable ecommerce stock visibility for internal or backend-only locations.
Address Details
| Field | Description |
|---|---|
| Address Line 1 | Primary address of the location |
| Address Line 2 | Secondary address or landmark (optional) |
| City | City where the location operates |
| State / Province | State or province Refer to Creating States or Provinces for detailed configuration. |
| Country | Country of operation Refer to Creating Country for setup instructions. |
| Postal Code | ZIP / PIN code |
💡 Important
When sales are processed through POS, the invoice automatically uses this location’s address details.
Inventory Inward Route
| Option | Description |
|---|---|
| Direct | Stock is immediately added to inventory once the incoming package is confirmed |
| Draft Inspection | Stock is received in draft mode and becomes sellable only after inspection approval |
Draft Inspection – GRN Based Flow
When Draft Inspection is enabled, inventory is received through a GRN (Goods Receipt Note) inspection process before becoming sellable.
This flow is recommended for businesses that require quality checks, quantity verification, or compliance validation before approving stock into inventory.
Learn more: Incoming Packages
Inventory Inward Route (Incoming Packages & GRN)
Defines how orders are fulfilled and dispatched from this location through Outgoing Packages.
| Option | Description |
|---|---|
| Direct | Orders are dispatched immediately without intermediate steps |
| Pick, Pack and Delivery | Orders follow a structured fulfillment workflow using outgoing packages |
Pick, Pack and Delivery – Outgoing Package Flow
When Pick, Pack and Delivery is enabled, orders are processed using Outgoing Packages, ensuring controlled picking, packing, and shipment confirmation.
This workflow is ideal for warehouse operations, multi-item orders, and courier-based deliveries, reducing dispatch errors and improving fulfillment accuracy.
Learn more: Outgoing Packages
Sub-Location Configuration
| Field | Description |
|---|---|
| Allow SubLocation | Enable to create child locations under this location |
📦 Example
Warehouse → Section → Rack → Bin
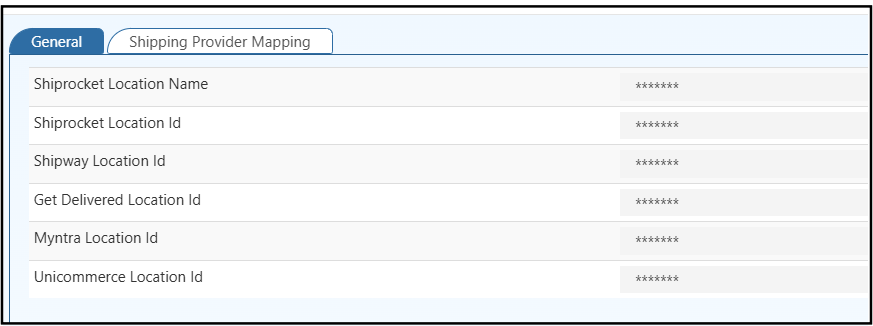
Shipping Provider Mapping Tab
The Shipping Provider Mapping tab connects the internal O2VEND location with external courier and marketplace systems.
This mapping ensures:
- Accurate pickup location
- Correct shipping rate calculation
- Proper order synchronization
Supported Provider Fields
| Field | Description |
|---|---|
| Shiprocket Location Name | Location name registered in Shiprocket |
| Shiprocket Location ID | Unique Shiprocket location identifier |
| Shipway Location ID | Location ID from Shipway |
| Get Delivered Location ID | Location ID from GetDelivered |
| Myntra Location ID | Warehouse/Store ID from Myntra Seller Panel |
| Unicommerce Location ID | Location ID from Unicommerce OMS |
💡 Tip
These IDs must exactly match the IDs configured in the respective courier or marketplace dashboards.
Related Topics
Explore related modules that work closely with Locations, inventory flow, and order fulfillment:
- Purchase Order – Create and track supplier orders before receiving stock
- Voucher – Manage sales vouchers linked to POS and inventory movement
- Dashboard– Monitor stock performance, sales trends, and fulfillment insights
- Stock Quantity Inventory – View and manage available stock across locations
- Branch - Learn how to manage store branches for POS billing, staff assignment, and multi-outlet operations.