Create Sales Order in O2VEND | Step-by-Step Guide
Learn how to create and manage a Sales Order in O2VEND with simple steps, screen explanations, and order processing actions.
This page helps you create and manage Sales Orders in O2VEND in a simple step-by-step way. A Sales Order is used to record customer orders, add products, review totals, and continue the order for invoicing or delivery processing.
Navigation Path
Back Office -> Orders -> Sales Order
Sales Orders List Page
The Sales Orders page shows all created sales orders in one place.
From this page, you can:
- view all sales orders
- filter orders by date, customer, status, and other details
- create a new sales order
- export or email sales order data
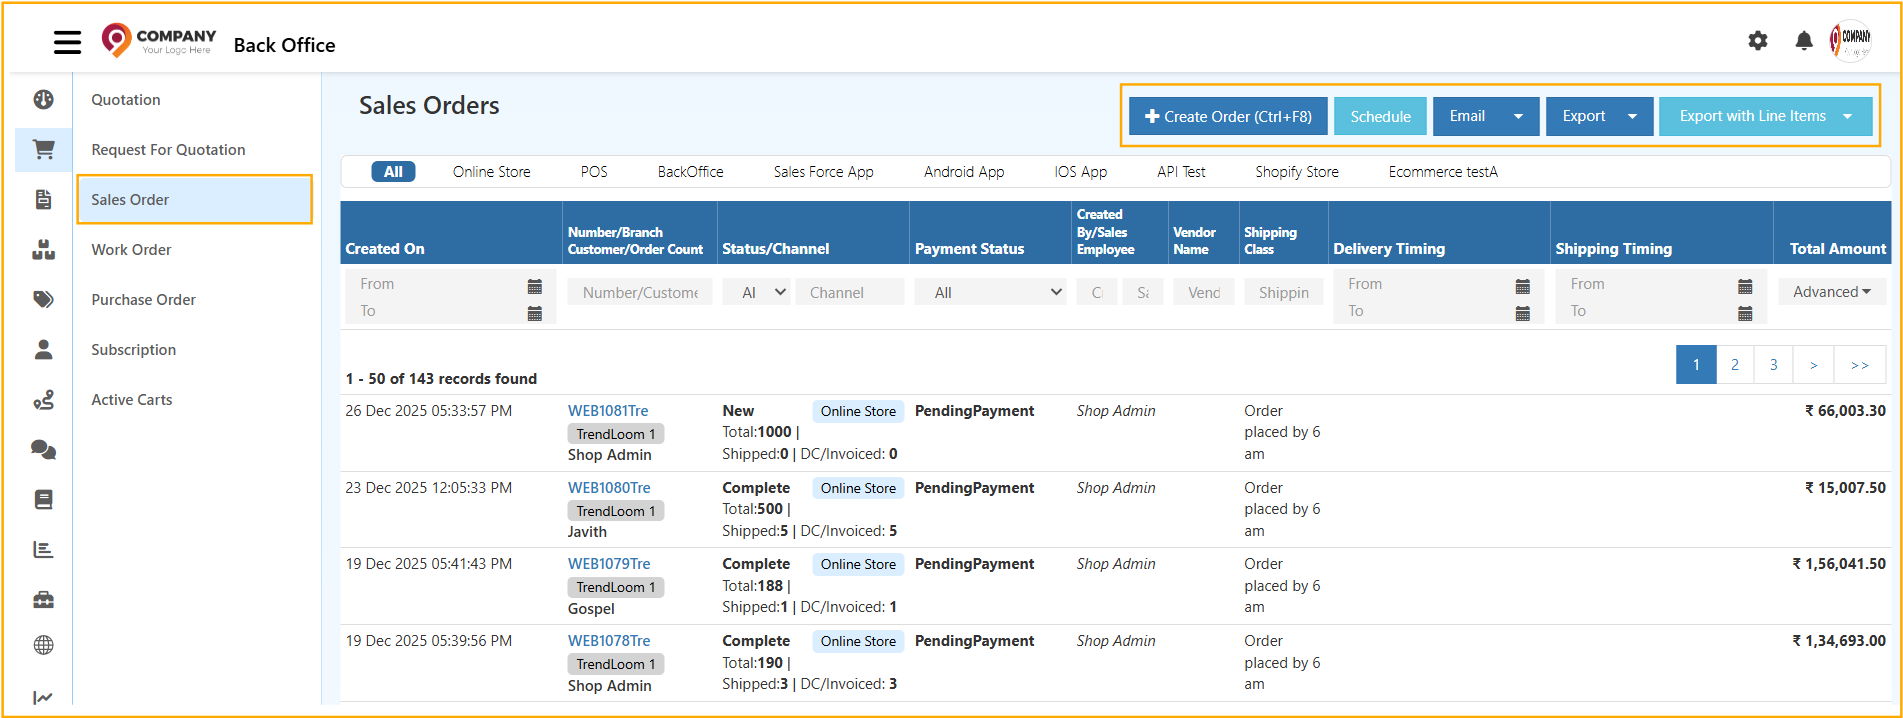
Main Areas in the Sales Orders List
Channel Tabs
The tabs at the top help you filter orders by source.
Common tabs shown:
- All
- Online Store
- POS
- BackOffice
- Sales Force App
- Android App
- iOS App
Important Columns
- Created On: Shows when the order was created
- Number / Branch / Customer / Order Count: Shows order details and customer information
- Status / Channel: Shows order status and source
- Payment Status: Shows whether payment is pending or received
- Created By / Sales Employee: Shows who created the order
- Vendor Name: Shows the vendor if linked
- Shipping Class: Shows the shipping type
- Delivery Timing: Shows delivery timing
- Shipping Timing: Shows shipping timing
- Total Amount: Shows the final order amount

Top Actions
- Create Order: Opens a new sales order screen
- Schedule: Schedules sales order reports by email
- Email: Sends sales order data by email
- Export: Exports sales order data
- Export with Line Items: Exports order data with product-level details
If you need to schedule sales order reports by email, use the Schedule option.

How to Create a Sales Order
- Go to Back Office -> Orders -> Sales Order
- Click Create Order
- Select the Branch
- Select the Customer Name
- Enter additional customer order details if needed
- Add products to the order
- Review quantity, price, discounts, and totals
- Check billing and shipping details
- Review the final summary
- Click Save
Create Sales Order Screen
The Create Sales Order screen is used to enter customer details, add products, and calculate the final order amount.
The page is usually divided into these sections:
- Customer Information
- Billing and Shipping Details
- Product Line Items
- Order Summary
- Top Action Buttons
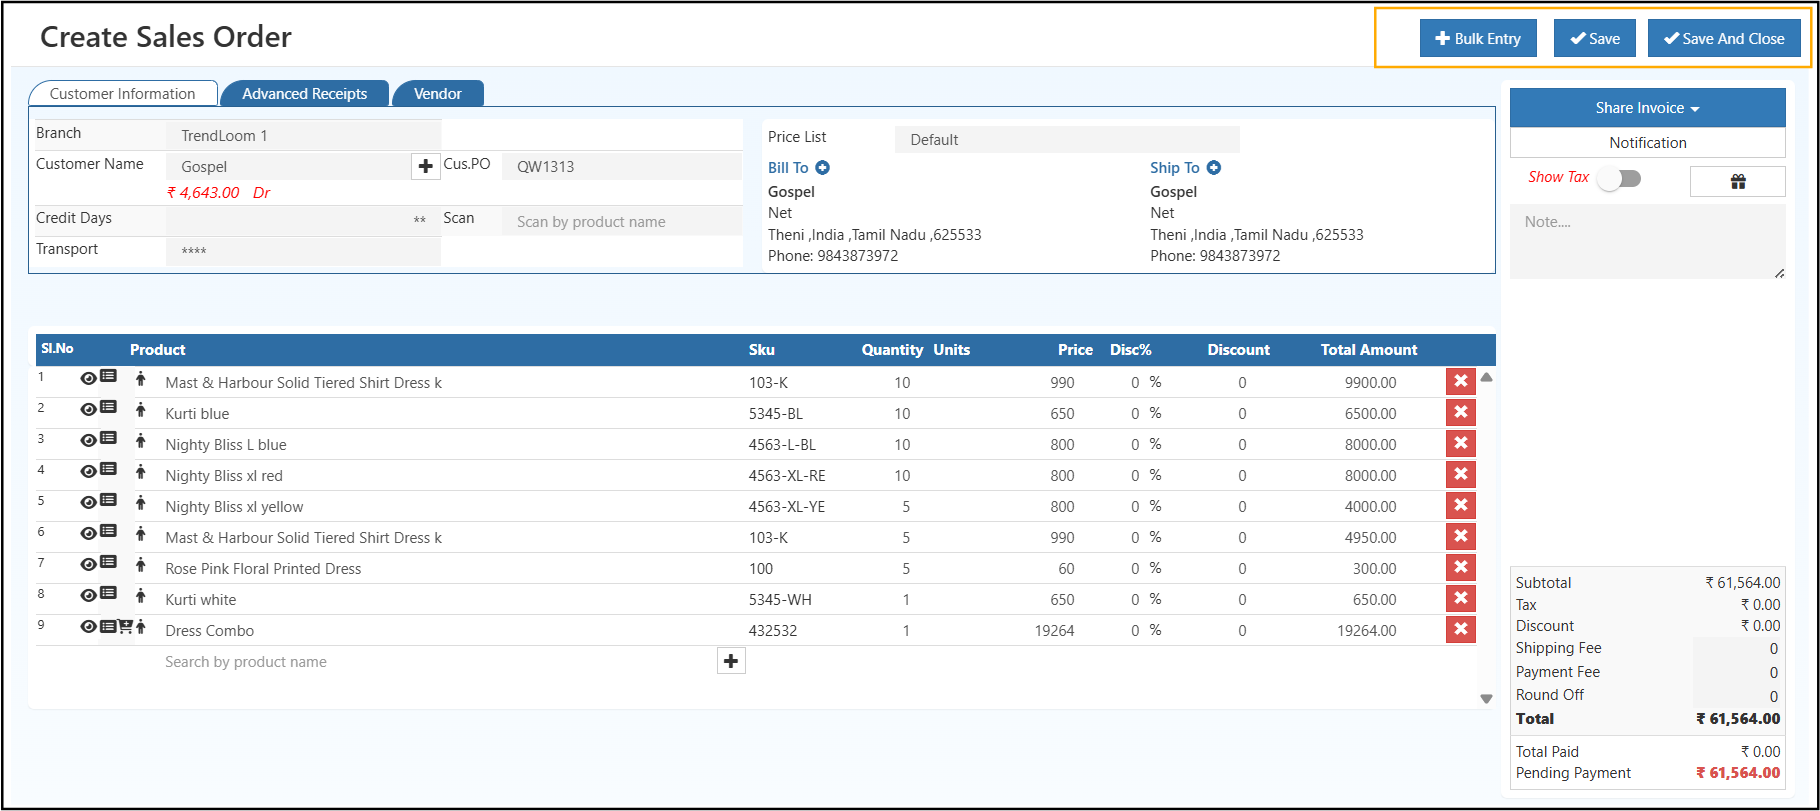
Customer Information Section
This section captures the basic order details.
Branch
Select the branch or store where the sales order is created.
This is important because stock, reports, and accounting may depend on the selected branch.
Customer Name
Select the customer who is placing the order.
After selecting the customer, the system may load related customer information automatically.
Customer PO
Use this field to enter the customer purchase order number if available.
This is useful for matching customer-side order references.
Credit Days
Use this field when the customer is allowed to pay after a specific number of days.
Transport
Use this field to add transport or delivery-related information if needed.
Billing and Shipping Section
This section shows where the order is billed and where the items are shipped.
Price List
Select the price list that should apply to the order.
The selected price list may control product pricing in the sales order.
Bill To
This section shows the billing details of the customer.
It is used for invoice-related information.
Ship To
This section shows the delivery address details.
It is used for shipping and order fulfillment.
Product Section
This is the main section where products are added to the sales order.
Product Search
Use the search box to find products by:
- product name
- SKU
- barcode
Product Columns
Each product row usually includes:
- Product
- SKU
- Quantity
- Units
- Price
- Discount %
- Discount Amount
- Total Amount
Quantity
Enter or update how many units the customer wants to order.
Price
This is the selling price for the product.
It may be auto-filled based on the price list.
Discount %
Use this field to apply a percentage discount to the item.
Discount Amount
Use this field to apply a fixed discount amount to the item.
Total Amount
This is calculated automatically based on quantity, price, and discount.
Remove Item
Use the delete icon to remove a product from the sales order.
Order Summary
The summary section helps you review the final order value.
It usually includes:
- Subtotal
- Tax
- Discount
- Shipping Fee
- Payment Fee
- Round Off
- Total
Payment Status
This shows the payment stage of the order, such as:
- Pending Payment
- Partially Paid
- Fully Paid
Top Action Buttons
Bulk Entry
Use Bulk Entry when you want to add many products quickly.
This is useful for large or repeat orders.
Save
Saves the sales order with the current details.
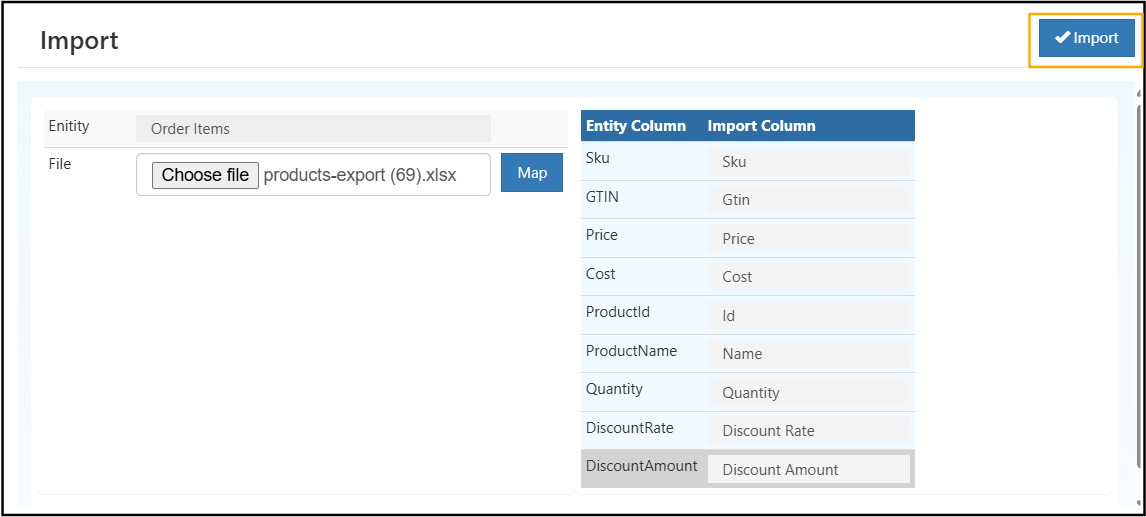
Bulk Entry
The Bulk Entry option helps you import multiple product line items into the sales order at once.
This is useful when:
- many products need to be added
- large orders are created frequently
- order items are prepared in Excel
Bulk Entry Flow
- Click Bulk Entry
- Upload the file
- Map the columns correctly
- Import the order items
- Review the imported products
- Save the sales order
Step-by-Step Order Flow
For easy understanding, follow this order every time:
- Open Sales Order
- Click Create Order
- Select branch and customer
- Check billing and shipping details
- Add products
- Review quantity, price, and discounts
- Review subtotal, tax, and total
- Save the order
Best Practices
- select the correct branch before adding items
- verify the customer before saving
- check quantity and price carefully
- review discounts before final save
- confirm billing and shipping details
- use bulk entry only when the import file is prepared correctly
Result
After saving, the Sales Order is created successfully and becomes available in the Sales Orders list for further actions such as invoicing, shipping, reporting, and tracking.