Work Order Management in O2VEND | How to Create, Track, and Invoice Jobs
Learn how to create, track, manage, and invoice work orders in O2VEND with clear steps, screen guidance, and job status tracking.
Navigation Path
Back Office -> Orders -> Work Order
What is a Work Order?
A work order is a job record that tracks a task from creation to billing. It captures the customer details, products or services involved, materials used, job cost, assigned salesperson, vendor, and current status.
Work orders are used for:
- Service jobs and repair orders
- Production and assembly tasks
- Job-based billing and invoice generation
- Material consumption and cost tracking per job
- Multi-channel order management
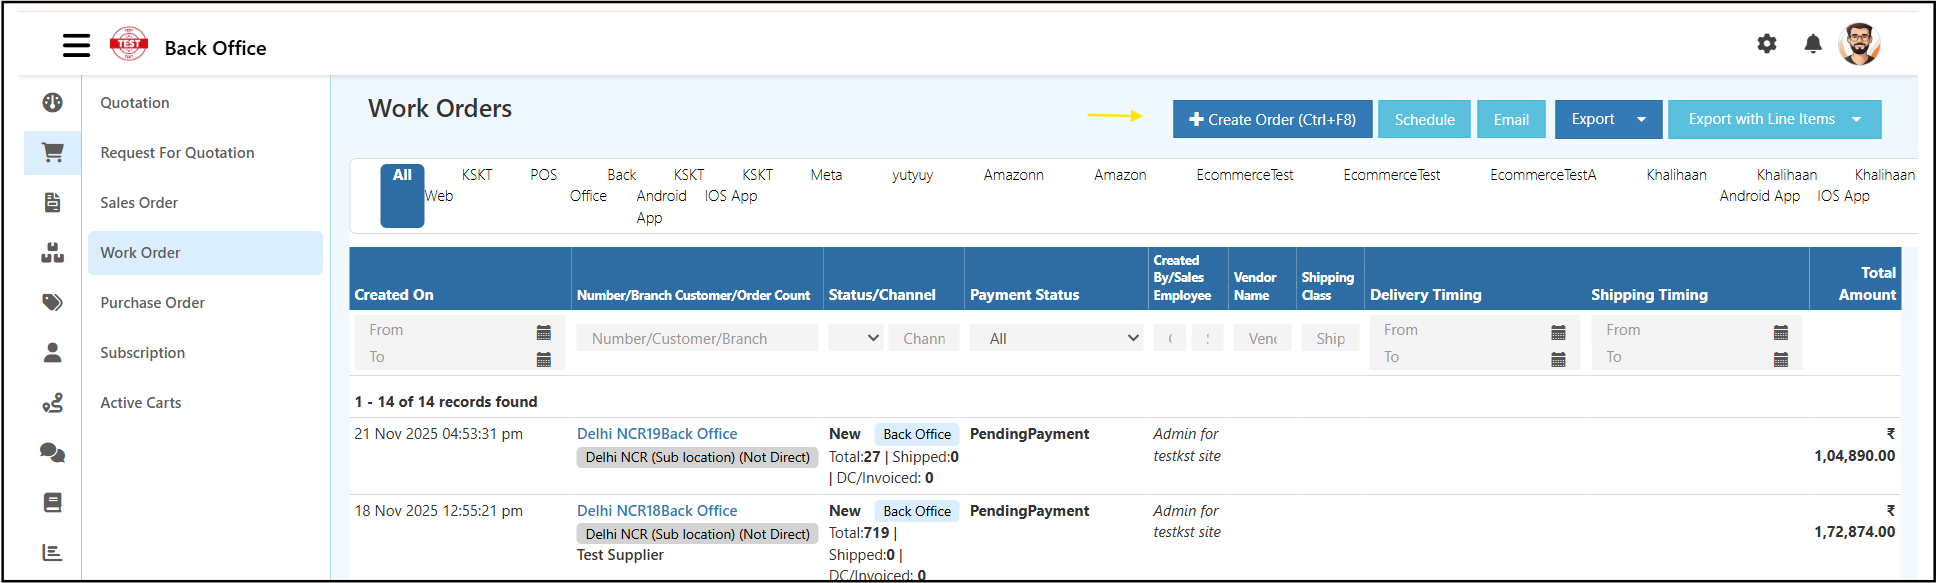
Work Order List Page
The Work Orders list shows all jobs created across branches and channels in one place.
Each row in the list shows:
- Created On: date and time the work order was created
- Number / Branch / Customer / Order Count: work order reference, branch name, customer name, and total item count with shipped and invoiced count
- Status / Channel: current job stage and the channel it came from, for example Back Office, POS, or Amazon
- Payment Status: pending payment or paid
- Created By / Sales Employee: staff member who created the order
- Vendor Name: supplier or vendor linked to the job
- Shipping Class: shipping category for the order
- Delivery Timing / Shipping Timing: expected delivery and shipping dates
- Total Amount: total job value
Channel Filter Bar
The filter bar just below the page title lets you switch between channels such as All, POS, Back Office, Android App, iOS App, Meta, and Amazon.
Filters
Use the filter row to narrow down results by date range, work order number, customer, branch, status, channel, or payment status.
Top Action Buttons
- Create Order (Ctrl+F8): opens a new work order form
- Schedule: sets up automated work order reports by email
- Email: sends the report to your team
- Export: downloads the list as Excel or CSV
- Export with Line Items: downloads the list with each product row included
How to Create a Work Order in O2VEND
Click Create Order to open the work order entry form.
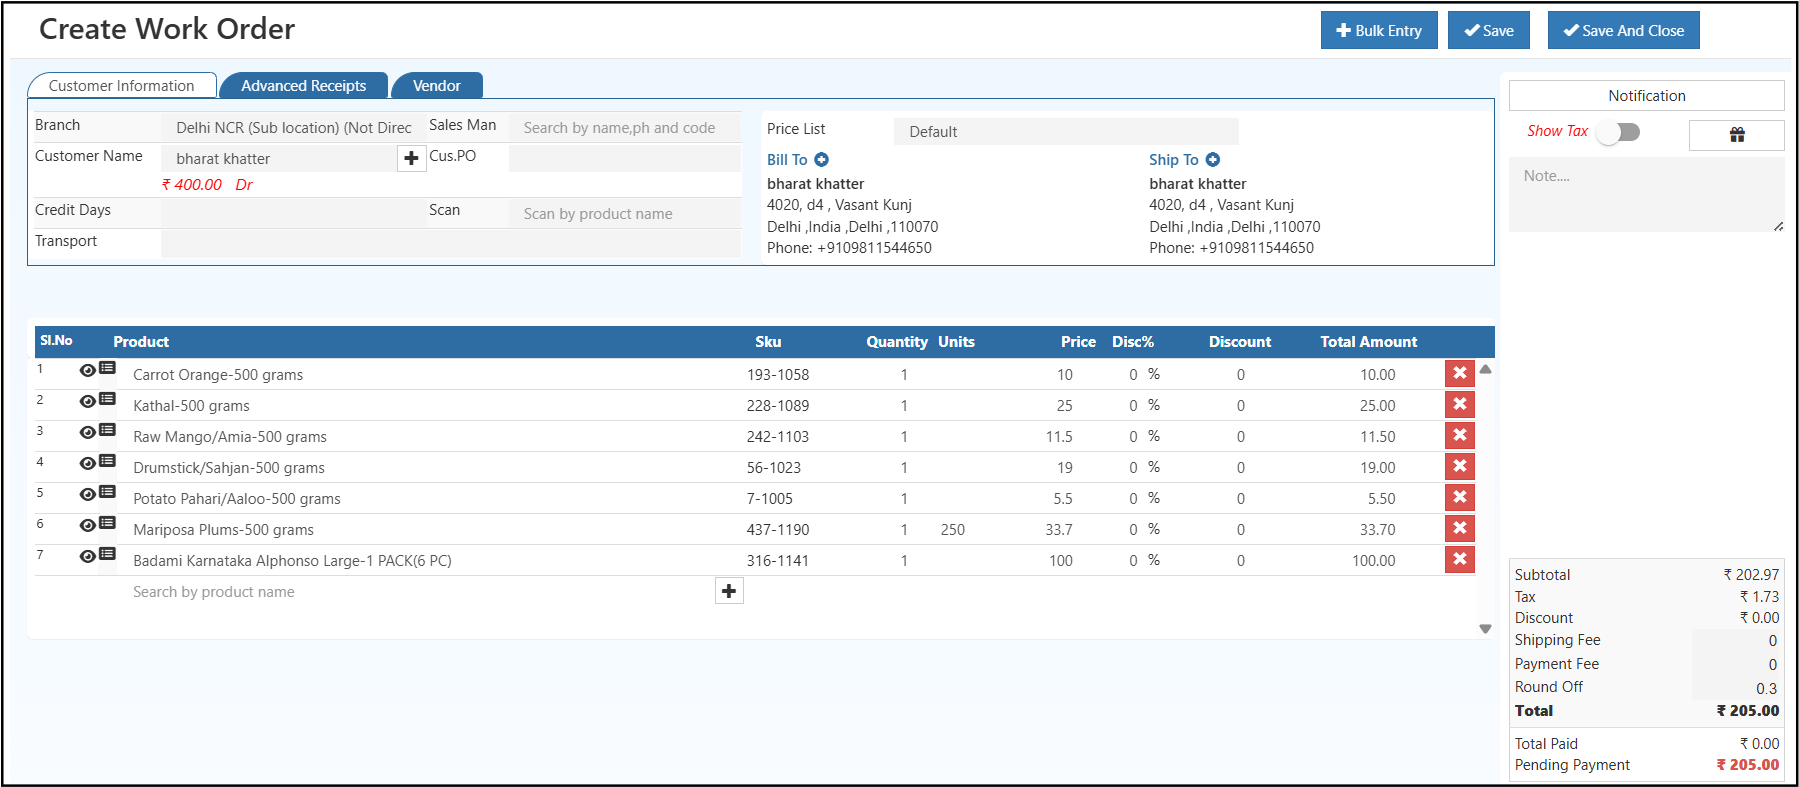
The form has three tabs: Customer Information, Advanced Receipts, and Vendor.
Customer Information Tab
This is the main tab where you fill in the job and customer details.
Branch: Select the branch handling this job. This determines which location's inventory and reporting the work order falls under.
Customer Name: Search and select the customer. Once selected, the customer's current credit balance appears below the name field. Click the + icon next to the customer field to add a new customer directly from this screen.
Cus.PO: Enter the customer's own purchase order number if they have provided one.
Sales Man: Search and assign a salesperson to this job by name, phone number, or employee code.
Price List: Select which price list to apply for this work order.
Credit Days: Enter the number of credit days agreed with the customer.
Transport: Enter the delivery or pickup method for this job if the finished work needs to be dispatched to the customer.
Scan: Use this field to scan products by name and add them to the job quickly.
Bill To and Ship To
The Bill To section shows the customer's billing address. The Ship To section shows the delivery or shipping address. Both are auto-filled from the customer's saved record.
Click the + icon next to Bill To or Ship To to update or change the address for this specific work order.
Advanced Receipts Tab
Use this tab to manage advance payment details and receipt records for the work order.
Vendor Tab
Use this tab to link a vendor or supplier to this work order.
Adding Products, Services, or Materials
In the product table at the bottom of the form, use the Search by product name field to find and add items. Each product you add appears as a new row.
Each row in the product table captures:
- Sl.No: row number, auto-increments as you add products
- Product: name of the product, service, or material
- SKU: auto-filled unique product code
- Quantity: number of units needed for this job
- Units: unit of measure for the product
- Price: rate per unit
- Disc%: discount percentage offered on this line
- Discount: calculated discount amount
- Total Amount: line total calculated automatically
To remove a product, click the delete button at the end of that row.
For jobs with many products or materials, click Bulk Entry to add multiple items at once.
Order Summary Panel
The right side of the screen shows a live breakdown of the total job cost as you add or change products.
- Subtotal: total of all product line amounts before tax and fees
- Tax: auto-calculated based on the branch and product tax settings
- Discount: total discount applied across all lines
- Shipping Fee: delivery or dispatch charge if applicable
- Payment Fee: any payment processing charge
- Round Off: minor rounding adjustment applied to the final amount
- Total: final job value after all adjustments
- Total Paid: amount already collected from the customer
- Pending Payment: remaining balance to be paid
Show Tax toggle: turn this on to display the tax field and include it in the total calculation.
Notification panel: use this area to configure SMS or email notifications for this work order.
Click Save to save the work order and stay on the form, or Save And Close to save and return to the list.
Managing a Work Order
Click any work order from the list to open its detail page. From here you can review all job details, update information, change the status, and take actions like printing, downloading, cloning, or converting to invoice.
The header shows the work order number, creation date, current status, and the channel it was created from.
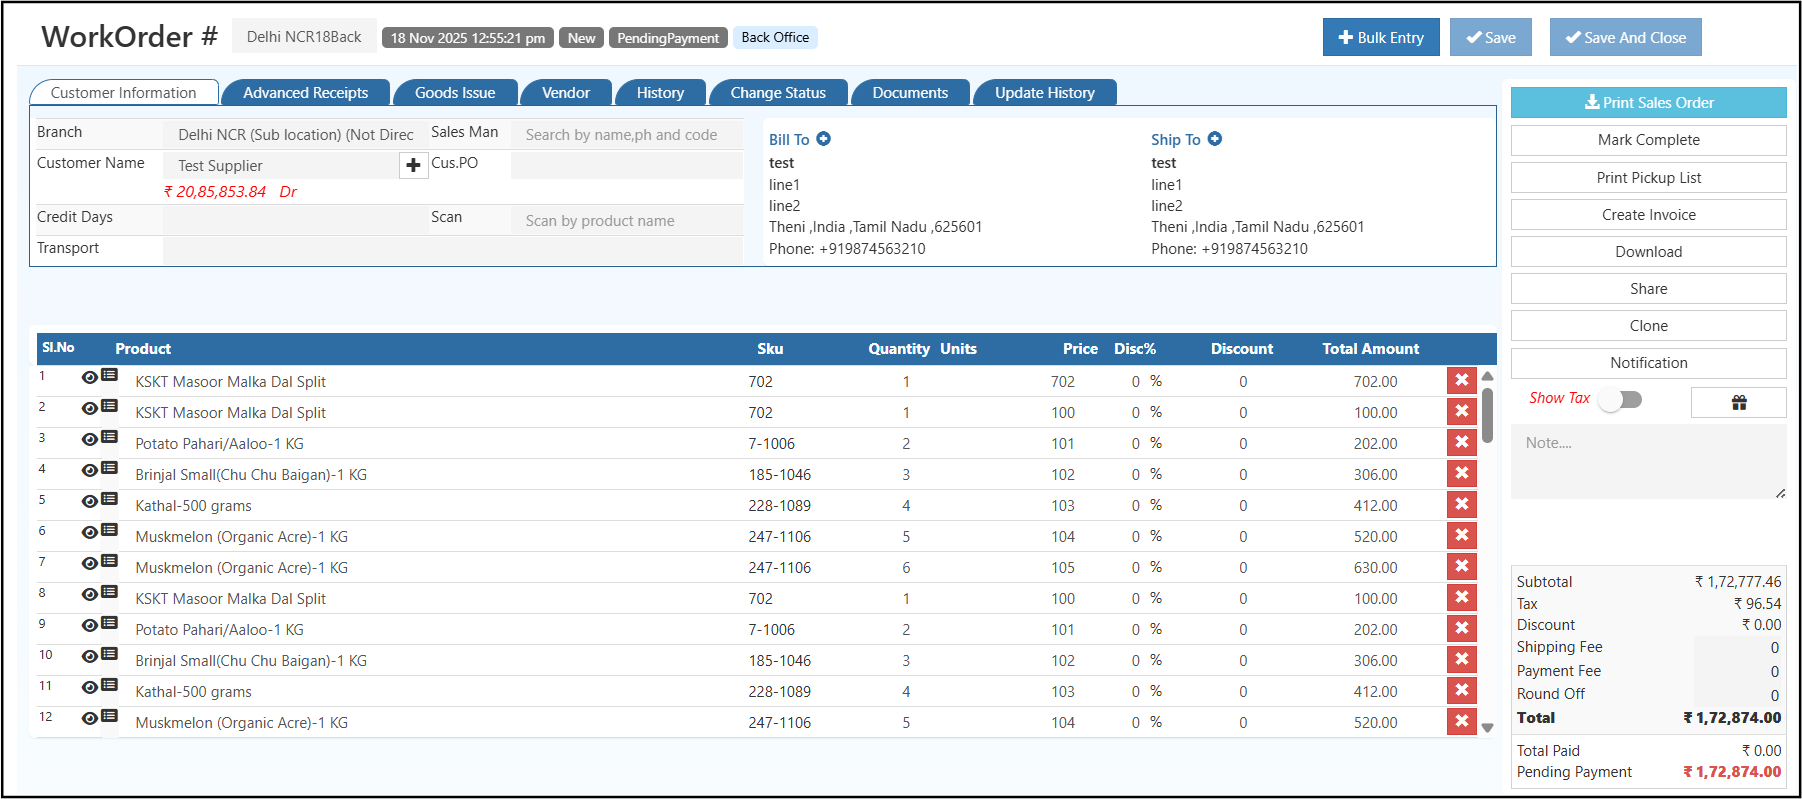
Tabs on the Detail Page
- Customer Information: view and edit all job details, products, pricing, and customer information
- History: complete log of all actions and updates made on this work order
- Change Status: manually move the job to the next stage such as New, In Progress, Complete, or Cancelled
- Documents: attach and view files related to this job
- Update History: detailed field-level change log
Right Panel Actions
- Bulk Entry: add multiple products or materials at once
- Mark Complete: closes the job and opens the manufacturing voucher to confirm finished quantity and material consumption
- Print Pickup List: prints a material list for your warehouse team
- Create Invoice: converts the work order into a sales invoice with all items, pricing, and tax carried over automatically
- Download: saves the work order as a PDF
- Share: shares via email or messaging
- Clone: duplicates the work order for a repeat job
- Notification: sends an SMS or email update to the customer or vendor
How to Convert a Work Order to a Sales Invoice
Once the job is finished, click Create Invoice from the right panel on the work order detail page.
All job details, including customer, products, materials, pricing, and tax, move into the invoice automatically. No re-entry is needed.
Work Order Status Reference
| Status | Meaning |
|---|---|
| New | Job created, not started yet |
| In Progress | Job is currently being worked on |
| Complete | Job finished, ready to invoice |
| Invoiced | Sales invoice created from this work order |
| Cancelled | Job cancelled and will not proceed |
To update the status, open the work order and go to the Change Status tab.
Frequently Asked Questions
Can I add both materials and services in one work order? Yes. Add any mix of products, services, and materials using the product search or Bulk Entry.
Can I reuse a work order for a repeat job? Yes. Use the Clone button on the detail page to copy all details into a new work order.
Does the invoice generate automatically when the job is complete? No. You click Create Invoice when you are ready to bill.